Unravel the Magic: Crafting Your Own Adorable Amigurumi Forest Friend
Have you ever dreamt of bringing a whimsical forest creature to life with your own hands? Imagine a charming, cuddly companion that carries the warmth of your craft and the spark of imagination. Well, your dream is about to come true! At Amyliva Handmade, we believe in the joy of creation, and today, we’re thrilled to unveil the complete guide to crafting your very own adorable Amigurumi Forest Friend.
This isn’t just another crochet project; it’s an enchanting journey into the world of amigurumi, where stitches transform into smiles, and yarn becomes a cherished memory. Whether you’re a seasoned crocheter or just picking up your hook, our detailed pattern and comprehensive guide will ensure a delightful and rewarding experience. Get ready to crochet your way into the heart of a magical forest!
What is Amigurumi? A Dive into the Adorable Art of Japanese Crochet
Before we embark on our crafting adventure, let’s briefly touch upon the enchanting art form itself. Amigurumi (編みぐるみ) is the Japanese art of crocheting or knitting small, stuffed yarn creatures. The word is a portmanteau of two Japanese words: ami, meaning crocheted or knitted, and nuigurumi, a stuffed doll. Originating in Japan, amigurumi has captured hearts worldwide with its inherent cuteness, whimsical designs, and endless possibilities for customization.
Unlike traditional crochet, amigurumi typically uses single crochet stitches worked in continuous rounds, creating a tight fabric that holds stuffing without gaps. This technique results in sturdy, huggable, and undeniably charming characters that make perfect gifts, unique decor, or treasured keepsakes.
Meet Our Forest Friend: A Glimpse at Your Next Masterpiece
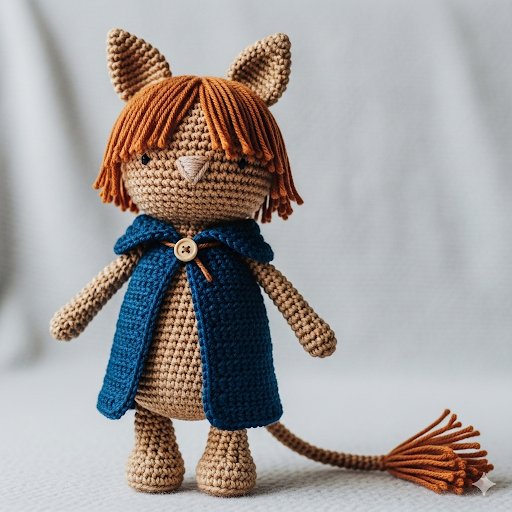
Our Amigurumi Forest Friend is designed to be universally appealing – a gender-neutral, charming character with distinct features that make it truly special. With its expressive ears, playful hair, and a cozy cloak, this little friend is ready for countless imaginary adventures. The design balances simplicity with character, ensuring that even intermediate crocheters can achieve a professional-looking result, while advanced crafters will enjoy the meditative rhythm of its construction.
The Amyliva Handmade Philosophy: Quality, Creativity, Community
At Amyliva Handmade, we are passionate about sharing the joy of crafting. Our patterns are meticulously designed, thoroughly tested, and presented with clarity, ensuring that your creative journey is smooth and enjoyable. We believe that every handmade item tells a story, and we’re here to help you tell yours. Join our growing community of crafters who find solace, inspiration, and immense satisfaction in bringing yarn to life.
The Complete Pattern: Crafting Your Forest Friend, Stitch by Stitch
Are you ready? Gather your materials and let’s begin crafting!
Materials You’ll Need:
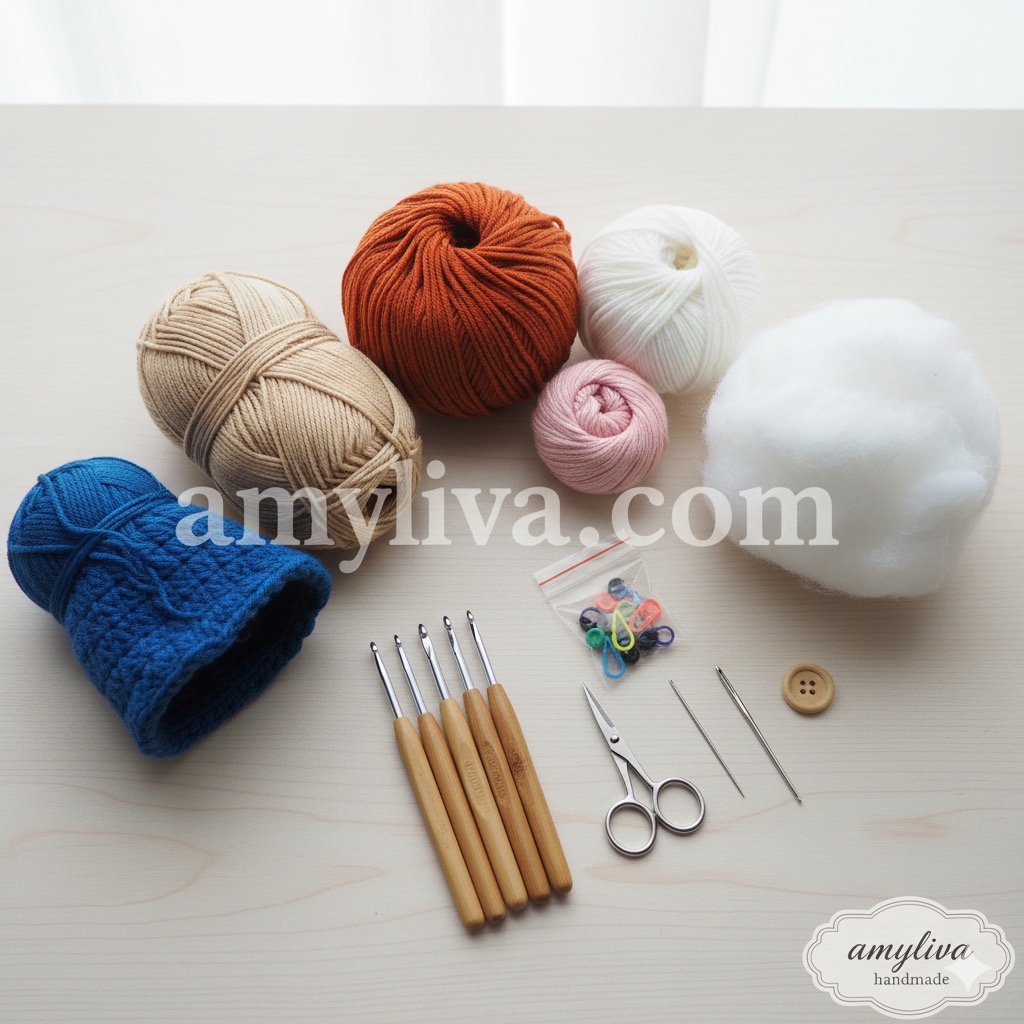
• Yarn: High-quality worsted weight yarn in desired colors (e.g., light brown for body, darker brown for hair and tail accents, blue for cloak, pink for inner legs, white for tail base). Consider using a blend that’s soft yet durable.
• Crochet Hook: Size appropriate for your yarn (usually 2.5mm – 3.5mm for worsted weight amigurumi to ensure tight stitches).
• Safety Eyes: (e.g., 6mm – 9mm, depending on desired expression).
• Stuffing: Polyester fiberfill.
• Tapestry Needle: For weaving in ends and sewing parts together.
• Stitch Markers: Essential for working in continuous rounds.
• Scissors:
• Small Button: For the cloak closure.
Abbreviations:
• MR: Magic Ring
• sc: single crochet
• inc: increase (2 sc in one stitch)
• dec: decrease (single crochet 2 stitches together)
• FLO: Front Loop Only
• T: Triple Crochet (UK: Treble Crochet)
• R: Round
• ( ) xN: Repeat instructions in parentheses N times
• (N): Total stitches in the round
🧠 Head
• R1: MR 6 sc (6)
• R2: inc x6 (12)
• R3: (sc, inc) x6 (18)
• R4: (2sc, inc) x6 (24)
• R5: (3sc, inc) x6 (30)
• R6: (4sc, inc) x6 (36)
• R7: (5sc, inc) x6 (42)
• R8: (6sc, inc) x6 (48)
• R9: (7sc, inc) x6 (54)
• R10: (8sc, inc) x6 (60)
• R11: (9sc, inc) x6 (66)
• R12–20: 66 sc (9 rounds)
• Insert safety eyes between R14 and R15, approximately 9-10 stitches apart. Start stuffing firmly as you go.
• R21: (9sc, dec) x6 (60)
• R22: (8sc, dec) x6 (54)
• R23: (7sc, dec) x6 (48)
• R24: (6sc, dec) x6 (42)
• R25: (5sc, dec) x6 (36)
• R26: (4sc, dec) x6 (30)
• R27: (3sc, dec) x6 (24)
• R28: (2sc, dec) x6 (18)
• R29: (sc, dec) x6 (12)
• R30: dec x6 (6)
• Fasten off, leave a long tail for sewing. Cinch the remaining hole closed and weave in the end.
🧍♀️ Body
• R1: MR 6 sc (6)
• R2: inc x6 (12)
• R3: (sc, inc) x6 (18)
• R4: (2sc, inc) x6 (24)
• R5: (3sc, inc) x6 (30)
• R6: (4sc, inc) x6 (36)
• R7: (5sc, inc) x6 (42)
• R8–13: 42 sc (6 rounds)
• Start stuffing the body firmly.
• R14: (5sc, dec) x6 (36)
• R15: (4sc, dec) x6 (30)
• R16: (3sc, dec) x6 (24)
• R17: (2sc, dec) x6 (18)
• R18: (sc, dec) x6 (12)
• R19: dec x6 (6)
• Fasten off, leave a long tail for sewing. Cinch the remaining hole closed.
👂 Ears (x2)
• R1: MR 8 sc (8)
• R2: (sc, inc) x4 (12)
• R3: (2sc, inc) x4 (16)
• R4: 16 sc (16)
• R5: (2sc, dec) x4 (12)
• R6: (sc, dec) x4 (8)
• R7: dec x4 (4)
• Fasten off, leave a long tail for sewing. Do not stuff. Flatten the ears.
• Make 2 pieces, then attach them to the head from R5 (the fifth increasing round) of the head, positioning them symmetrically.
💇♀️ Hair
• This will consist of several strands of varying lengths to create a textured, fringe-like look.
• Cut several pieces of yarn (same color as the main hair color) to your desired length. For a fringe, they won’t be extremely long.
• Using your crochet hook, loop individual strands of yarn onto the head. You’ll insert your hook from the outside of the head to the inside, pull through a loop of yarn, then pull the two ends of the yarn through that loop to create a knot (similar to attaching fringe to a scarf).
• Distribute these strands evenly across the top front of the head to create the hair. You can vary the length for a more natural look. Our suggestion uses lengths for 1sc, 2sc, and 5sc to create varied texture once attached, but feel free to experiment!
👃 Nose
• R1: MR 6 sc (6)
• R2: (2sc, inc) x2 (8)
• R3: 8 sc (8)
• Fasten off, leave a long tail for sewing. Do not stuff. Pinch and shape the nose to be triangular.
• Embroider or sew onto the head below the eyes.
🤲 Arms (x2)
• R1: MR 6 sc (6)
• R2: inc x6 (12)
• R3: (sc, inc) x6 (18)
• R4–6: 18 sc (3 rounds)
• Lightly stuff the hand part.
• R7: (sc, dec) x6 (12)
• R8–13: 12 sc (6 rounds)
• Continue stuffing very lightly, or not at all for a floppy arm.
• R14: dec x6 (6)
• Fasten off, leave a long tail for sewing. Cinch the hole closed.
🧥 Cloak
• This cloak is worked in rows rather than rounds, and then joined.
• R1: MR 6 sc (6)
• R2: inc x6 (12)
• R3: (sc, inc) x6 (18)
• R4: (2sc, inc) x6 (24)
• R5: (3sc, inc) x6 (30)
• R6: (4sc, inc) x6 (36)
• R7: (5sc, inc) x6 (42)
• R8: (6sc, inc) x6 (48)
• R9: (7sc, inc) x6 (54)
• R10: (8sc, inc) x6 (60)
• R11: (9sc, inc) x6 (66)
• R12: (10sc, inc) x6 (72)
• R13: (11sc, inc) x6 (78)
• R14: (12sc, inc) x6 (84)
• R15: (13sc, inc) x6 (90)
• R16: FLO: 2sc, 2T, 22sc, 2T, sc (This creates a slight shaping and perhaps a decorative edge. Adjust ‘T’ (Triple Crochet) placement to create buttonholes or decorative elements as desired. You may need to adjust the number of stitches between the Ts to create symmetrical openings for the button.)
• Fasten off and weave in ends. Attach a small button to one side of the cloak and create a small loop with yarn on the opposite side to serve as a button closure.
🦵 Legs (x2)
• Use pink yarn for the first few rounds if you want a different “sock” color, then switch to main body color.
• R1: MR 6 sc (6)
• R2: inc x6 (12)
• R3: (sc, inc) x6 (18)
• R4: (2sc, inc) x6 (24)
• R5: (3sc, inc) x6 (30)
• R6: (4sc, inc) x6 (36)
• R7: (5sc, inc) x6 (42)
• R8: 42 sc (42)
• Start stuffing the foot firmly.
• R9: (5sc, dec) x6 (36)
• R10: (4sc, dec) x6 (30)
• R11: (3sc, dec) x6 (24)
• R12: (2sc, dec) x6 (18)
• R13: (sc, dec) x6 (12)
• R14: dec x6 (6)
• Fasten off, leave a long tail for sewing. Cinch the hole closed.
🐾 Tail
• Use white yarn for the base, then change to the hair color for the “fluff” at the end if desired.
• R1: MR 4 sc (4)
• R2: inc x4 (8)
• R3: (sc, inc) x4 (12)
• R4: (2sc, inc) x4 (16)
• R5: 16 sc (16)
• R6: (2sc, dec) x4 (12)
• R7: (sc, dec) x4 (8)
• R8: dec x4 (4)
• Fasten off, leave a long tail for sewing. Lightly stuff the tail.
• For the fluffy end, cut several strands of yarn (matching hair color) and attach them to the last round of the tail using the same method as for the hair. Trim to desired length.
• Sew onto the back of the body, positioning it where a natural tail would sit.
Assembly: Bringing Your Forest Friend to Life
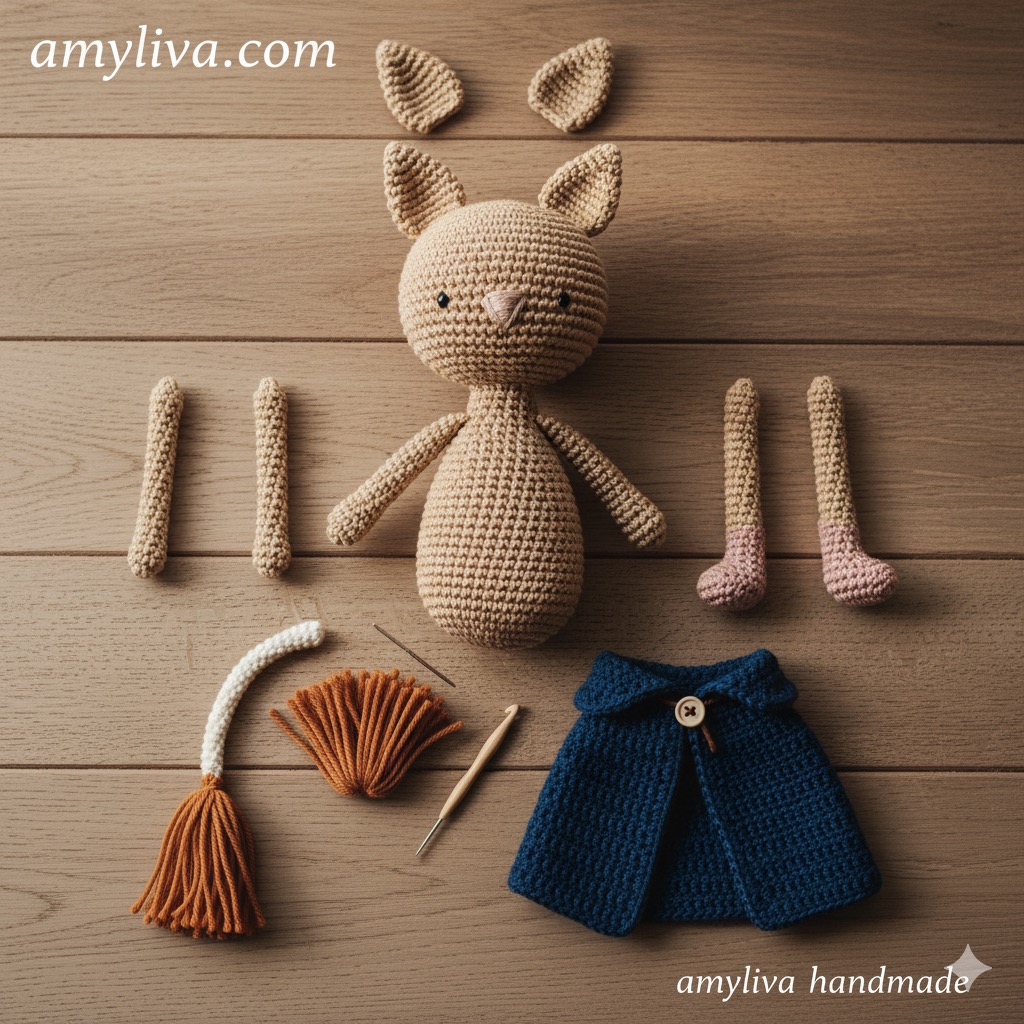
Now comes the exciting part – bringing all your meticulously crafted pieces together!
1. Attach the Head to the Body: Use the long tail from the head to sew it securely to the top of the body. Ensure it’s centered and straight.
2. Attach the Arms: Position the arms on either side of the body, just below the neck. Sew them firmly in place.
3. Attach the Legs: Sew the legs to the bottom of the body. You can place them slightly apart for a sitting pose or closer for a standing one.
4. Attach the Ears: Sew the flattened ears symmetrically to the top of the head, referencing your desired placement.
5. Attach the Nose: Carefully sew the shaped nose onto the face, between and below the safety eyes.
6. Style the Hair: Arrange the yarn strands you’ve attached to create the desired hairstyle. You can trim and adjust as needed.
7. Attach the Cloak: Dress your forest friend in its cozy cloak. Secure the button closure.
8. Attach the Tail: Sew the tail securely to the back of the body.
Take a step back and admire your creation! Each stitch, each piece, has come together to form a unique and lovable character.
Usage Warnings and Care Instructions
To ensure your Amigurumi Forest Friend remains a cherished companion for years to come, please observe the following:
• Small Parts Warning: This item contains small parts (safety eyes, button) which can pose a choking hazard for infants and small children. If making for a baby or very young child, consider embroidering the eyes and avoiding the button on the cloak.
• Supervision: Always supervise young children during play, especially if the toy contains small components.
• Washing: Hand wash gently with mild soap and cold water. Press out excess water with a towel and air dry flat. Avoid machine washing or drying as this can distort the shape and damage the yarn.
• Avoid Harsh Chemicals: Do not use bleach or harsh detergents.
• Heat: Keep away from direct heat sources to prevent yarn damage or melting of synthetic fibers.
• Stuffing Shifting: Over time, stuffing may shift. Gently reshape the toy as needed.
Frequently Asked Questions (FAQs)
Q1: What kind of yarn is best for amigurumi?
A1: Worsted weight (or DK/light worsted) acrylic or cotton yarn is generally recommended. Acrylic is durable, affordable, and comes in a vast array of colors. Cotton is great for definition and less stretch but can be less forgiving for beginners. Choose yarn that’s not too fuzzy to ensure stitch definition.
Q2: How do I make my stitches tight enough so the stuffing doesn’t show?
A2: The key is to use a crochet hook that is smaller than what you would typically use for the chosen yarn weight. This creates a denser fabric. Also, ensure you are pulling your stitches consistently firm.
Q3: Can I customize the colors and accessories?
A3: Absolutely! That’s one of the beauties of amigurumi. Feel free to experiment with different yarn colors for the body, hair, cloak, and even add embellishments like embroidered details, a tiny backpack, or a different hat. Let your creativity run wild!
Q4: I’m struggling with the Magic Ring. Are there alternatives?
A4: Yes! While the Magic Ring creates a very tight start, you can also chain 2, then single crochet the specified number of stitches into the first chain. This leaves a small hole, which you can often cinch closed with your starting tail.
Q5: How do I join the pieces neatly?
A5: For a seamless look, use a mattress stitch or whip stitch. Ensure you are working into the corresponding stitches of both pieces and pulling your stitches taut. Take your time, and don’t be afraid to redo a section if it doesn’t look right.
Q6: What if my amigurumi doesn’t look exactly like the picture?
A6: Every handmade item is unique, and that’s its charm! Don’t worry if yours has its own distinct personality. The beauty is in the process and the love you put into it. Keep practicing, and your skills will grow with every project.
Why Choose Amyliva Handmade Patterns?
• Detailed & Clear Instructions: We break down each step, making complex stitches accessible.
• Beginner-Friendly with Room for Growth: Our patterns cater to various skill levels.
• Unique & Adorable Designs: We focus on creating characters that spark joy and imagination.
• Community Support: Join our online community for tips, encouragement, and sharing your creations. (Link to your social media or forum here)
• High-Quality Visuals: (Referencing the image you generated) Our patterns come with inspiring visuals to guide and motivate you.
Embark on Your Amigurumi Journey Today!
Crafting this Amigurumi Forest Friend is more than just following a pattern; it’s an experience. It’s about disconnecting from the digital noise, engaging your hands and mind, and creating something truly special. Whether this little friend finds a home on your shelf, in a child’s arms, or as a heartfelt gift, it will carry the essence of your dedication and artistic flair.
Don’t wait! Gather your yarn, hook, and a sprinkle of imagination, and begin your Amigurumi Forest Friend adventure today. Share your progress with us using #AmylivaHandmadeForestFriend – we can’t wait to see your unique creations!
amyliva handmade
Yorum gönder