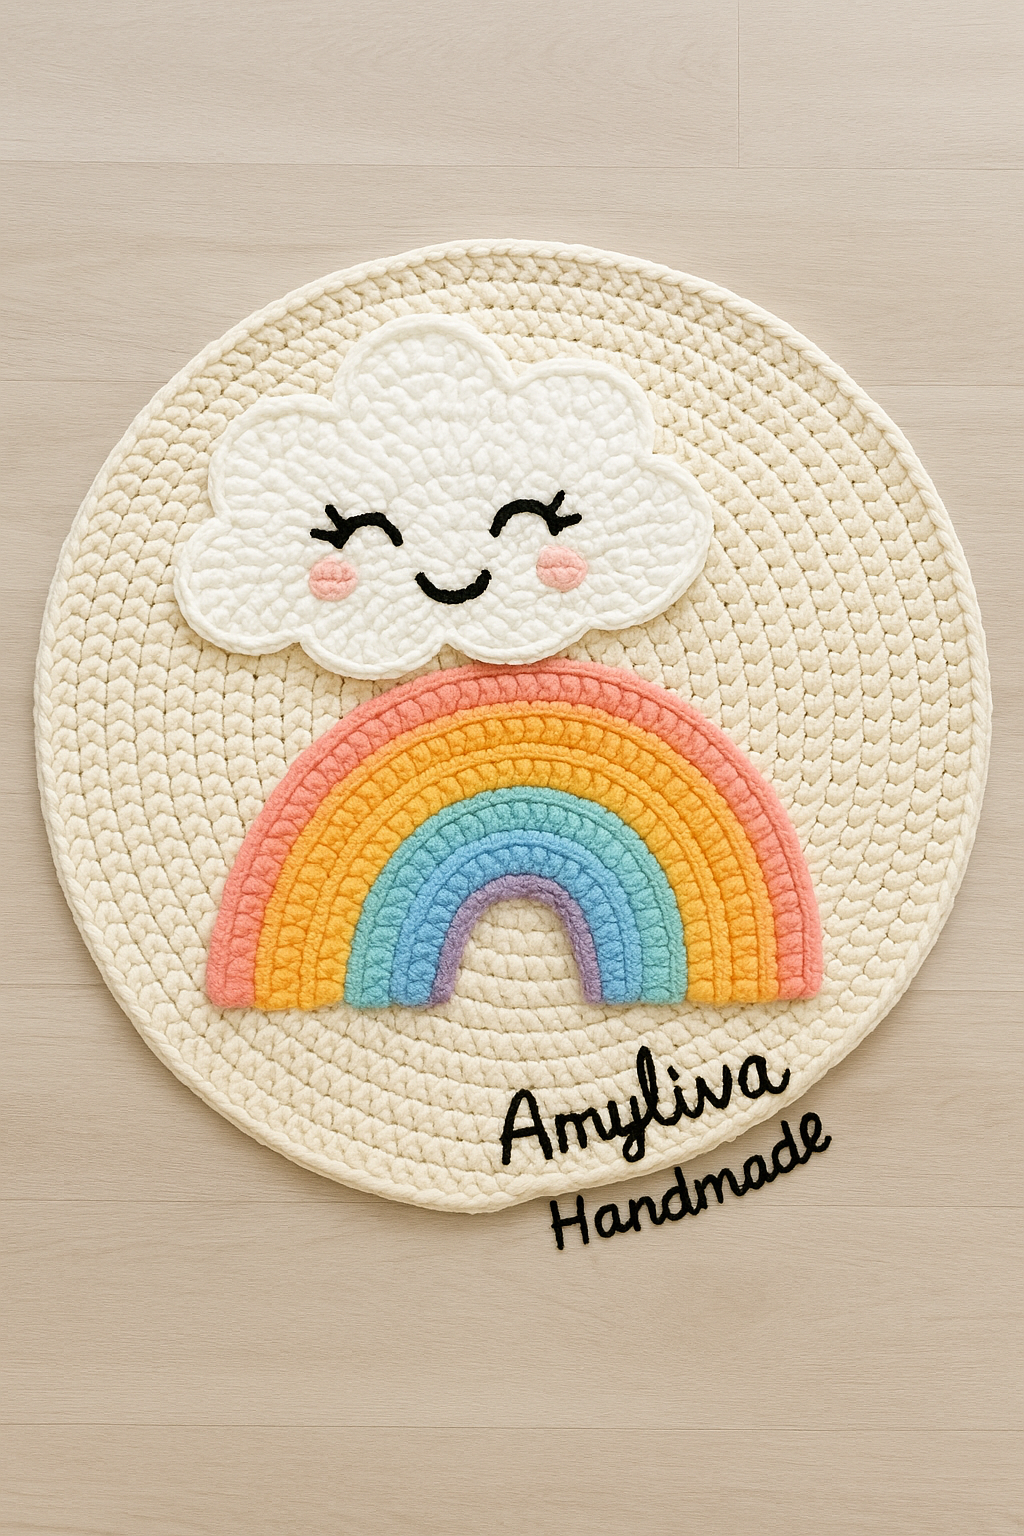
Chunky Crochet Kids Room Rug – Full Step-by-Step Pattern
By Amyliva Handmade
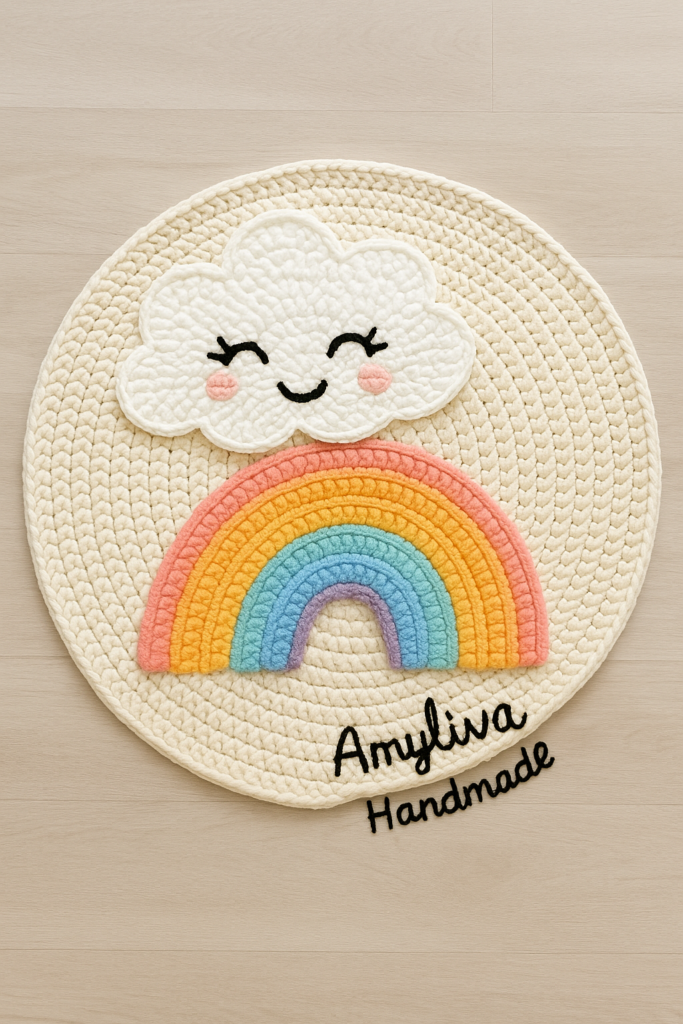
Creating a warm and imaginative atmosphere in a child’s room is easier than you think. With the rise of cute, handcrafted decor pieces, chunky crochet rugs are now one of the most popular choices for nurseries and playrooms. Made with soft plush yarn, these rugs feel cozy, look adorable, and add personality to any interior.
In this guide, you’ll learn exactly how to crochet a round base rug, a 3D puffy cloud, and pastel rainbow arches—all using beginner-friendly techniques.
⸻
📌 About This Pattern (Important Notice)
This crochet rug pattern is 100% original and exclusively written for Amyliva Handmade.
It is not copied, adapted, or inspired by any other paid or free pattern.
All stitch counts, shaping sequences, cloud buns, rainbow curves, and instructions were created from scratch for this tutorial.
You are welcome to use this pattern to make rugs for personal use, gifts, or handmade sales.
Please do not copy or redistribute the written instructions.
Sharing a link to Amyliva.com is always appreciated.
⸻
✨ Why This Rug Is Perfect for Kids
A chunky crochet rug provides:
• Softness for sitting, crawling, and playing
• Warmth during winter
• Safety (no hard edges or detachable pieces)
• Easy washing
• A beautiful, handmade aesthetic
If you like handmade decor, explore more designs at:
👉 Amyliva.com
⸻
🧶 Materials You Will Need
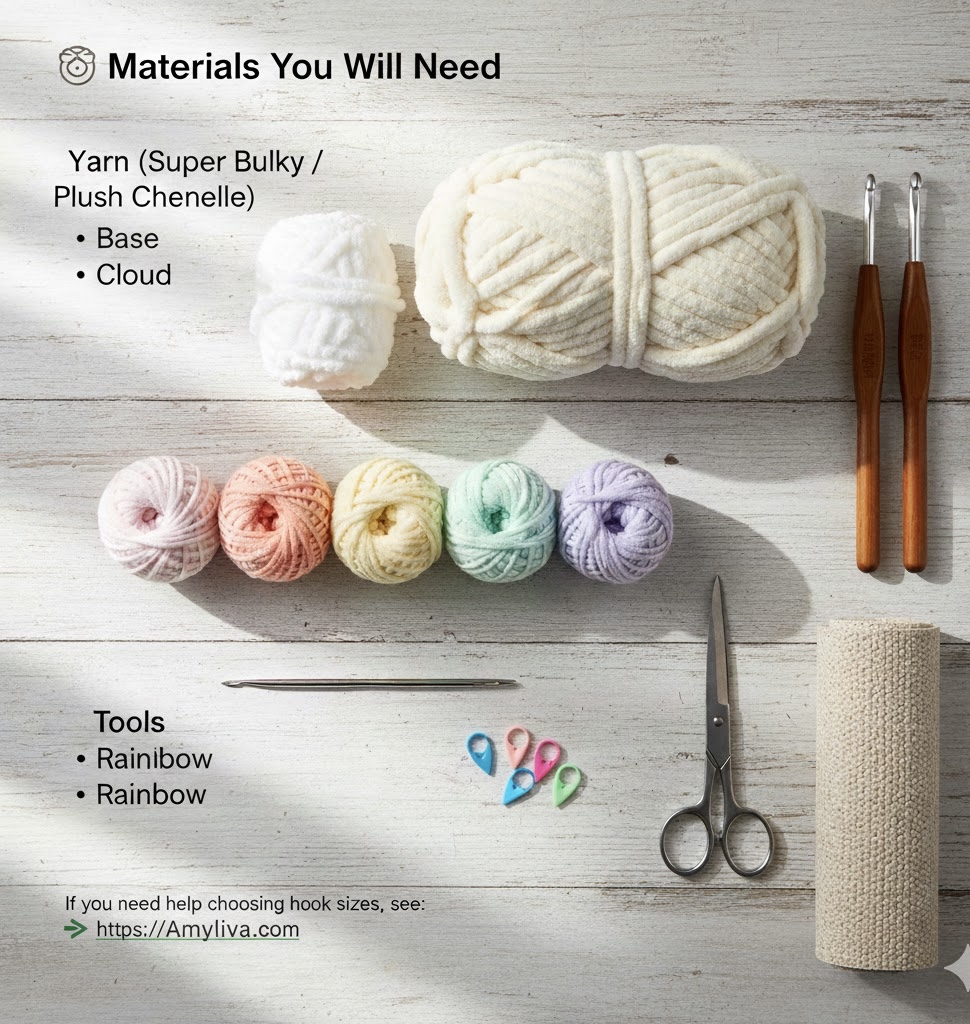
Yarn (Super Bulky / Plush Chenille)
• Base: Cream, beige, or pastel neutral
• Cloud: White or off-white
• Rainbow: Pastel pink, peach/orange, yellow, mint green, baby blue, lavender
Hooks
• 8 mm or 10 mm (recommended for plush yarn)
Tools
• Large yarn needle
• Scissors
• Stitch markers
• Optional: non-slip rug backing
If you need help choosing hook sizes, see:
👉 https://www.clover-usa.com
⸻
⚙️ Crochet Techniques You Should Know
This pattern uses the following stitches:
• Magic Ring
• Single Crochet (SC)
• Increase (INC)
• Back Loop Only (BLO) (optional for texture)
• Invisible Decrease (used in cloud shaping)
If you’re new to crochet, this beginner guide helps:
👉 https://www.craftyarncouncil.com/standards/how-to-crochet
⸻
🌀 SECTION 1 — Round Rug Base (Ultra Detailed Version)
This forms the main floor mat.
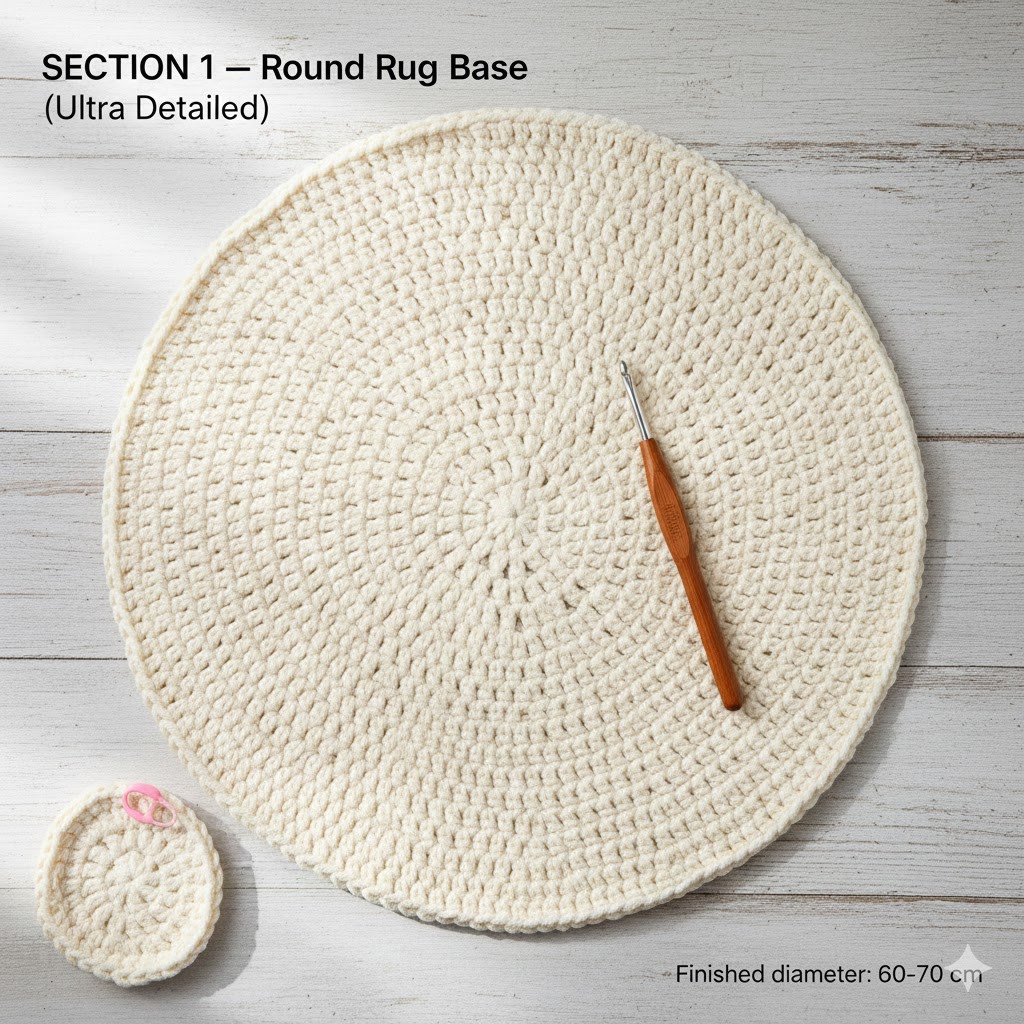
General Notes
• Always start with 6 SC in a magic ring.
• Increase evenly to maintain a flat circle.
• Keep your tension firm so the rug structure remains stable.
Round-by-Round Base Pattern
Round 1:
Magic ring → 6 SC (6)
Round 2:
INC in each stitch → 12 (12)
Round 3:
1 SC, INC repeat → 18
Round 4:
2 SC, INC repeat → 24
Round 5:
3 SC, INC repeat → 30
Round 6:
4 SC, INC repeat → 36
Round 7:
5 SC, INC repeat → 42
Round 8:
6 SC, INC repeat → 48
Round 9:
7 SC, INC repeat → 56
Round 10:
8 SC, INC repeat → 63
Round 11:
9 SC, INC repeat → 70
Round 12:
10 SC, INC repeat → 77
Round 13:
11 SC, INC repeat → 84
Round 14:
12 SC, INC repeat → 91
Round 15:
13 SC, INC repeat → 98
Round 16:
14 SC, INC repeat → 105
Round 17:
15 SC, INC repeat → 112
Round 18:
16 SC, INC repeat → 119
Round 19:
17 SC, INC repeat → 126
Round 20:
18 SC, INC repeat → 133
➡️ Finished diameter: 60–70 cm depending on yarn thickness and tension.
Troubleshooting
• Rug curling upward: add extra SC between increases.
• Rug waving: remove one increase from next round.
• Too loose: go down one hook size.
For increase structure charts:
👉 https://www.christacodesign.com/crochet-increase-guide
⸻
☁️ SECTION 2 — Puffy Cloud (Deep-Detailed Version)
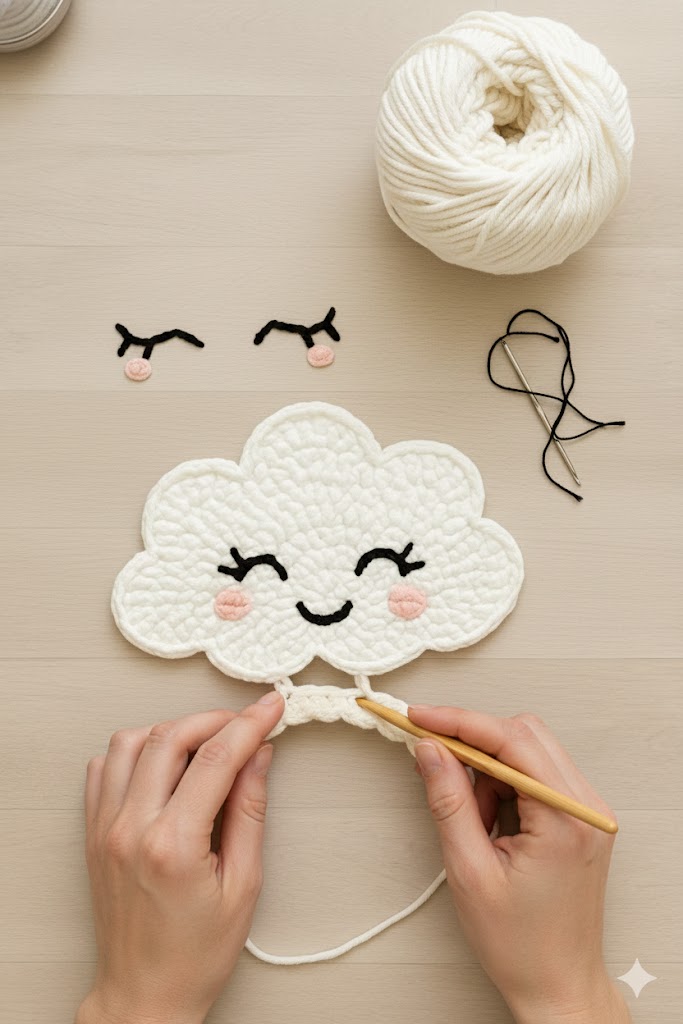
The cloud is made separately and attached afterwards.
Part 1: Cloud Base Oval
1. Chain 12
2. Row 1: SC in each chain (11)
3. At last chain, work 3 SC in the same stitch to turn
4. SC across the opposite side of the chain
5. Increase both ends again → this creates a soft oval
Part 2: Cloud Bumps (The Puffy Edges)
We create 5–7 cloud “puffs” around the oval.
Each puff:
• 3 SC
• 2 HDC
• 1 DC (center of puff)
• 2 HDC
• 3 SC
Work into each stitch around the oval to create repeated scallops.
Part 3: Shaping the Cloud Curve
• Add invisible decreases between scallops so the cloud curves naturally.
• Flatten with your hands to maintain rounded symmetry.
Part 4: Facial Details
Use black or dark gray yarn:
• Eyes: small curved lines or “happy eyes”
• Blush: pink plush yarn, two small circles
• Mouth: small embroidered smile
Safety guidelines for children’s items:
👉 https://www.cpsc.gov
⸻
🌈 SECTION 3 — Rainbow Arches (Fully Expanded Version)
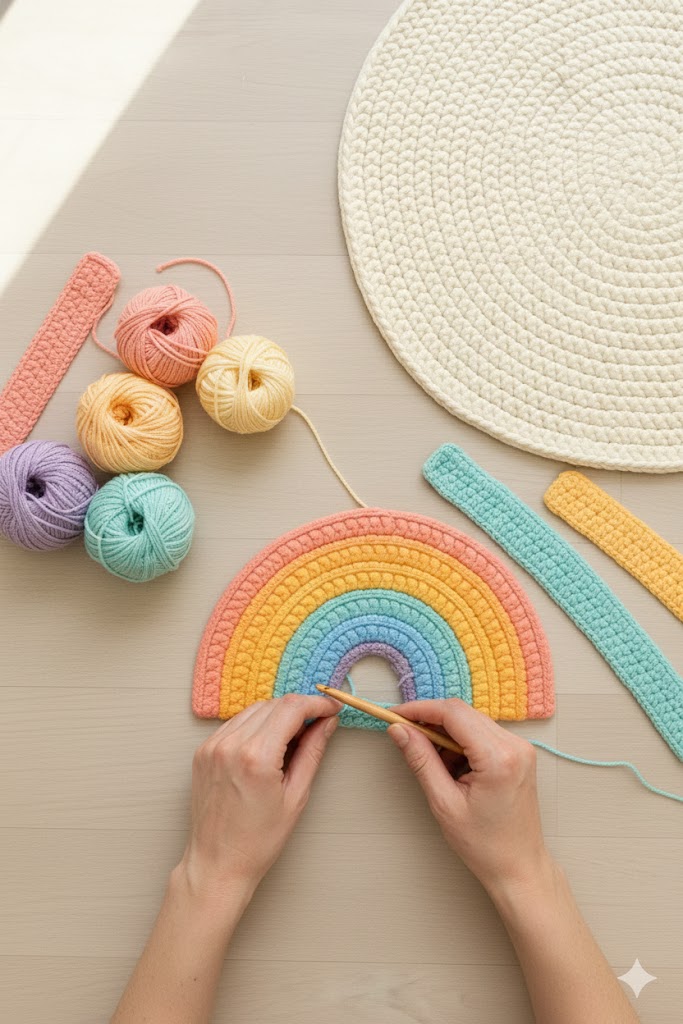
We crochet six separate curved strips.
Arch Construction (For Each Color)
Row Width: 2–3 rows of SC
Length: 30–45 chains depending on placement
Increase:
• Add 1–2 increases at both ends of every row
• This naturally forms a curve
Color Order (Pastel Theme)
1. Pink
2. Peach/Orange
3. Yellow
4. Mint Green
5. Baby Blue
6. Lavender
Assembly of Arches
• Place the largest arch first
• Stack each color inside
• Slide the top of each arch slightly under the cloud
• Sew tightly using invisible stitch
More pastel color inspiration:
👉 Amyliva.com pastel collection (internal link)
⸻
🧵 SECTION 4 — Final Assembly (Extra Detailed)
- Position the Cloud
Place it slightly above center.
Pin with stitch markers.
- Attach the Rainbow
• Start with the widest arch (pink)
• Sew small sections at a time
• Curve manually as you go
• Insert smaller arches underneath the cloud - Secure Edges
Use plush yarn scraps to sew densely for durability.
Avoid pulling too tightly to prevent dents.
- Add Non-Slip Backing (Optional)
For tile or laminate floors:
👉 https://www.ikea.com
Use small dots of anti-slip mesh.
⸻
🧼 SECTION 5 — Care Instructions
• Hand wash or gentle cycle
• Cold water only
• Do not wring
• Lay flat to dry
• Shake weekly
Yarn care reference:
👉 https://www.lionbrand.com/pages/care-instructions
⸻
🎨 Customization Ideas
• Add mini stars
• Add child’s name
• Make the cloud winking
• Add pom-poms around the edge
• Use bright rainbow colors instead of pastel
More patterns:
👉 Amyliva Free Crochet Patterns (internal link)
⸻
❓ Frequently Asked Questions (FAQ)
- Is the rug baby-safe?
Yes, when sewn securely.
- Can I make the rug larger?
Yes — continue increasing evenly.
- Which yarn is best?
Soft chenille or velvet yarn works perfectly.
- How long does this take?
Approximately 2–5 hours depending on size.
- Is this pattern original?
Yes — the entire pattern is 100% original, written exclusively by Amyliva Handmade.
⸻
🌟 Final Thoughts
This chunky crochet kids room rug adds softness, charm, and creativity to any nursery or play area. With its puffy cloud and pastel rainbow, it brings joy and comfort to children and parents alike.
For more handmade designs:
👉 https://amyliva.com
Amy Liva
Yorum gönder