Crochet Cherry Earrings – Free Amigurumi Pattern & Tutorial
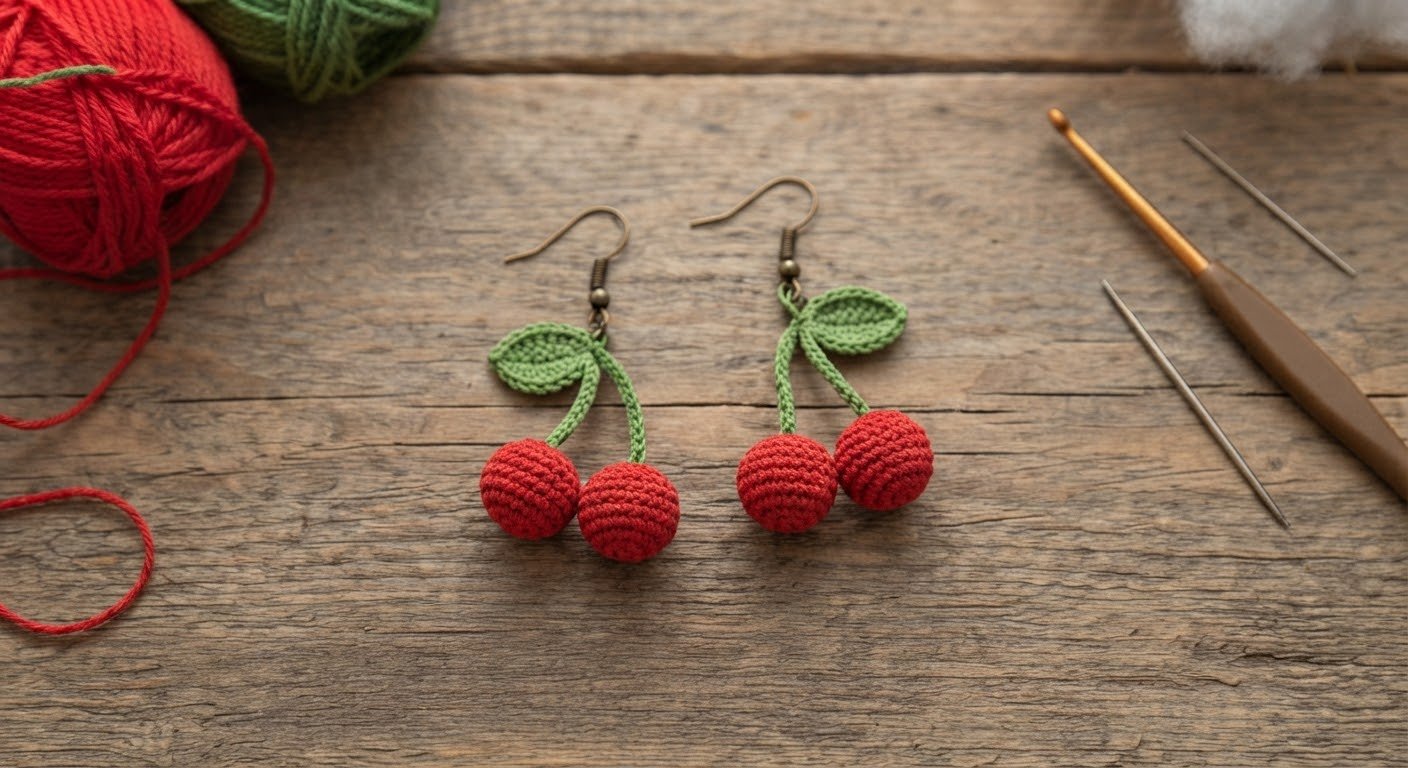
These crochet cherry earrings are a small amigurumi project made with red and green yarn. The cherries are crocheted separately, then attached to a simple green stem with a small leaf. Once the pieces are assembled, they can be attached to earring hooks or hoops.
This is a simple project for crocheters who enjoy making small handmade accessories. You can also change the yarn colors or adjust the size to create your own version.
I especially like this project because it is small enough to finish in a short time, but the little cherries still stand out when the earrings are worn. It is also a nice way to use small amounts of leftover red and green yarn.
Project Details
- Skill level: Easy
- Crochet terms: US terms
- Approximate crochet time: 1–2 hours
- Finished earring drop: approximately 5–7 cm
- Main techniques: magic ring, single crochet, increases, decreases, chains, slip stitches, half double crochet, and double crochet
The actual working time may vary depending on your crochet speed and experience with small amigurumi pieces.
Materials
- Small amount of red yarn for the cherries
- Small amount of green yarn for the stem and leaf
- 2.0–2.5 mm crochet hook
- 2 lightweight earring hooks or small earring hoops
- 2 small jump rings, if needed for attaching the earring hardware
- Small amount of polyester fiberfill
- Yarn needle
- Scissors
- Stitch marker
You only need a small amount of yarn for this project, so it is a good way to use leftover yarn from other crochet projects.
For the most consistent result, use yarn of a similar thickness for the red and green parts. A smooth fine or sport-weight yarn works well with the hook sizes suggested above.
A Note About the Materials
A smooth cotton or other fine amigurumi yarn works particularly well for this project because the stitches remain easy to see on the small cherries. Cotton also gives the crocheted pieces enough structure to hold their shape after stuffing.
The 2.0–2.5 mm hook range is suitable for making a firm crochet fabric with fine or sport-weight yarn. The best hook size for you may vary depending on your tension. Before making the cherries, check that the stitches are close enough together that the fiberfill will not show through.
Only a small amount of stuffing is needed. Polyester fiberfill keeps the cherries lightweight while giving them enough volume to look rounded.
For the earring findings, choose lightweight hooks or hoops. If you use jump rings, make sure they are completely closed after attaching them. If you have sensitive ears, choose earring findings made from a material you normally tolerate comfortably.
Finished Size
When made with fine or sport-weight yarn and a 2.0–2.5 mm crochet hook, each finished cherry is approximately 1.5–2 cm in diameter.
The complete earrings will usually have a drop of approximately 5–7 cm, depending on the length of the crocheted stem and the type of earring finding used.
The finished size may vary slightly with yarn thickness, hook size, and crochet tension. For earrings, keeping the cherries and other crocheted pieces relatively small helps keep the finished pair lightweight and comfortable to wear.
Crochet Abbreviations
This pattern uses standard US crochet terms:
- MR – magic ring
- sc – single crochet
- inc – increase
- dec – decrease
- sl st – slip stitch
- ch – chain
- hdc – half double crochet
- dc – double crochet
Numbers in parentheses show the total number of stitches at the end of each round.
Step 1: Make the Cherries
Use red yarn to make two identical cherries.
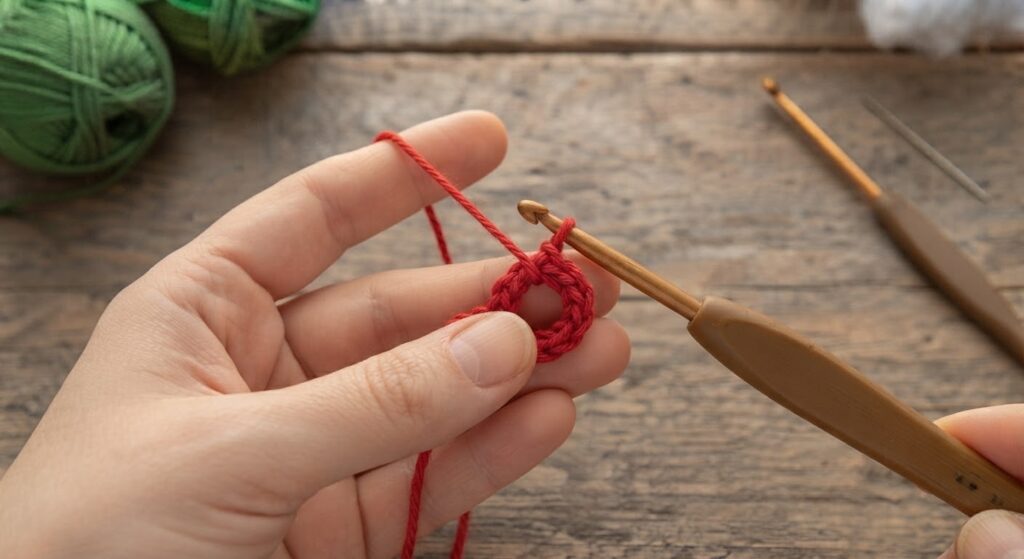
Cherry – Make 2
Start with a magic ring.
- R1: MR, 6 sc (6)
- R2: 6 inc (12)
- R3–R4: sc around (12)
- R5: 6 dec (6)
After Round 5, you should have 6 stitches remaining.
Add a small amount of polyester fiberfill through the remaining opening. Work the stuffing around the inside of the cherry with your fingers or the blunt end of your yarn needle so it is distributed evenly.
Do not overstuff the cherry. It should feel lightly filled and keep a soft, rounded shape without stretching the crochet stitches.
Using a yarn needle, close the remaining 6 stitches gradually by working through the front loops of the stitches. Pull the yarn gently until the opening is closed, then weave in the yarn securely.
Make a second cherry using the same instructions. Try to keep the yarn tension and amount of stuffing similar so both cherries are approximately the same size.
Cherry Size
When made with fine or sport-weight yarn and a 2.0–2.5 mm crochet hook, each finished cherry is approximately 1.5–2 cm in diameter. The exact size will vary depending on your yarn thickness and crochet tension.
For earrings, keeping the cherries relatively small helps keep the finished pair lightweight and comfortable to wear.
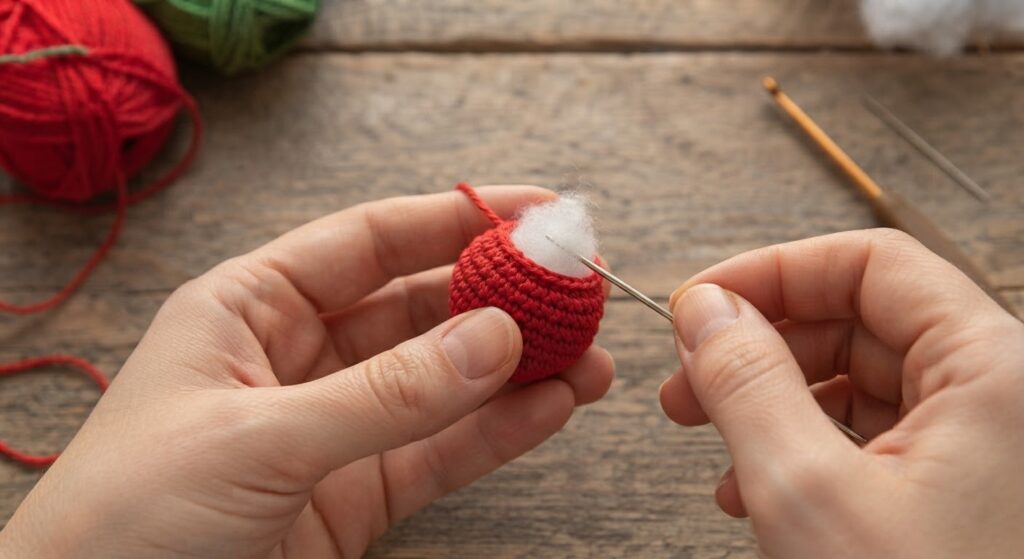
A Small Tip for the Cherry Shape
The cherries should have a soft, rounded shape rather than looking completely firm or stretched.
When adding the fiberfill, start with a very small amount and add more only if necessary. Gently rotate the cherry between your fingers to help distribute the stuffing around the inside.
If you notice a flat area, use the blunt end of your yarn needle to move a little fiberfill toward that section. This is easier to control than adding a large amount of stuffing at once.
If the crochet stitches begin to stretch or you can see the stuffing between them, remove a little fiberfill before closing the cherry.
For a more even pair, finish and shape the first cherry before stuffing the second one. You can then use the first cherry as a visual reference for the amount of stuffing and the final shape.
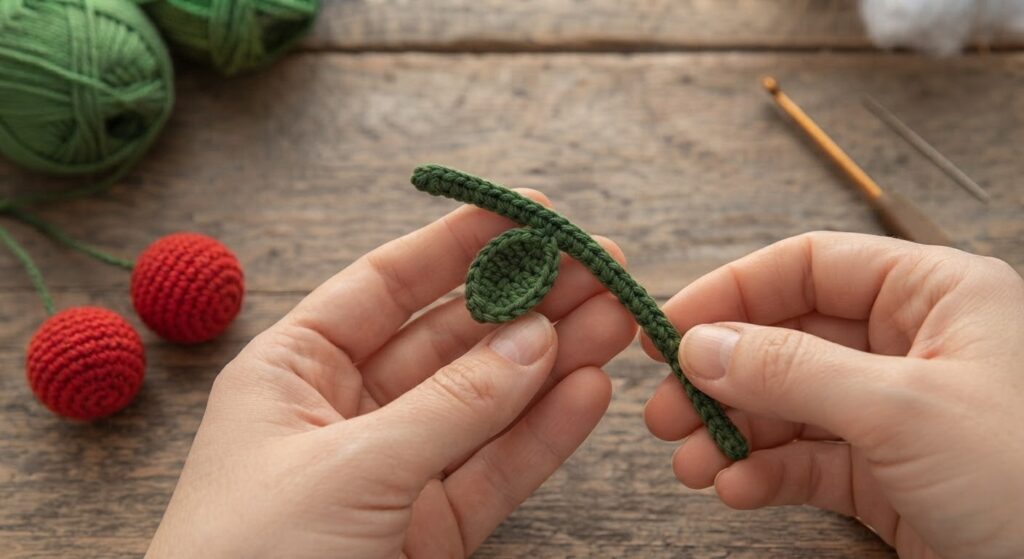
Step 2: Create the Stem and Leaf
Use green yarn for the stem and leaf.
Stem
Chain 18.
Starting in the second chain from the hook, slip stitch in each chain across.
Fasten off, leaving a long yarn tail for attaching the stem to the cherries.
The finished stem will usually be approximately 5–6 cm long, depending on your yarn thickness and crochet tension.
Small Leaf
Attach the green yarn to the middle area of the stem, approximately halfway along the 18-chain stem. This does not need to be exact; choose a point that leaves a similar amount of stem visible above and below the leaf.
Chain 5.
Starting in the second chain from the hook:
- 1 sc in the next chain
- 1 hdc in the next chain
- 1 dc in each of the last 2 chains
You should now have 4 stitches worked along the chain.
Slip stitch into the base of the leaf to secure it to the stem. Fasten off and weave in the yarn end.
Gently flatten the leaf with your fingers and adjust its position before securing the yarn end completely.
Position the Cherries
Place the two finished red cherries together at the top end of the green stem.
Check their position from the front before sewing. The cherries should sit close together, with the stem visible underneath them and the leaf positioned slightly to one side.
Once you are happy with the placement, use the long yarn tail from the stem to sew the two cherries securely to the stem.
Pass the needle through several stitches at the base of each cherry rather than attaching them at only one point. This helps prevent the cherries from twisting when the earrings are worn.
Shaping the Stem and Leaf
After making the stem, gently curve it with your fingers rather than pulling or stretching the stitches. A slight curve can make the finished cherries look more natural.
The leaf is intentionally small so it does not overpower the cherries. Before weaving in the yarn end, gently flatten the leaf with your fingers and adjust its position on the stem.
When positioning the cherries, place them close together at the top of the stem. Check the pair from the front before sewing them in place so that both cherries sit at a similar height.
Because handmade pieces can vary slightly, the stem and leaf do not need to be perfectly symmetrical. Small differences are part of the handmade appearance.
Step 3: Assembling the Earrings
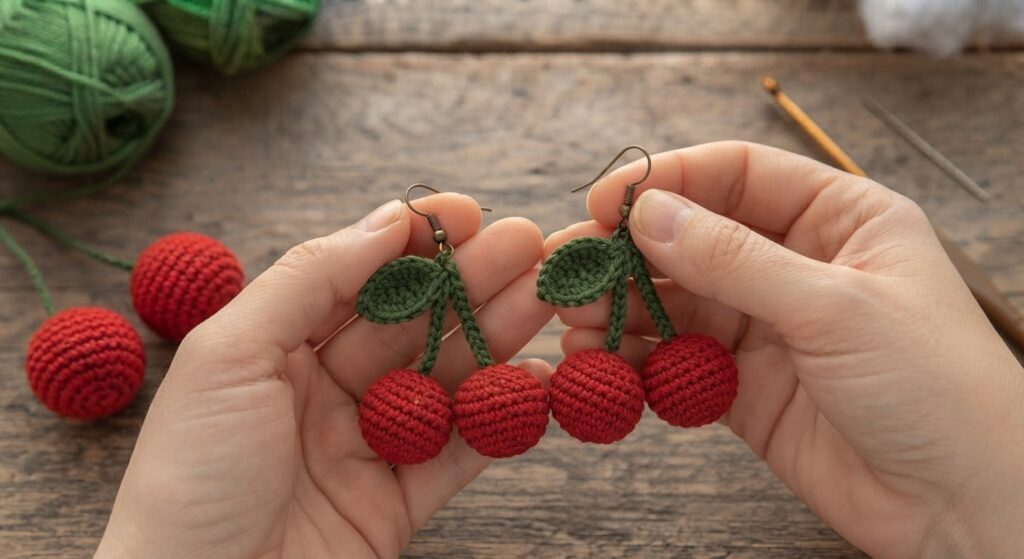
Once the two cherries, stem, and leaf are finished, assemble the first earring before making the second one.
Attach the Cherries
Position the two red cherries together at the top of the green stem. Place them close enough that they look like a pair of cherries, but leave enough space for the stem to remain visible underneath.
Using the long yarn tail from the stem, sew through the base of each cherry several times. Pass the needle through the crocheted fabric rather than only catching the surface stitches. This helps keep the cherries firmly attached.
After sewing, gently pull on each cherry to check that it does not move or separate from the stem. Weave in the remaining yarn securely and trim the excess.
Attach the Earring Finding
For this small design, use lightweight earring hooks or small hoops. If you use jump rings, a ring of approximately 5–6 mm works well for connecting the crocheted loop to the earring finding.
At the top end of the green stem, form a small loop with the remaining yarn tail. Pass the yarn through the top stitches of the stem several times and secure it to create a firm attachment loop.
Pass the loop through the earring hook or hoop and sew the base of the loop securely to the stem.
If you are using a small jump ring instead, pass the ring through the crocheted attachment loop and close the ring completely before attaching the earring hook.
Gently pull the earring finding to check that it is firmly attached before wearing the earring.
Make the Second Earring
Repeat the same steps for the second earring. Compare it with the first one before finishing so the cherries, leaf, and stem are positioned at a similar height.
Small differences are normal in handmade earrings, but keeping the two pieces close in size and shape will make the finished pair look more balanced.
Final Check Before Wearing
Before wearing the earrings, check each attachment point carefully.
Gently hold the earring hook or hoop and pull the crocheted piece very lightly. The cherries and stem should stay securely connected without moving away from the hardware.
Check that the jump ring, if used, is completely closed and that no loose yarn ends are visible around the attachment point.
Look at both earrings together to make sure the stems are similar in length and the cherries are positioned at approximately the same height.
If anything feels loose, reinforce the stitches before wearing the earrings. It is better to spend a few extra minutes securing the small parts than to discover a loose connection while wearing them.
Balancing the Earrings
Before weaving in the final yarn ends, place the two finished earrings next to each other on a flat surface. Check the overall length, the position of the cherries, and the direction of the leaves.
If one stem is slightly longer, you can gently adjust its shape with your fingers. If the cherries sit at different heights, carefully reposition them before making the final stitches.
The two earrings do not have to be perfectly identical. Since they are handmade, small differences in tension and stitch placement are normal. The main goal is to keep the overall size and proportions similar so they look like a matching pair when worn.
Tips for Better Results
- Keep your stitches tight and consistent. Small gaps between the stitches can allow the stuffing to show through the cherries.
- Use a stitch marker to keep track of the beginning of each round, especially when working with small pieces.
- Add only a small amount of fiberfill to each cherry. Overstuffing can make the cherries look too large or cause the stitches to stretch.
- Roll the finished cherry gently between your fingers after stuffing to help distribute the fiberfill evenly and create a smoother round shape.
- Keep the stem firm but flexible. Avoid pulling the slip stitches too tightly, as this can make the stem difficult to shape.
- Use smooth yarn with good stitch definition. Very fuzzy or loosely spun yarn can make the small stitches harder to see.
- Keep the yarn weight and hook size consistent for both earrings so the finished pair has a similar size and weight.
- Check the attachment points before wearing the earrings. The cherries, stem, leaf, and earring hardware should all be firmly secured.
- When making the second earring, use the first one as a visual guide instead of relying only on the written instructions. This makes it easier to match the length and positioning of the two pieces.
A Few Tricky Parts
Because the cherries and leaf are small, some parts of this project can feel fiddly, especially if you are not used to working with tiny amigurumi pieces.
Closing the Cherry
After Round 5, there are only six stitches left. This opening can be small and slightly difficult to work into. Use a blunt yarn needle and take your time when closing the remaining stitches.
Do not pull the yarn too hard at once. Tightening the opening gradually helps keep the cherry round instead of creating a pointed or uneven shape.
Keeping the Cherry Round
The amount of stuffing makes a noticeable difference in such a small piece. If the cherry looks lumpy, gently move the fiberfill around with the tip of your needle before closing it.
If the stitches look stretched or the stuffing is visible, remove a small amount of fiberfill rather than pulling the stitches tighter.
Making the Stem
The stem is worked as a narrow slip-stitch chain, so it can curl or bend slightly. This is not a problem. Gently shape it with your fingers after crocheting.
If the stem feels too stiff, avoid pulling the stitches tighter. If it feels too loose, try using slightly more tension on your next stem.
Attaching the Small Leaf
The leaf is very small, so its position can change the overall appearance of the earrings. Before securing it permanently, hold the leaf against the stem and check how it looks from the front.
If the leaf looks too large compared with the cherries, remake it with one fewer chain or use a smaller hook.
Choosing Yarn for the Earrings
For these earrings, choose a yarn that produces clear stitches and does not make the cherries unnecessarily heavy.
Smooth cotton yarn is a practical choice because it keeps its shape well and makes the small stitches easy to see. Mercerized cotton gives the cherries a slightly smoother and more defined surface, while regular cotton can give them a softer handmade appearance.
A fine or sport-weight yarn works well with the 2.0–2.5 mm crochet hook range used in this pattern. If you use a thicker yarn, the cherries will become larger and heavier, so you may need to reduce the hook size to keep the fabric firm.
Try to use the same yarn weight for the red cherries and the green stem and leaf. Using noticeably different yarn thicknesses can make the proportions look uneven.
If you are making earrings for everyday wear, lightweight yarn and small amounts of stuffing are preferable. The finished earrings should feel comfortable rather than pulling heavily on the earring hooks.
Changing the Size
You can change the size of the crochet cherries by using a different yarn weight and crochet hook.
For smaller cherries, use a finer yarn with a smaller hook. Keep your stitches tight enough that the stuffing cannot be seen through the fabric.
For larger cherries, use a thicker yarn and a larger hook. Keep in mind that larger cherries will also make the earrings heavier. For wearable earrings, avoid increasing the size too much, especially if you are using metal earring findings.
You can also make the earrings slightly longer by adding a few chains to the stem. If you change the stem length, make the second earring to the same length so the finished pair remains balanced.
Changing the yarn and hook will also change the amount of yarn and stuffing needed, so use the finished size of your first cherry as a guide when making adjustments.
About This Cherry Earring Design
I designed these crochet cherry earrings as a small and lightweight accessory that could be made without using a large amount of yarn. The cherries are kept small and rounded, while the green stem and leaf add just enough detail to make the fruit recognizable.
The two cherries are made separately and sewn to the stem rather than crocheted directly onto it. This makes it easier to adjust their position before securing them and also allows each cherry to keep its rounded shape.
The simple construction also makes the design easy to adapt. You can change the color of the cherries, make the stem slightly longer or shorter, or leave out the leaf for a simpler version.
If you are new to small crochet projects, take your time with the assembly. The crocheting itself is short, but careful positioning and secure sewing make a noticeable difference in the finished earrings.
My Tip for a Neater Finish
For a cleaner-looking pair of earrings, take a little extra time with the final sewing and yarn ends.
Before closing each cherry, check the stuffing and make sure it is distributed evenly. A small amount of fiberfill is enough for these tiny pieces. Closing the opening gradually with a yarn needle will help keep the bottom of the cherry neat.
When attaching the cherries to the stem, sew through several stitches of both pieces instead of making only one or two stitches. This gives the connection more stability and helps prevent the cherries from twisting.
I also recommend attaching the earring hardware only after the crocheted pieces are completely finished. This makes it easier to shape the stem, position the leaf, and check the balance of the earrings before the final attachment.
Finally, weave in all yarn ends securely and trim them close to the fabric. Give each earring a gentle pull at the attachment points before wearing it. This quick check can help you find a loose connection before the earrings are used.
Safety and Care
Because these crochet earrings contain small crocheted pieces and metal earring findings, check them regularly before wearing them.
Make sure the cherries are firmly sewn to the stem and that the earring hook, hoop, or jump ring is completely secure. If any part becomes loose, repair it before wearing the earrings again.
If you have sensitive ears, choose earring findings made from a metal or material that you normally tolerate well. Remove the earrings if you notice any irritation or discomfort.
Keep the earrings away from small children and pets because the small pieces and metal findings can present a choking or swallowing hazard.
To keep the crochet pieces looking clean, avoid wearing the earrings while showering, swimming, or exercising heavily. Water and moisture can affect the yarn and may also cause the metal hardware to tarnish.
For light cleaning, gently spot-clean the crocheted parts with a slightly damp cloth. Avoid soaking the earrings unless the yarn and earring hardware are specifically suitable for washing.
Allow the earrings to dry completely before storing them. Store them in a dry place where the stems and leaves will not be crushed or bent.
Wearing the Crochet Cherry Earrings
These crochet cherry earrings are small enough to work well as a simple everyday accessory. The red cherries and green leaf give them a playful look without requiring a complicated design.
They can be worn with casual outfits, especially during spring and summer, or used as a small handmade gift for someone who enjoys crochet and fruit-inspired accessories.
Because the earrings are handmade, handle the crocheted pieces gently when putting them on or taking them off. Avoid pulling the cherries or leaf, and hold the metal earring finding when removing the earrings from your ears.
If you want to make a pair for a special occasion, you can change the yarn colors to match an outfit or use a slightly different shade of green for the leaves. Just keep the yarn weight and hook size similar between the two earrings so the finished pair remains balanced.
Frequently Asked Questions
Why do my crochet cherries look flat instead of round?
The most common reason is too little or unevenly distributed stuffing. Add a small amount of fiberfill at a time and gently shape the cherry with your fingers before closing it. Avoid packing it too firmly, because excessive stuffing can stretch the stitches.
Why can I see the stuffing through the stitches?
Your stitches may be too loose, or the cherry may be overstuffed. Try using slightly more tension when crocheting or remove a small amount of fiberfill. A firm crochet fabric with small, even stitches works best for this project.
Can I use a 2.5 mm crochet hook?
Yes. A 2.5 mm hook can work well if your yarn is suitable and your tension produces a firm fabric. If your stitches are loose, try a smaller hook so the stuffing does not show through.
Can I make the cherries in another color?
Yes. You can use pink, dark red, burgundy, yellow, orange, or another color you prefer. The green stem and leaf can also be changed to suit your design.
Can I make the earrings without stuffing?
Yes, but the cherries will not have the same three-dimensional shape. Without stuffing, they will be flatter and may work better as a decorative crochet piece than as a rounded fruit.
How can I make the cherries smaller?
Use a finer yarn and a smaller crochet hook while keeping your stitches tight. Remember that changing the yarn and hook will also change the finished size of the stem and leaf, so make both earrings using the same materials.
How can I make the earrings larger?
Use a thicker yarn and an appropriately larger hook. Keep in mind that larger cherries will add weight, so avoid making them unnecessarily large for wearable earrings.
How do I keep both earrings the same size?
Make the first earring completely before starting the second. Use it as a visual guide when making the second cherry, stem, and leaf. Matching your yarn tension and hook size also helps keep the pair consistent.
Can I wash crochet cherry earrings?
Spot cleaning is preferable. Avoid soaking the earrings because the combination of yarn, stuffing, and metal hardware may not respond well to prolonged moisture. Allow them to dry completely before storing or wearing them.
How do I keep the earrings from becoming misshapen?
Store them somewhere dry and avoid placing heavy objects on top of them. If the stem or leaf becomes slightly bent, gently reshape it with your fingers rather than pulling the stitches.
Are these earrings suitable for children?
They are not recommended for small children because they contain small crocheted and metal components that could present a choking or swallowing hazard.
Can I use different earring hooks or hoops?
Yes. You can use different lightweight earring findings as long as they can be securely attached to the crocheted stem. If you have sensitive ears, choose a material that you normally tolerate well.
Copyright and Pattern Use
This crochet pattern and the original photographs on this page are the property of Amyliva Handmade.
You may use this pattern to make crochet cherry earrings for yourself or as gifts. Please do not copy, repost, translate, redistribute, or sell the written pattern or the photographs as your own.
If you share a finished pair made from this pattern online, crediting Amyliva Handmade and linking back to this pattern is appreciated.
The finished crochet earrings are handmade items created from this pattern. Please make sure that any finished items you share or sell comply with your own local requirements and the terms you choose for your handmade work.

Yorum gönder