Step by Step Amigurumi
amigurumi, amigurumi designs, AmyLiva Handmade, bag charm, bunny keychain, crochet, Crochet Bunny, crochet inspiration, crochet keychain, Crochet Pattern, cute crochet, DIY amigurumi, DIY crochet, diy gift ideas, free amigurumi pattern, free crochet pattern, handmade keychain, Handmade With Love, HandmadeWithLove, kawaii crochet, mini amigurumi
admin
0 Yorumlar
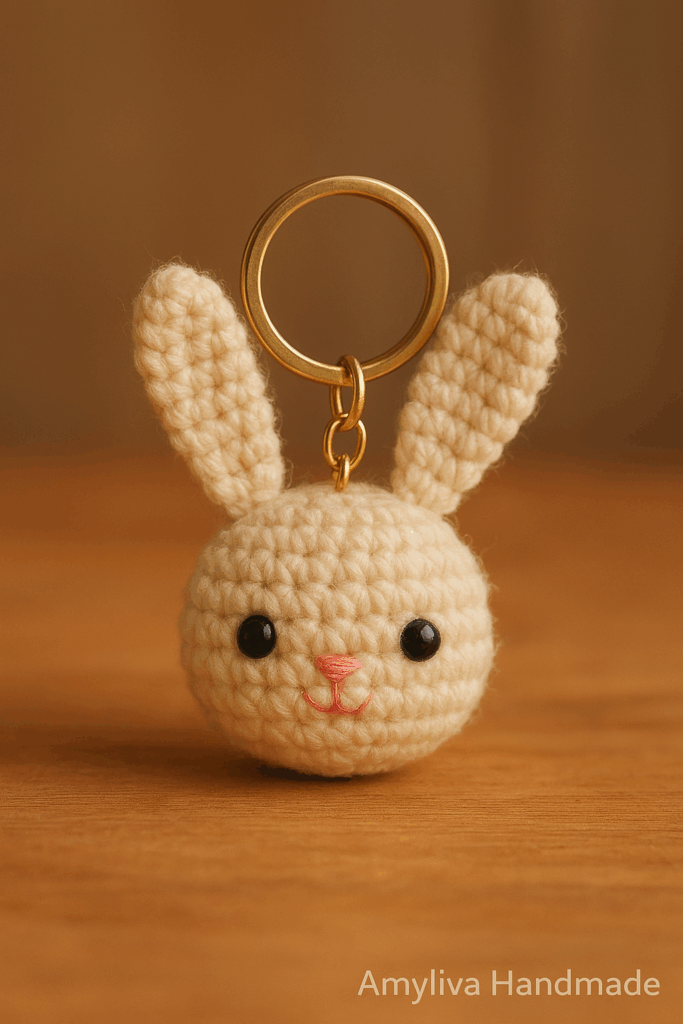
Step-by-Step Guide: How to Crochet a Cute Mini Bunny (Amigurumi Pattern)

Introduction
Crochet has become one of the most popular hobbies for creative minds, and amigurumi—the Japanese art of crocheting small stuffed toys—is loved by crafters all over the world. If you are new to this craft, starting with a mini amigurumi bunny is the perfect idea. It’s simple, adorable, and a great way to practice your crochet skills.
In this detailed guide, we will explore the materials you need, step-by-step instructions, tips for beginners, and creative variations. By the end, you’ll have your very own handmade mini bunny that can be used as a toy, decoration, or even a keychain.
Why Choose a Mini Bunny as Your First Project?
- 🧵 Beginner-friendly: Uses basic stitches such as single crochet, increase, and decrease.
- 🕒 Quick project: Can be finished in just a few hours.
- 🎁 Perfect gift: Handmade bunnies make thoughtful presents for birthdays, baby showers, or Easter.
- 🐇 Customizable: You can change the color, add accessories, or turn it into a keychain.
Materials You’ll Need
Before we start crocheting, prepare these supplies:
- Cotton yarn in your favorite colors (light pink, white, or gray are classic bunny shades).
- Crochet hook size 2.5 mm–3.0 mm.
- Fiberfill stuffing.
- Yarn needle for sewing.
- Scissors.
- Safety eyes (6 mm) or embroidery thread for eyes.
- Stitch marker (optional, but helpful).
- Keychain ring (if you want to make a bunny keychain).
Step-by-Step Crochet Instructions
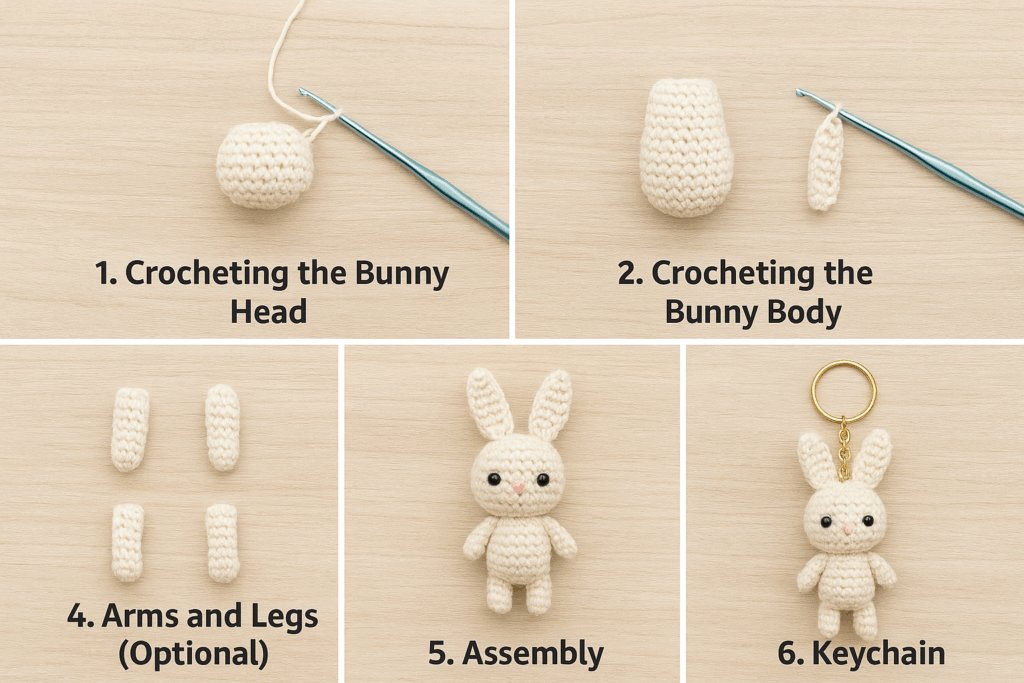
✨ Note: This is a beginner-friendly version of the bunny. Each piece will be made separately and then sewn together.
1. Crocheting the Bunny Head
- Start with a magic ring and 6 single crochets (sc).
- Round 2: Increase in each stitch (12 sc).
- Round 3: 1 sc, inc repeat around (18 sc).
- Round 4–6: Work even (18 sc).
- Round 7: 1 sc, dec repeat (12 sc).
- Add stuffing and place safety eyes.
- Round 8: Decrease around (6 sc), fasten off.
2. Crocheting the Bunny Body
- Start with a magic ring, 6 sc.
- Round 2: Increase in each stitch (12 sc).
- Round 3–5: Work even (12 sc).
- Round 6: 1 sc, dec repeat (8 sc).
- Stuff lightly and close.
3. Bunny Ears (Make 2)
- Chain 5, work sc across.
- Work back and forth to form an oval shape.
- Fasten off, leaving a long tail for sewing.
4. Arms and Legs (Optional)
- Arms: Magic ring with 4 sc, work 3 rounds, stuff lightly, close.
- Legs: Magic ring with 5 sc, work 4 rounds, stuff lightly, close.
5. Assembly
- Sew the head and body together.
- Attach ears on top of the head.
- Add arms and legs if desired.
- Embroider a small nose using pink thread.
- Attach to a keychain ring if you want a cute bunny keychain.
Tips for Beginners
- Keep stitches tight: This prevents stuffing from showing through.
- Use cotton yarn: It holds shape better than acrylic.
- Practice invisible decreases: It gives your amigurumi a smooth finish.
- Stuff gradually: Add small amounts of fiberfill instead of big chunks.
- Mark your rounds: A stitch marker helps you keep track.
Creative Variations
- 🎀 Add a bow tie or ribbon around the bunny’s neck.
- 🥕 Crochet a tiny carrot as an accessory.
- 🌈 Experiment with colors: Try pastel shades for Easter or bright neon for a modern look.
- 🔑 Turn it into a keychain: Attach to your bag, purse, or keys.
Frequently Asked Questions (FAQ)
1. How long does it take to crochet a mini bunny?
For beginners, around 3–4 hours. With practice, less than 2 hours.
2. Can I use leftover yarn?
Yes! Mini projects are perfect for scrap yarn.
3. Do I need safety eyes?
Not necessarily—you can embroider eyes for a safer option (great for kids’ toys).
4. What size should my bunny be?
Using 2.5 mm hook and cotton yarn, the bunny will be about 6–8 cm tall.
Conclusion
Crocheting a mini amigurumi bunny is a rewarding project for beginners. It’s small, quick, and customizable, making it the perfect first step into the world of amigurumi. Whether you keep it as a decoration, gift it to a friend, or attach it to a keychain, this little bunny will bring joy and creativity to your day.
✨ Explore more free patterns and crochet tips on AmyLiva Handmade, and start building your own collection of amigurumi animals today!
⚠️ Usage Disclaimer
The Crochet Cat Paw Earrings pattern shared in this blog post is for personal use only. You are welcome to make these earrings for yourself, as gifts, or even to sell in small quantities, but please do not redistribute or sell the pattern itself as your own.
• All images in this post are the property of Amyliva Handmade. Please do not use, copy, or share them without permission.
• If you would like to feature this design on your website, kindly link back to the original post on amyliva.com.
• Safety note: These earrings are not toys and should be kept away from small children and pets, as small parts may pose a choking hazard.
By following this tutorial, you agree to use the pattern and related images responsibly

Yorum gönder