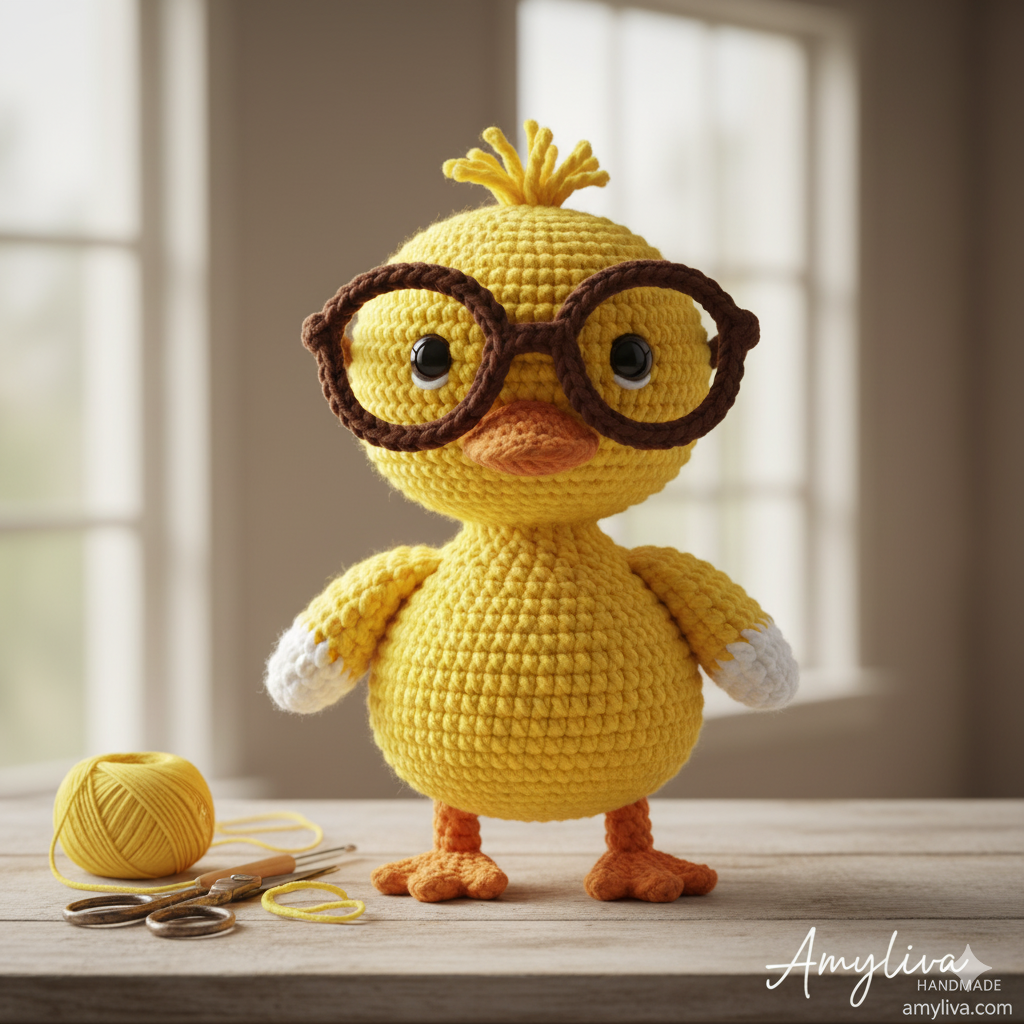
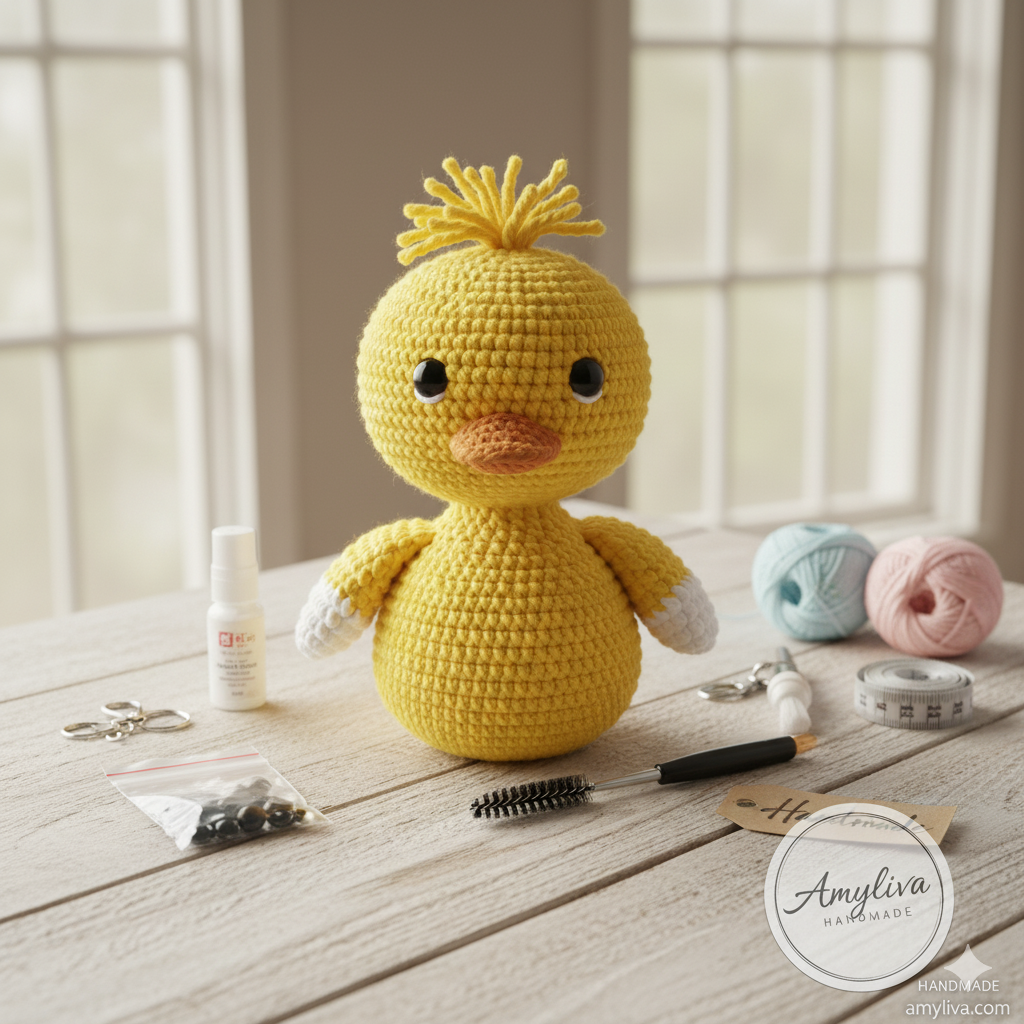
The Ultimate Amigurumi Duck Pattern: Step-by-Step Crochet Guide
Introduction: Why This Adorable Duck is a Must-Crochet Project
Hello Amigurumi Artists!
Today, we’re diving into a project that will instantly add a splash of sunshine to your crochet collection: the Amigurumi Duck Pattern! Whether you’re crafting it for a baby shower gift, a charming desk companion, or a quirky keychain, this little yellow fellow is guaranteed to bring smiles.
In this comprehensive guide, we won’t just list the pattern abbreviations; we’ll provide A-to-Z details covering everything from essential techniques and yarn selection to stuffing tips and, most importantly, how to attach those iconic glasses. By the end of this blog post, you’ll have successfully created a mini, handmade miracle in the Amyliva Handmade style.
So, grab your hooks and let’s start stitching this cute amigurumi duck!
1. Amigurumi Essentials: Your Detailed Supplies Checklist
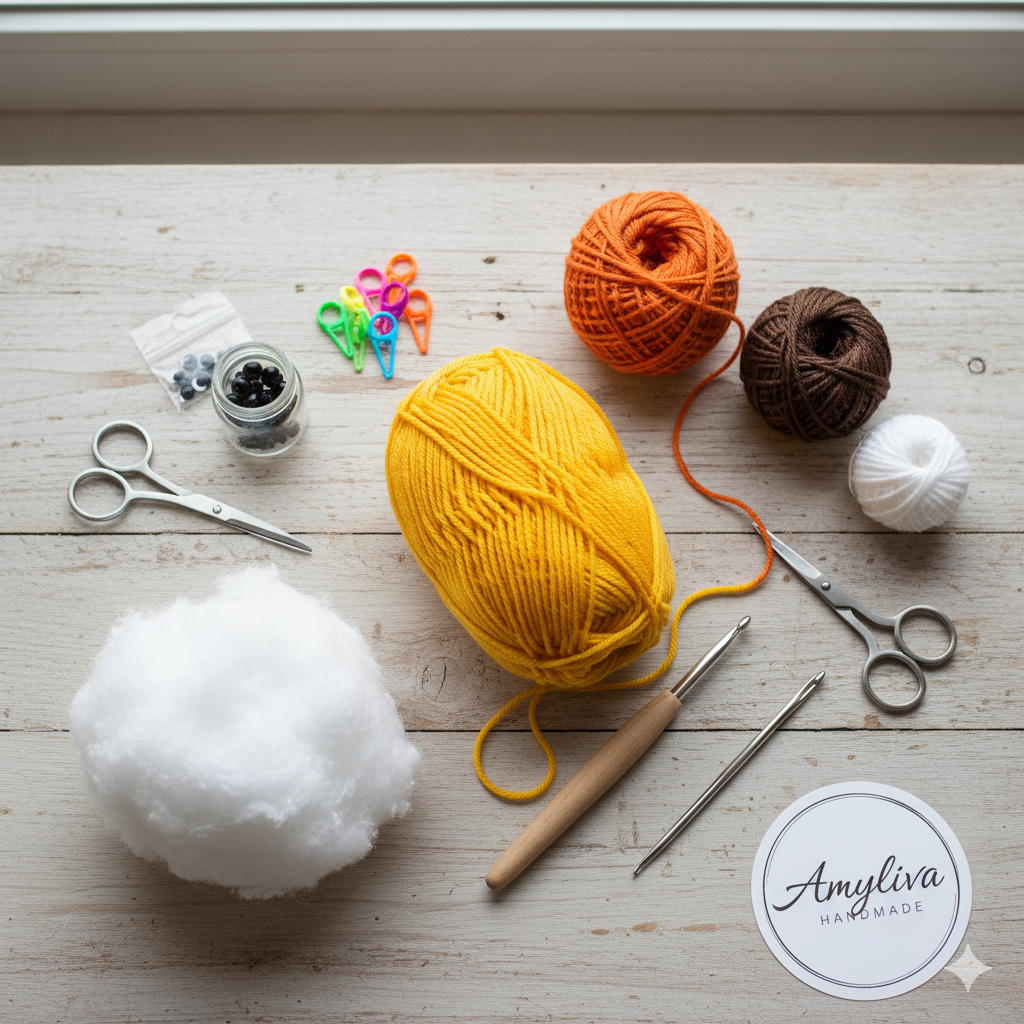
Starting with the right tools is the secret to a professional-looking Amigurumi Duck. Below, you’ll find a carefully prepared supply list.
Required Materials and Yarn Selection Guide
- Main Yarn (Yellow): Opt for cotton blends like Gazzal Baby Cotton or YarnArt Jeans. Non-pilling, 50% cotton–50% acrylic blends are ideal. Choose a bright, cheerful yellow to give your duck that signature sunny look.
- Mouth/Feet Yarn (Orange/Brown): Match the weight of the main yarn. Darker yarn (black or dark brown) is for the glasses.
- Eyes (Brown/Black): Use Safety Eyes (6mm–8mm) or crocheted eyes. For toys meant for children under 3, always use embroidered or crocheted eyes for safety.
- Crochet Hook: Use one size smaller than recommended on the yarn label (e.g., 2.0 mm or 2.5 mm). A smaller hook ensures tight stitches and prevents stuffing from showing through.
- Stuffing: Premium Polyester Fiberfill (Siliconized) is best. Ensure it’s anti-allergenic and washable.
- Other Tools: Stitch Marker, Tapestry Needle, Scissors, Wire Brush (optional for fluffing hair).
Optional Tools & Accessories
- Small beads or buttons for decoration
- Ribbon for a bow tie or scarf
- Safety pins or stitch holders for easier assembly
💡 Tip: Using a smaller hook than recommended ensures the fabric is tight and prevents fiberfill from escaping. Always keep your materials organized before starting your Amigurumi Duck Pattern.
Essential Amigurumi Abbreviations Glossary
- MR: Magic Ring / Magic Circle
- sc: Single Crochet
- inc: Increase (2 sc in one stitch)
- dec: Decrease (sc 2 stitches together)
- sl st: Slip Stitch
- Ch: Chain
- R: Round / Row
- ( ) xN: Repeat instructions N times
- (sc, inc): Example → (1 sc, inc)
💡 Keep this list near you while crocheting so you never lose track of your stitches.
2. The Amyliva Duck Pattern: Step-by-Step Crochet Instructions
We’ll start with the body, the main part of the duck. Remember to check your stitch count at the end of every round for accuracy.
2.1. The Body (Yellow Yarn)
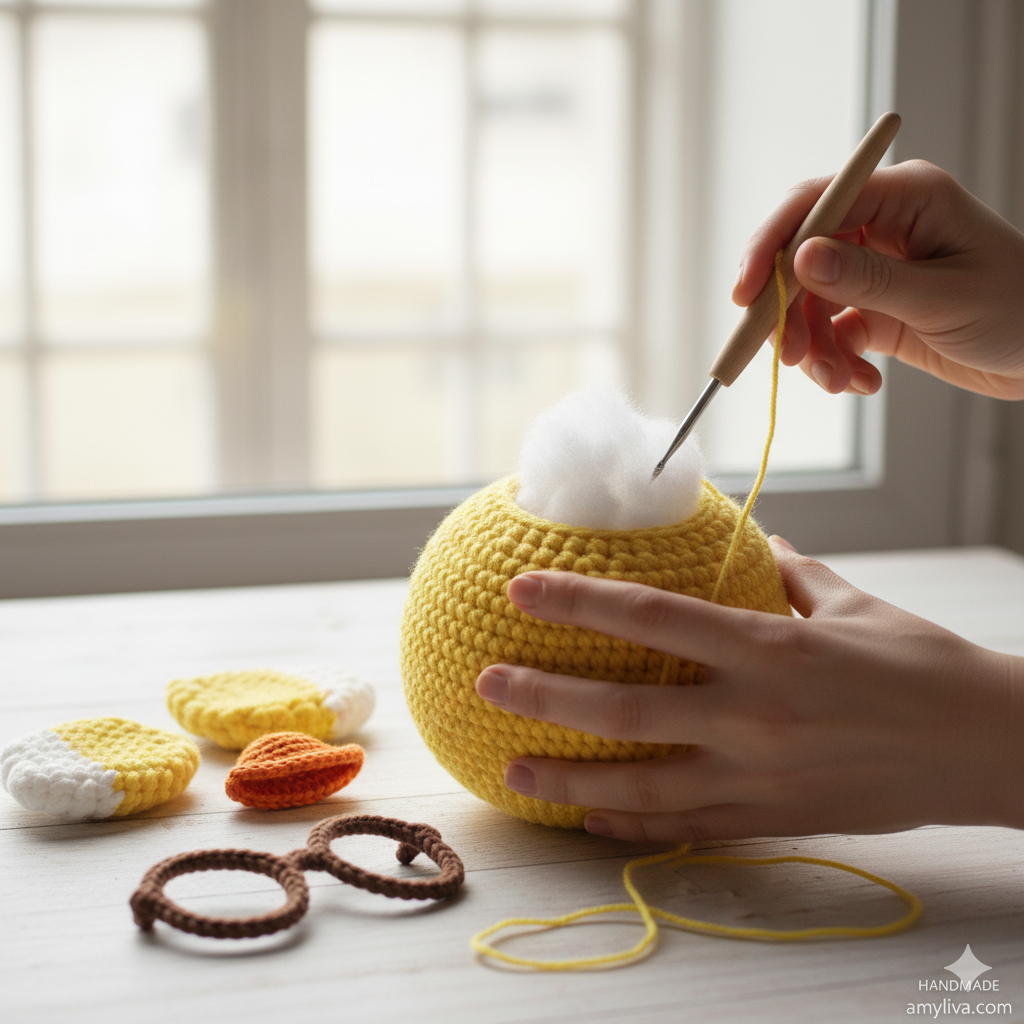
- R1: MR: 8 sc. (8)
- R2: inc x8. (16)
- R3: (sc, inc) x8. (24)
- R4: (2 sc, inc) x8. (32)
- R5: (3 sc, inc) x8. (40)
- R6–R11: 40 sc. (6 rounds). (40)
- R12: (3 sc, dec) x8. (32)
- R13: (2 sc, dec) x8. Stuff firmly. (24)
- R14: (sc, dec) x8. (16)
- R15: dec x8. (8)
- Finish: Cut yarn, weave through remaining stitches, and fasten off.
💡 Tip: Stuff the body gradually to maintain a smooth shape. Avoid overstuffing, which can distort the duck.
2.2. The Mouth/Beak (Orange/Brown Yarn)
- R1: MR: inc x6. (12)
- R2: Ch & 12 sc. (12)
- R3: MR: 3 sc. Small closing piece.
- Sew securely below the glasses.
2.3. Wings (Yellow and White Yarn, Make 2)
- R1: MR: 6 sc. (6)
- R2: inc x6. (12)
- R3–R4: 12 sc. (2 rounds). (12)
- Finish: Leave long tail for sewing. Attach symmetrically between R10–R11 of the body.
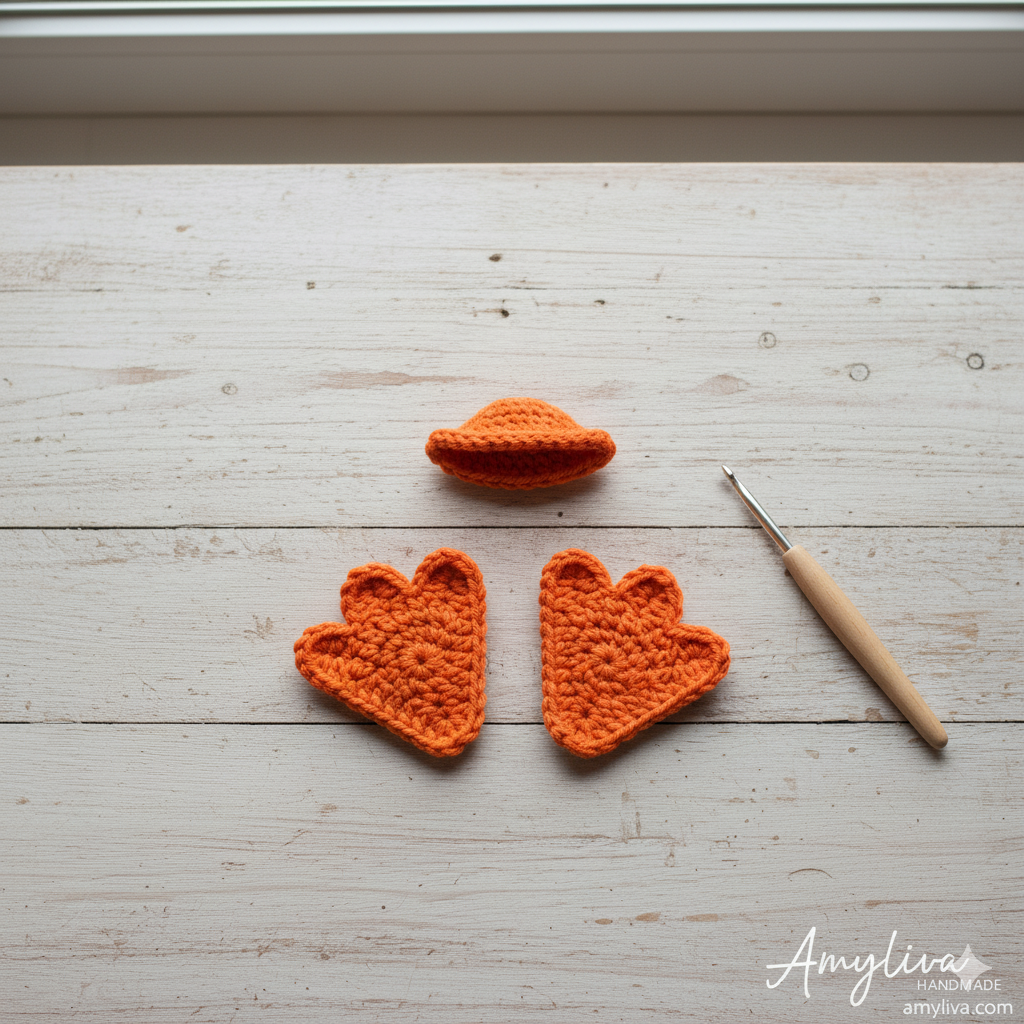
2.4. Legs/Feet (Orange Yarn)
- R1: MR: 6 sc. (6)
- R2: inc x6. (12)
- Finish: 2 sc, 51 ch. Crochet 2 sc, then chain 51, and sl st back down for one toe. Repeat three times. Leave a long tail for sewing.
💡 Tip: Adjust the length of toes for more realistic proportions.
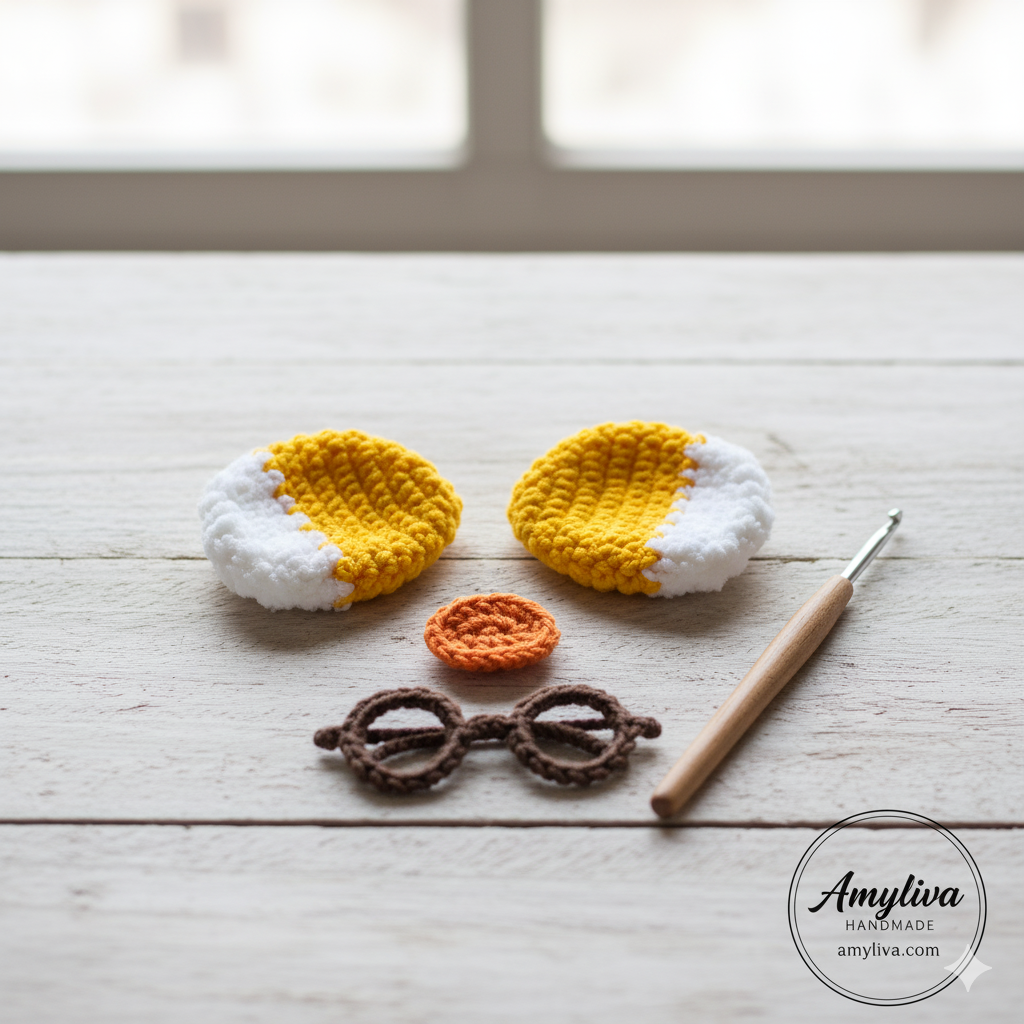
3. Detailing and Final Assembly: The Glasses and Hair
3.1. Hair (Yellow Yarn)
- Make 3 strands: Attach yarn to the top center, chain 10–15, then sl st back down to form a tuft. Repeat 3 times.
3.2. Glasses (Dark Brown/Black Yarn)
- Eye Rings (Make 2): R1: MR: 6 sc. R2: inc x6. (12)
- Bridge: Crochet 6 sc between the rings where they touch. Sew completed glasses to the face between R8–R10.
3.3. Final Assembly
- Sew the beak just below the glasses.
- Attach wings firmly so they don’t flop.
- Use small tufts of fiberfill while sewing parts.
- Check all seams and stitch ends to ensure durability.
4. Optional Materials & Tips
- Yarn Types: Soft acrylic, bamboo blend, or merino wool for a softer feel.
- Color Options: Pastel tones for baby toys, bright colors for desk decorations.
- Accessories: Tiny bows, scarves, or mini hats add personality.
- Eye Options: Embroidered eyes for safety, beads for decorative purposes.
💡 Tip: Test your yarn combination on a small swatch to check for tension, color bleeding, and overall look.
5. Common Mistakes & How to Fix Them
- Stuffing shows through: Use smaller hook or tighter stitches.
- Uneven wings/legs: Count stitches carefully and pin pieces before sewing.
- Glasses placement off-center: Sew lightly first, adjust placement, then secure fully.
- Neck wobbling: Firmly pack fiberfill at top rounds before closing.
💡 Tip: Take photos as you progress to track alignment and symmetry.
6. Amigurumi Duck Care & Maintenance
- Washing: Hand wash gently in cold water with mild detergent.
- Drying: Air dry, reshape while damp. Avoid direct sunlight for long periods.
- Storage: Keep in a dry, cool place. Use resealable plastic bags to protect from dust.
- Maintaining Shape: Avoid overhandling or stretching, especially the wings and neck.
7. Advanced Customization Ideas
- Tiny Accessories: Scarves, bow ties, mini backpacks, or even crochet hats.
- Color Combinations: Try two-tone wings or gradient yarn for body.
- Expressions: Embroidered eyebrows or blush for more character.
💡 Tip: Customization not only adds charm but can make your Amigurumi Duck Pattern unique for gifting or selling.
8. Frequently Asked Questions (FAQ)
Q1: What size will my finished Amigurumi Duck be?
A: Around 8–10 cm (3–4 inches) using a 2.5 mm hook.
Q2: My stuffing is showing. What’s wrong?
A: Use a smaller hook size or tighten your stitches.
Q3: Are crocheted eyes safer than safety eyes?
A: Yes, especially for children under 3 years old.
Q4: My duck’s neck is wobbly. How can I fix it?
A: Firmly pack fiberfill at R13–R14 before closing.
Q5: Can I sell my finished duck?
A: Yes, credit AmyLiva Handmade and include a link to this post.
9. Copyright and Usage Notice
This Amigurumi Duck Pattern is the exclusive design of AmyLiva Handmade (Amyliva.com).
- ✅ Personal Use: Allowed for gifts or charity.
- ✅ Commercial Use: Allowed for finished items, with credit.
- ❌ Sharing the Pattern: Not allowed in any format (PDF, images, text).
10. Conclusion: Admire Your New Companion!
Congratulations! 🎉 You’ve successfully completed the Amigurumi Duck Pattern and crafted a unique handmade friend.
Don’t forget to share your finished duck on social media with #AmylivaDuck and tag @amylivahandmade.
👉 Explore more patterns and tutorials on Amyliva.com and continue your crochet adventure!
Follow AmyLiva Handmade
For more free crochet patterns and tutorials:
- Website: amyliva.com
- Pinterest: AmyLiva Handmade
- YouTube: AmyLiva Handmade Channel
- Instagram: @amyliva_handmade
Warmly,
The Amyliva Team
Amyliva.com

Yorum gönder