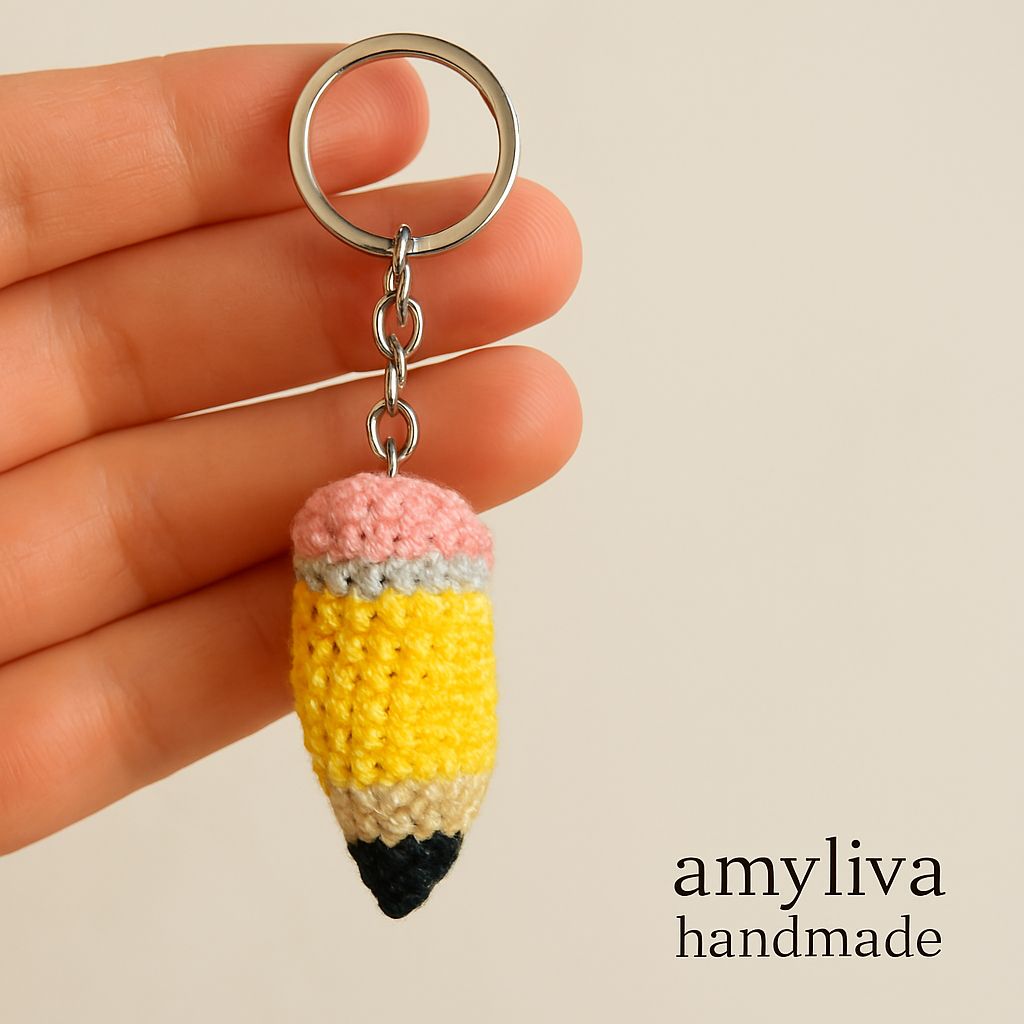
Crochet Pencil Keychain Pattern – Easy Amigurumi Tutorial for Beginners

🖊 Crochet Pencil Keychain Pattern – Easy Amigurumi Tutorial for Beginners
Crocheting small and practical items is always fun, and a crochet pencil keychain pattern is one of the cutest projects you can try. This beginner-friendly amigurumi tutorial is not only quick to make but also a perfect gift idea for students, teachers, or anyone who loves stationery. In this step-by-step guide, you will learn how to crochet a mini pencil keychain from scratch, the materials you need, and how to customize it with your own creativity.
Whether you are new to crochet or already an experienced crafter, this project is simple, portable, and rewarding. Let’s dive into the details!
⸻
✨ Why Crochet a Pencil Keychain?
• Practical and cute – A crochet pencil keychain is both decorative and useful.
• Perfect gift – Handmade items make thoughtful gifts for teachers, classmates, or friends.
• Beginner-friendly – This pattern is easy to follow, even if you are just starting with amigurumi.
• Customizable – Change the yarn color to create different pencil designs (yellow, pink, blue, or even rainbow).
🧶 Materials You Will Need
To create your crochet pencil keychain, prepare the following:
• Yarn: 100% cotton yarn or soft acrylic in yellow (pencil body), pink (eraser), beige (tip), gray (metal band), and black (lead).
• Hook: 2.0 – 2.5 mm crochet hook (depending on yarn weight).
• Stuffing: Polyester fiberfill for shaping the pencil.
• Keychain ring: A small metal ring with chain.
• Tapestry needle: For sewing and weaving ends.
• Scissors – To cut the yarn neatly.
👉 Tip: Cotton yarn is recommended because it gives your pencil a neat and defined look.
⸻
🔄 Abbreviations (US Terms)
• MR – Magic Ring
• SC – Single Crochet
• INC – Increase (2 SC in one stitch)
• DEC – Decrease (single crochet two stitches together)
• SL ST – Slip Stitch
• CH – Chain
⸻
🪡 Step-by-Step Crochet Pencil Keychain Pattern
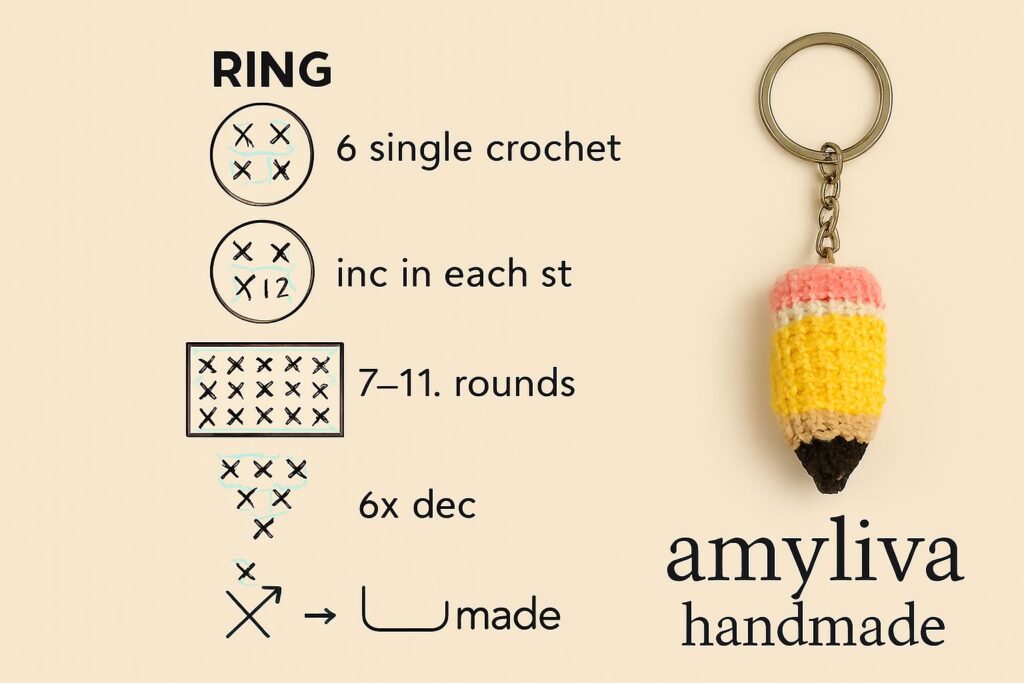
This crochet pattern is worked in continuous rounds. Do not join rounds unless instructed. Use a stitch marker to mark the first stitch of each round.
- Pencil Tip (Beige Yarn)
- Start with a magic ring (MR) and 6 SC inside. (6)
- Round 2: INC around. (12)
- Round 3: (1 SC, INC) repeat. (18)
- Round 4–5: SC around. (18)
👉 This forms the pointed tip of your pencil.
⸻
- Pencil Body (Yellow Yarn)
- Change to yellow yarn.
- Round 6–12: SC in each stitch around. (18)
- Keep stuffing as you go to maintain shape.
⸻
- Metal Band (Gray Yarn)
- Round 13–14: SC around in gray yarn. (18)
⸻
- Eraser (Pink Yarn)
- Round 15–18: SC around in pink yarn. (18)
- Round 19: (1 SC, DEC) repeat. (12)
- Round 20: DEC around. (6)
- Fasten off and close.
⸻
- Pencil Lead (Black Yarn)
• With black yarn, add a few stitches at the tip to create the “lead” detail.
⸻
- Attaching the Keychain
• Sew a small loop at the top of the eraser.
• Insert your metal ring and chain.
• Secure tightly so it can be used daily without falling apart.
⸻
🎨 Variations & Ideas
One of the best things about amigurumi is the freedom to customize. Here are some creative variations for your crochet pencil keychain pattern:
- Rainbow Pencil: Use different colors for each round of the pencil body.
- Personalized Gift: Add initials or small embroidery details.
- Glitter Yarn: Use metallic yarn for the eraser band for a fun effect.
- Mini & Maxi Versions: Adjust hook and yarn size to create smaller or larger pencils.
💡 Why You’ll Love This Project
- Quick & Easy: Takes less than an hour to complete.
- Scrap Yarn Friendly: Perfect way to use leftover yarn.
- Giftable: A thoughtful handmade gift for teachers, students, or friends.
- Practical: Not just decorative – it’s also a functional keychain!
📌 Uses for Crochet Pencil Keychain
- As a keychain for house, office, or car keys
- As a bag charm for school bags or handbags
- As a teacher appreciation gift
- As a party favor for kids’ events or back-to-school parties
- As a handmade shop item to sell online
❓ Frequently Asked Questions (FAQ)
- How long does it take to make one crochet pencil keychain?
Usually between 1–2 hours, depending on your skill level. - Can beginners follow this pattern?
Yes! It uses only basic stitches (SC, INC, DEC), making it perfect for beginners. - What yarn works best?
Cotton yarn is recommended for durability and neat stitches. Acrylic also works if you want a softer feel. - How do I clean the pencil keychain?
Hand wash gently in cold water and let it air dry. Avoid machine washing to keep its shape. - Can I sell the finished keychains?
Yes! Handmade pencil keychains are popular at craft fairs, Etsy shops, and as teacher appreciation gifts.
🔗 Related Patterns You Might Like
If you enjoyed this project, you may also want to try:
• Mini Amigurumi Baby Keychain Pattern
• Crochet Christmas Tree Ornament
• Essential Crochet Tools for Amigurumi
⸻
⚠ Important Notes
• This pattern is for personal use only. Do not copy or resell the instructions.
• You may sell finished products, but please credit AmyLiva Handmade as the designer.
📲 Share Your Work!
If you make this crochet pencil keychain, don’t forget to share it online! Tag @AmyLiva Handmade on Instagram, TikTok, or Pinterest so we can see your amazing creations.
👉 For more free patterns and tutorials, visit: www.amyliva.com
🌟 Final Thoughts
The crochet pencil keychain pattern is a wonderful beginner-friendly amigurumi project. Not only is it quick and fun to make, but it also produces a functional and charming accessory. With just a few basic stitches and some colorful yarn, you can create the perfect handmade gift for teachers, friends, or yourself.
Give it a try, and soon you’ll have a whole set of colorful crochet pencils decorating your keys or bag!

Yorum gönder