CROCHET ACCESSORIES AND HOME
amigurumi, amigurumi free pattern, amigurumi pattern, AmyLiva, AmyLiva Handmade, crochet beginners, Crochet Gift Ideas, crochet keychain, crochet love, crochet toy, crochet tutorial, cute amigurumi, easy crochet pattern, free crochet pattern, handmade gifts, Handmade With Love, kawaii crochet, Patrick amigurumi, Patrick Star, SpongeBob
admin
0 Yorumlar
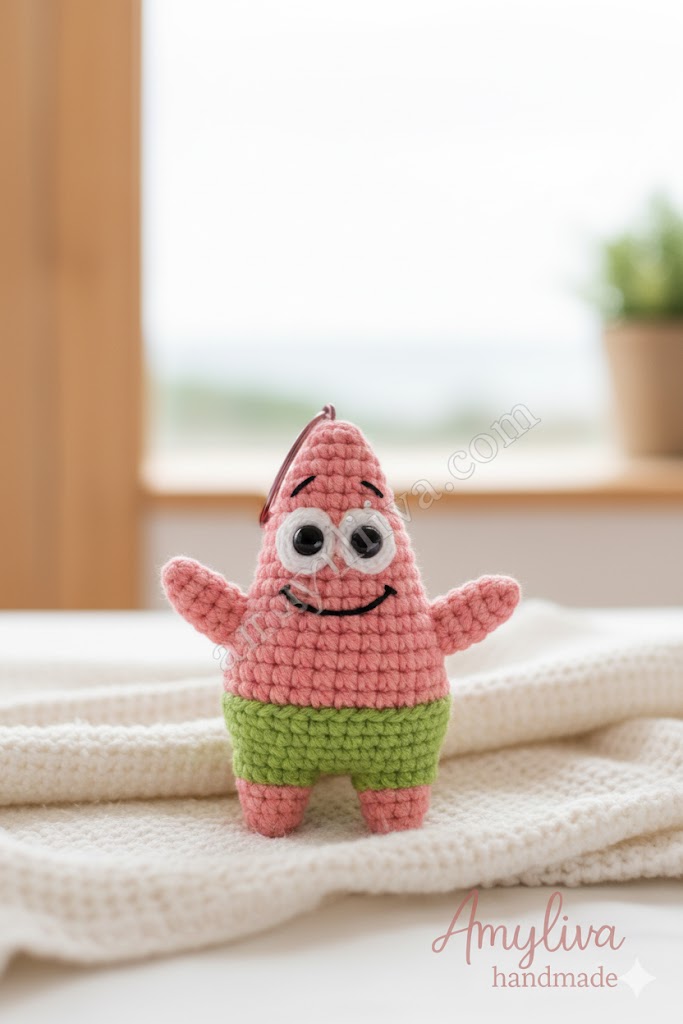
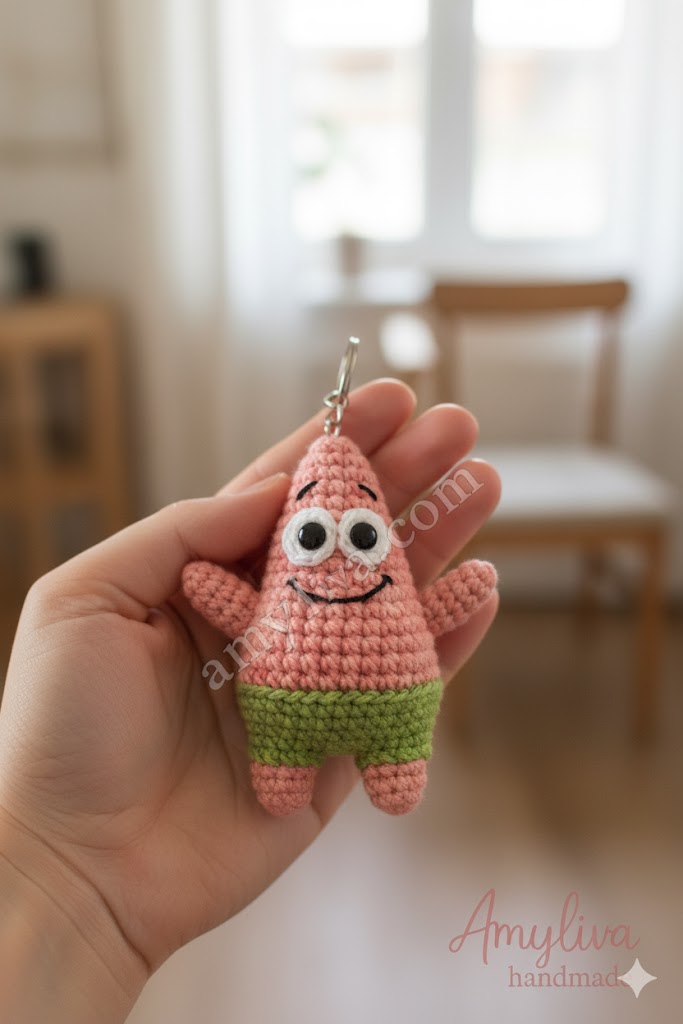
The Ultimate Free Amigurumi Patrick Star Keychain Pattern!
Introduction: Who Lives in a Pineapple Under the Sea?
Ready to bring a slice of Bikini Bottom to your everyday life? Patrick Star, SpongeBob’s lovable, goofy best friend, is a fan-favorite for a reason! His iconic pink star shape and bright green shorts make him the perfect, cheerful project for any crocheter.
This guide will walk you through creating an adorable, pocket-sized Amigurumi Patrick Star Keychain. Whether you’re a seasoned crocheter looking for a fun weekend project or a beginner ready to tackle your first character, this free pattern offers everything you need. This detailed tutorial is not just a pattern; it’s a deep dive into techniques, essential tips, and the joy of creating a handmade piece of your favorite cartoon!
Get your hooks and yarn ready—let’s make some magic!
I. Why Crochet a Patrick Star Keychain? (The SEO & Engagement Hook)
Amigurumi, the Japanese art of crocheting stuffed yarn toys, has exploded in popularity. Character keychains are particularly trendy, offering a blend of nostalgia and practicality.
- Perfect Gift: A handmade Patrick is a unique and thoughtful gift for SpongeBob SquarePants fans of all ages.
- Skill Builder: The simple, repetitive shapes of Patrick’s body and limbs are excellent for practicing essential amigurumi techniques like the Magic Ring, Invisible Decrease, and working in continuous rounds.
- Quick Project: Being a keychain, this project is relatively small, making it a quick and satisfying make that can be completed in an afternoon.
- Portable Fandom: Attach it to your keys, backpack, purse, or even use it as a charming car accessory to show off your love for the underwater world.
II. Essential Materials: What You Need to Get Started
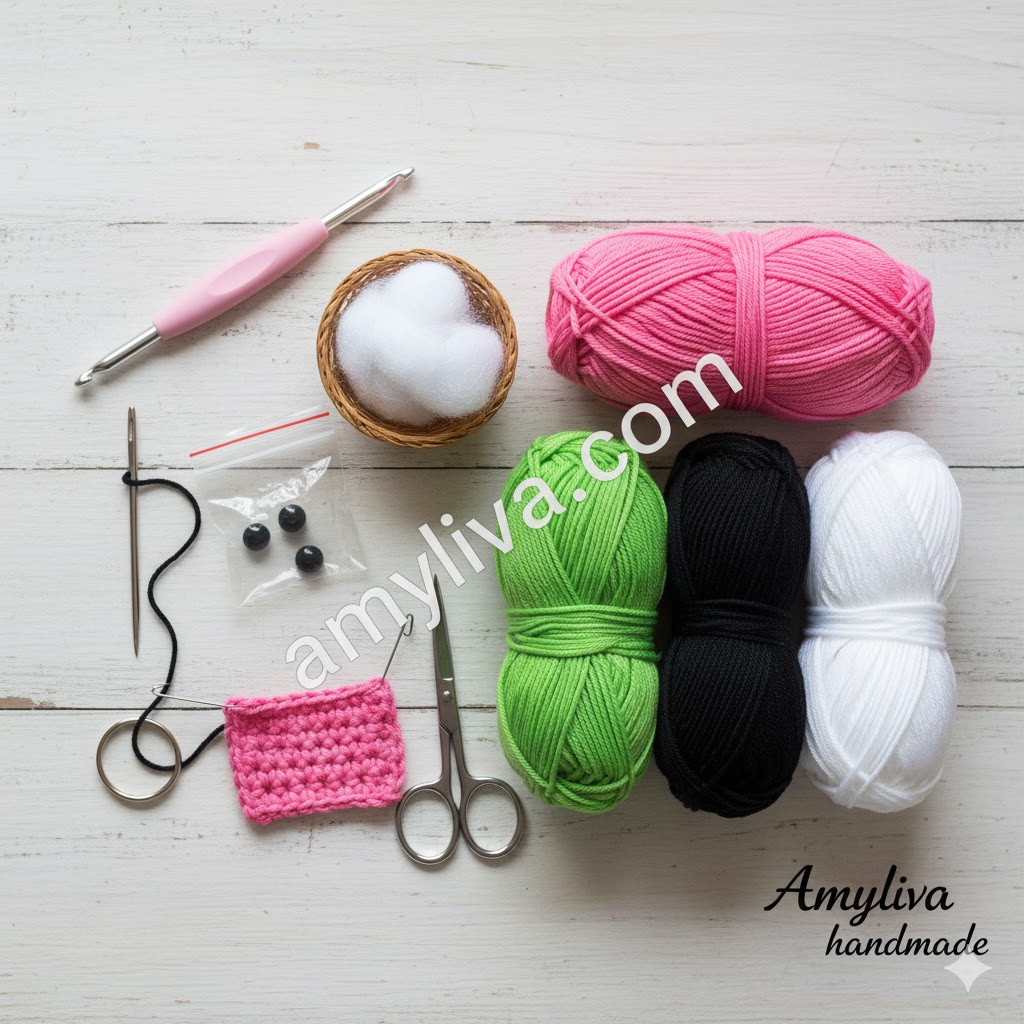
Before diving into the stitches, gather your supplies. The right materials ensure your Patrick is sturdy, well-shaped, and authentically vibrant.
| Material | Suggested Color/Type | Purpose | Pro Tip |
| Yarn | Pink, Bright Green, Black, White (Medium/Worsted Weight – #4) | Body, Shorts, Eyes, Mouth | Acrylic or Cotton yarn works best for clear stitch definition. |
| Crochet Hook | 3.0mm or 3.5mm (E/4) | For tight stitches, essential for amigurumi stuffing | Always use a hook size smaller than suggested on your yarn label! |
| Stuffing | Polyester Fiberfill | To give Patrick his plump, adorable shape | Stuff firmly and consistently for a smooth finish. |
| Eyes | 6mm or 8mm Safety Eyes | For a cartoon-accurate, secure look | Can be substituted with embroidered eyes for infants. |
| Key Ring | Standard metal keychain ring | To turn your Patrick into a functional accessory | Use a split ring for a more secure attachment. |
| Tools | Tapestry Needle, Scissors, Stitch Marker | For weaving ends, sewing pieces, and tracking rounds | A stitch marker is non-negotiable for working in rounds! |
III. Decoding the Amigurumi Language: Abbreviations
This pattern uses standard US crochet terminology. Familiarize yourself with these terms before you begin:
- MR: Magic Ring (or Magic Circle)
- st(s): Stitch(es)
- ch: Chain
- sc: Single Crochet
- inc: Increase (work 2 single crochet stitches into the same stitch)
- dec: Decrease (work 2 single crochet stitches together—use the invisible decrease (inv-sc2tog) for a smoother finish)
- sl st: Slip Stitch
- FO: Fasten Off
- BLO: Back Loop Only
- (…) x 6: Repeat the instructions in the parentheses the specified number of times.
- …: Indicates the total number of stitches you should have at the end of the round.
IV. The Free Amigurumi Patrick Star Keychain Pattern
The key to Patrick’s unique shape lies in gradually increasing and decreasing stitches to form the star body.
A. The Body (Head & Torso – Start with Pink Yarn)
We work in continuous rounds. Use a stitch marker to track the beginning of each round.
| Round (R) | Instructions | Total Stitches | Sts | Technique Focus |
| R1 | 6 sc in a MR | 6 | Magic Ring: Ensures a closed top—crucial for amigurumi. | |
| R2 | inc in each st around | 12 | Standard increase. | |
| R3 | (sc, inc) x 6 | 18 | Consistent shaping. | |
| R4 | (2 sc, inc) x 6 | 24 | Continue to build width. | |
| R5-R8 | sc in each st around | 24 | Straight Section: This forms the mid-section of Patrick’s head. (4 Rows) | |
| R9 | (2 sc, dec) x 6 | 18 | Start Shaping: Begin the gentle taper towards the bottom. | |
| R10 | sc in each st around | 18 | Straight row for height. |
- Eyes Placement: Before continuing, insert the safety eyes between R7 and R8, approximately 5 stitches apart.
- Stuffing Note: Begin stuffing the body firmly with fiberfill. Continue to stuff as you go.
B. The Shorts (Switch to Green Yarn)
This section creates the base and the transition to the legs.
| Round (R) | Instructions | Total Stitches | Sts | Technique Focus |
| R11 | (2 sc, inc) x 6 | 24 | Color Change: Switch colors and create a slight flare for the shorts. | |
| R12-R13 | sc in each st around | 24 | Straight Section: Forms the main height of the shorts. (2 Rows) | |
| R14 | (2 sc, dec) x 6 | 18 | Tapering the bottom edge. | |
| R15 | (sc, dec) x 6 | 12 | Closing the opening. | |
| R16 | dec x 6 | 6 | Final Close: Use a tapestry needle to weave the remaining tail through the front loops of the last 6 stitches and pull tight to close the hole. FO and weave in the end. |
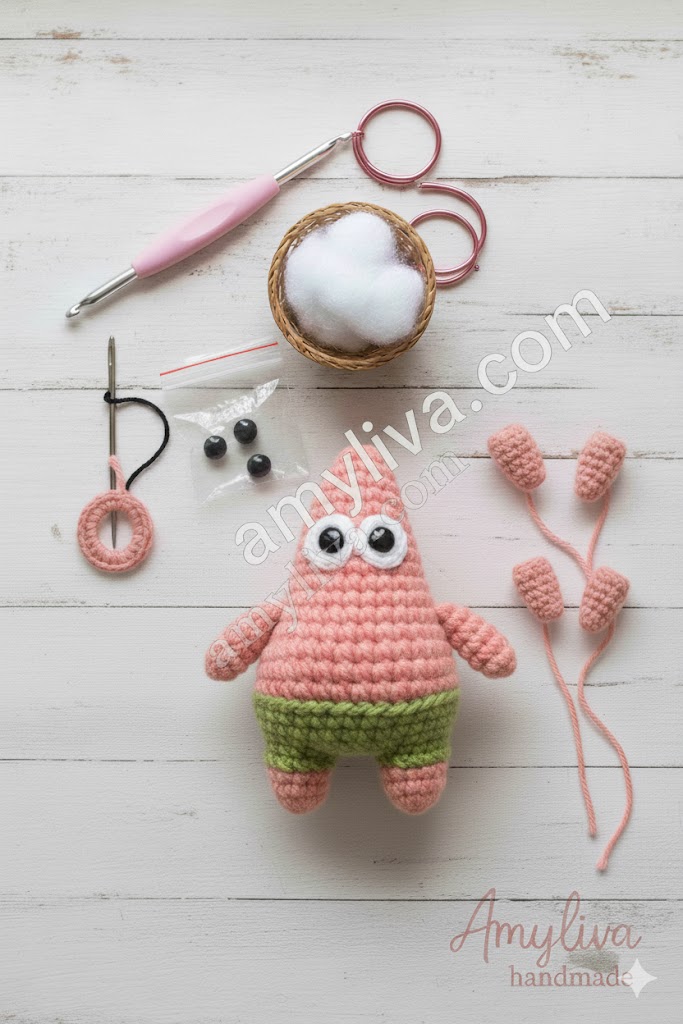
C. The Arms (Make 2 – Pink Yarn)
The arms are small and generally unstuffed or minimally stuffed.
| Round (R) | Instructions | Total Stitches | Sts | Technique Focus |
| R1 | 4 sc in a MR | 4 | Small, tight start. | |
| R2 | (sc, inc) x 2 | 6 | Gentle widening for the “hand” area. | |
| R3-R4 | sc in each st around | 6 | Straight tube shape. (2 Rows) |
- FO and leave a long tail for sewing. Do not stuff.
D. The Legs (Make 2 – Pink Yarn)
The legs are slightly larger and should be lightly stuffed.
| Round (R) | Instructions | Total Stitches | Sts | Technique Focus |
| R1 | 6 sc in a MR | 6 | Standard starting point. | |
| R2 | (sc, inc) x 3 | 9 | Creates a wider foot base. | |
| R3-R4 | sc in each st around | 9 | Straight tube shape. (2 Rows) |
- FO and leave a long tail for sewing. Stuff lightly for shape retention.
V. Finishing Touches: Assembly and Detailing
This is where your crocheted pieces transform into Patrick Star! A neat finish elevates your work.
- Sewing the Limbs: Using the long tails left on the Arms and Legs, carefully attach them to the main body using your tapestry needle.
- Arms: Attach the arms just below the R8—where the pink section starts to taper.
- Legs: Attach the legs evenly spaced on the bottom edge of the Green Shorts (around R13-R14).
- Facial Features (The Signature Smile):
- Mouth: Using black yarn, embroider Patrick’s wide, characteristic smile. A simple arch spanning across the stitches below the eyes works perfectly. You can stitch a wide “W” shape for a more cartoon-accurate look.
- Eyebrows: Add two small arches above the eyes with black yarn for that classic goofy expression.
- The Keychain Attachment: Securely thread a small piece of matching pink yarn or the keychain ring itself through the top center stitch of the body (R1). Ensure the attachment is robust enough to handle daily wear and tear.
VI. SEO Optimization & Advanced Amigurumi Tips
To make this blog post rank highly and help you master the craft, here are some essential tips:
Advanced Amigurumi Techniques to Master
- The Invisible Decrease (Inv-Dec): This technique, where you insert the hook through the front loop only of the next two stitches, is crucial for seamless shaping, especially on small characters like Patrick.
- Color Changes: When switching from Pink to Green, use the new color on the last yarn over of the final stitch of the previous color. This creates a clean transition.
- Stitch Tension: Maintain consistent, tight tension. Loose stitches will result in holes where the stuffing can poke through (the dreaded “stuffing peek”). If your tension is naturally loose, consider dropping down half a hook size.
Troubleshooting Common Amigurumi Issues
| Problem | Cause | Solution |
| The “Stuffing Peek” | Loose tension or thin yarn. | Use a smaller hook size; ensure stuffing is evenly distributed but not overstuffed. |
| The “Pointy Top” | Pulling the Magic Ring too tightly, or uneven starting stitches. | Practice the Magic Ring slowly; ensure you have exactly 6 stitches in R1. |
| Wobbly Head/Limb | Poor sewing technique. | Sew through the body of the fabric, not just the loops; pull stitches tight and make sure the limb sits flush before securing. |
The Role of a Stitch Marker
Since we work in continuous spirals, it’s vital to know where a round begins and ends. Always place the marker in the last stitch of the round and move it up on the last stitch of the next round. This prevents mistakes in counting and ensures your increases/decreases are placed correctly for the symmetrical star shape.
VII. Frequently Asked Questions (FAQ) – SEO Booster
Here we address common queries that users search for online, establishing this post as a definitive resource.
Q1: Can a beginner crochet this Patrick Star keychain?
A: Absolutely! This pattern primarily uses single crochet (sc), increases (inc), and decreases (dec). As long as you can manage a Magic Ring and a single crochet, you can complete this project. It’s an ideal project for practicing basic Amigurumi shaping.
Q2: What is the best yarn for a small keychain amigurumi?
A: Sport weight (#2) or light worsted weight (#3) yarn is highly recommended. These thinner yarns will produce a smaller, more detailed keychain size, which is practical for carrying. If you want a plushie, use worsted weight (#4) yarn.
Q3: How do I make the color change from pink to green seamless?
A: To switch from pink (R10) to green (R11):
- Work the last single crochet of R10 until you have two loops on the hook (using the pink yarn).
- Drop the pink yarn, pick up the green yarn, and yarn over with the green yarn, pulling through the last two loops on the hook.
- Continue R11 with the green yarn. This technique ensures the new color starts perfectly on the new round.
Q4: How do I attach the key ring securely?
A: You have two main options:
- Direct Attachment: Use pliers to open a jump ring and thread it through the top center stitch of the head (R1).
- Yarn Loop: Create a small 5-chain loop with pink yarn and sew it securely to the top of the head. Attach the key ring to this loop.
Q5: Can I make this a ‘No Sew’ pattern?
A: While the body is worked in one piece, the arms and legs must be attached separately, requiring a tapestry needle and some sewing. However, some patterns exist where the limbs are crocheted directly onto the body, so look for “No-Sew Patrick Star” patterns if sewing is a major obstacle.
Conclusion: Your New Nautical Pal
Congratulations! You’ve navigated the depths of Amigurumi and created your very own Patrick Star Keychain. This little pink starfish is more than just a craft; he’s a testament to your growing crochet skills and a fun, quirky addition to your daily essentials.
Don’t forget to share your finished Patrick with the online community! Tag us and show off your hard work. Happy crocheting!
Yorum gönder