Step by Step Amigurumi
amigurumi, amigurumi designs, AmyLiva Handmade, beginner crochet, cat cactus, craft ideas, crochet, Crochet Pattern, crochet project, crochet tutorial, cute crochet, DIY amigurumi, DIY crochet, DIY home decor, free crochet pattern, handmade gift, HandmadeWithLove, home decor, mini cactus, soft baby doll, storytelling amigurumi, Yarn Crafts
admin
0 Yorumlar
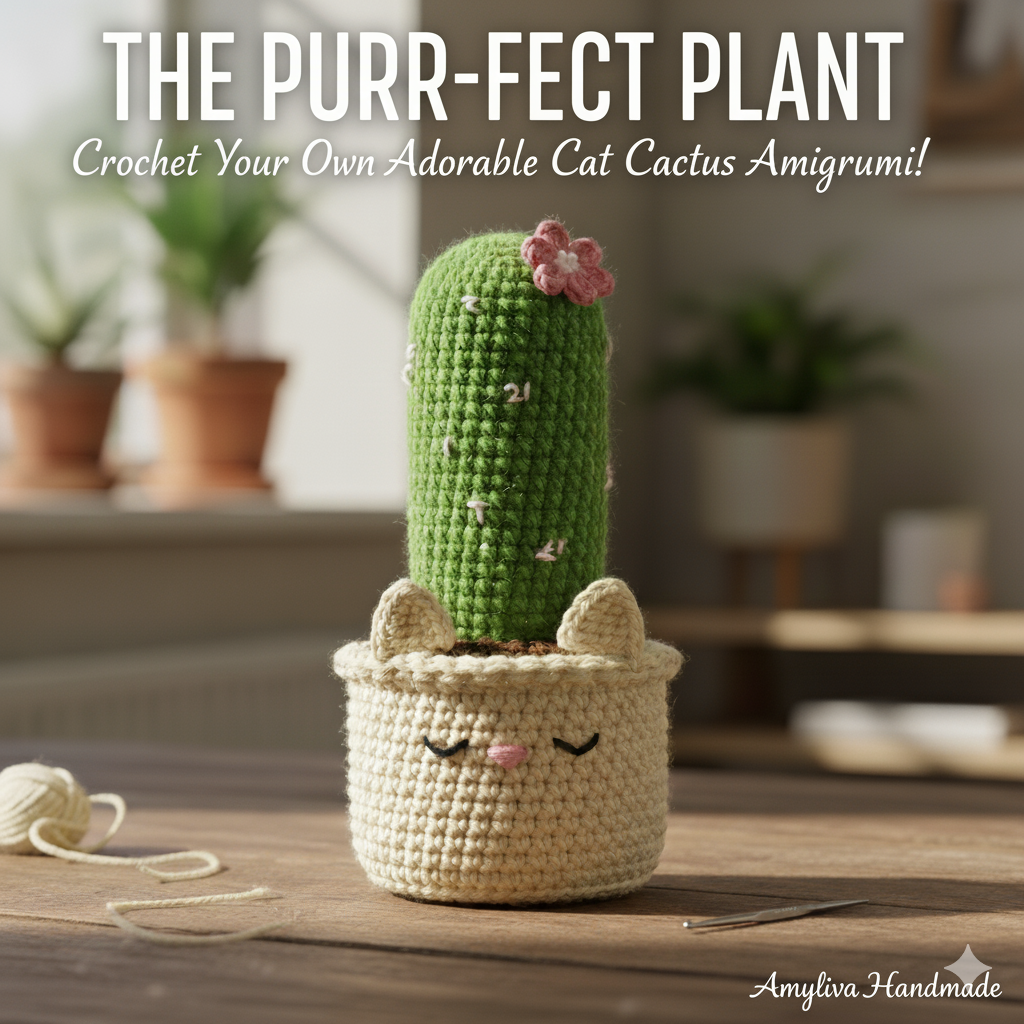
How to Crochet a Cat Cactus: Beginner-Friendly Amigurumi Pattern!
Are you a cat lover? A plant enthusiast? Why not be both without the worry of watering? If you’re just starting out, check out our guide: Easy Amigurumi Patterns for Beginners.
This beginner-friendly amigurumi pattern is your perfect solution, combining the best of both worlds: a cute, grumpy cat pot and a simple, textured cactus that requires zero maintenance. This project transforms simple yarn into a beloved piece of DIY home decor that makes an excellent, heartfelt crochet gift.
This easy crochet project is ideal for beginners looking to move confidently beyond simple squares and master core amigurumi techniques. Throughout this tutorial, you’ll learn how to work in continuous rounds, create fantastic texture using half double crochet, and utilize essential stitches like the back loop only (BLO) and front loop only (FLO) to achieve professional-looking shaping.
Getting Organized: Your Amigurumi Supply Checklist
Before starting this fun journey into crochet creation, gathering your materials is essential. This detailed list will ensure you are prepared for every step of the pattern.
Yarn Requirements
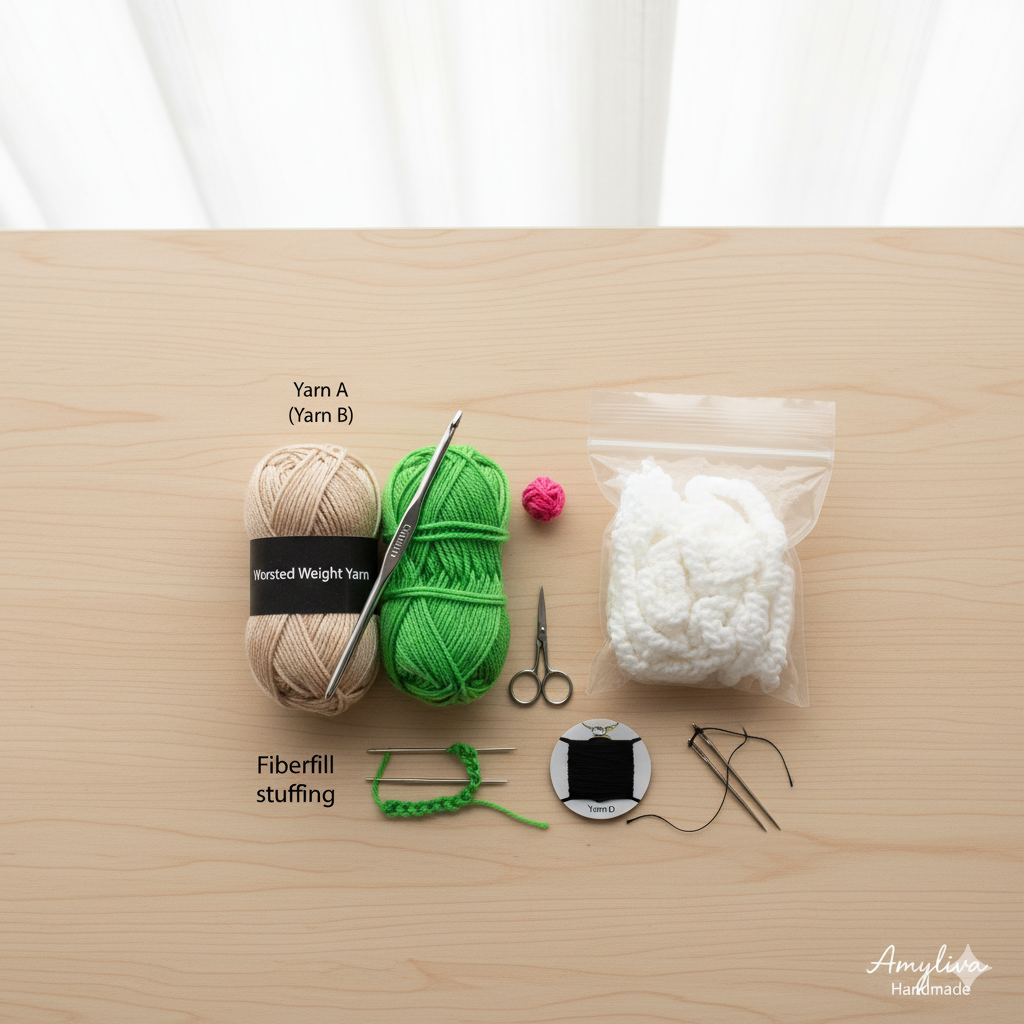
This project uses four different yarn colors, each serving a specific structural or decorative purpose:
• Yarn A (The Pot Color): Choose a neutral shade such as beige, cream, or light brown. For the best structural result, we strongly recommend using a Worsted Weight (Category 4) or DK Weight (Category 3) yarn. This weight provides the necessary thickness and firmness to ensure the pot holds its shape.
• Yarn B (The Cactus Color): You will need a vibrant bright green yarn. It is important to use a yarn of the same weight category as Yarn A (Worsted or DK) to maintain consistent sizing between the two main pieces.
• Yarn C (The Flower Color): Only small scraps of yarn are required for this piece, perfect for using up leftovers in pink, yellow, or red.
• Yarn D (The Face Detail): A small amount of black embroidery floss is needed for stitching the sleepy eyes and nose, which brings your cat pot to life.
Tool and Notion Essentials
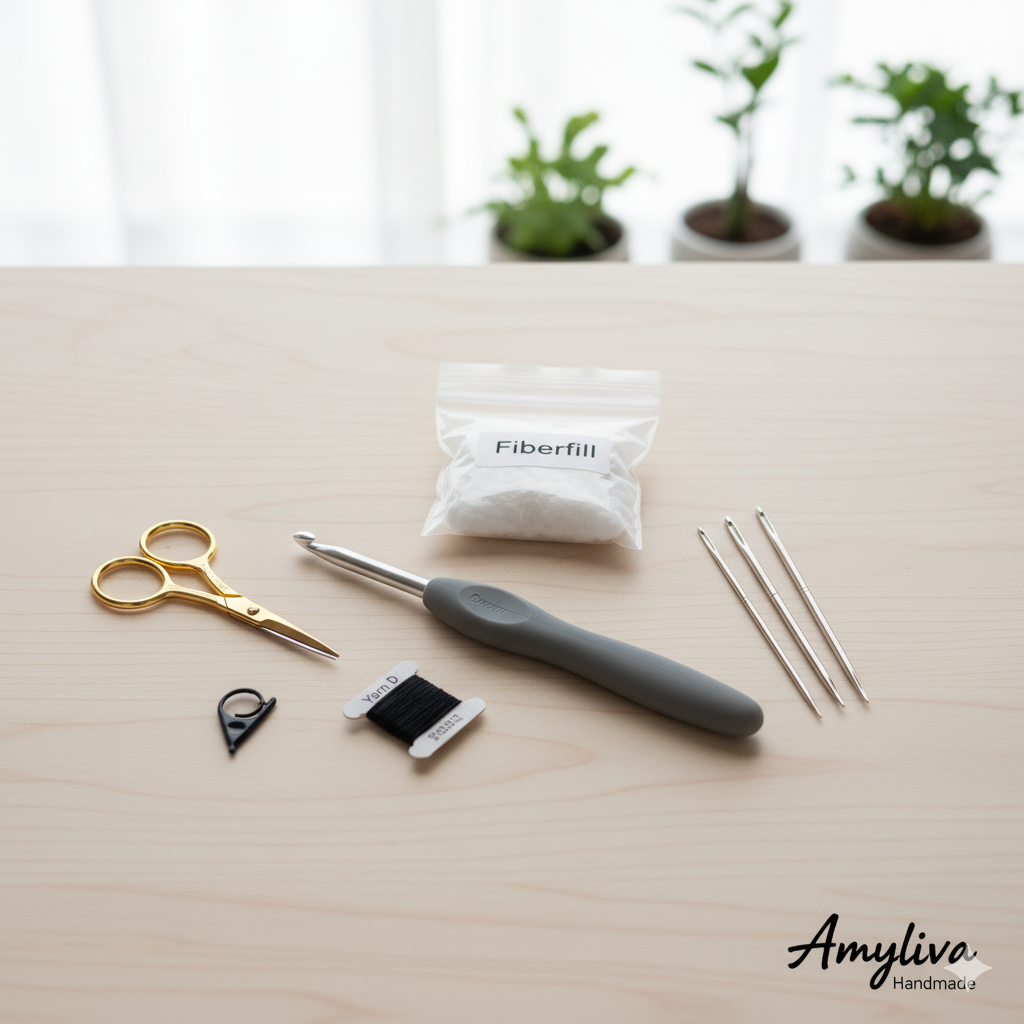
Proper tools are just as important as the yarn for successful amigurumi work:
• Crochet Hook: We suggest a 3.0 mm or 3.5 mm hook. Always choose a size smaller than what your yarn label recommends. This is a critical tip for amigurumi, as it creates the tight stitches necessary to prevent the white Fiberfill from showing through your finished piece.
• Stuffing: Fiberfill is required to firmly stuff the cactus body and lightly fill the base of the pot.
• Stitch Marker: A Stitch Marker is essential for marking the first stitch of every round, as we will be crocheting in a continuous spiral. Do not skip this!
• Assembly Tools: You will need a Yarn Needle (or tapestry needle) for sewing the separate pieces together and safely weaving in all your ends, along with a sharp pair of Scissors.
Decoding the Language: Essential Amigurumi Abbreviations
The pattern uses standard US crochet terms:
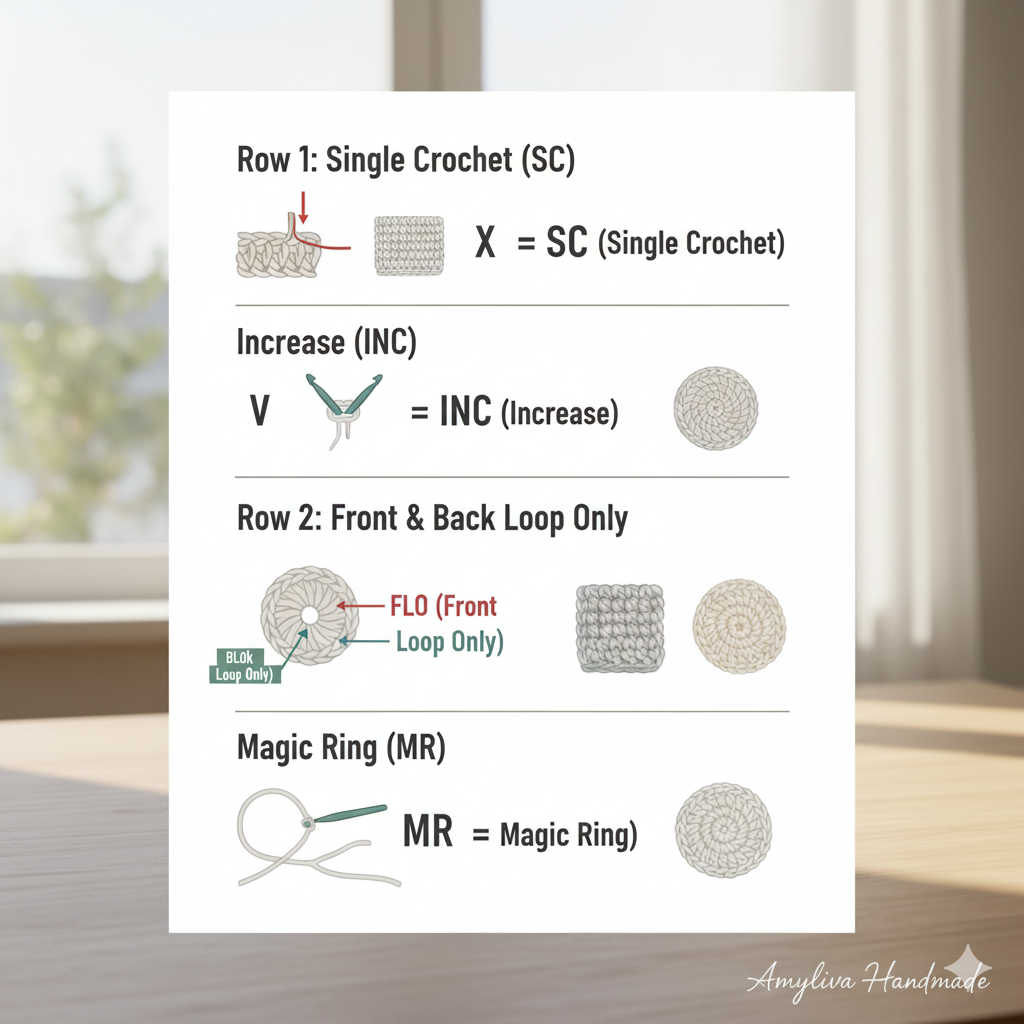
• ch (chain)
• sc (single crochet)
• inc (increase: 2 sc in one st)
• hdc (half double crochet)
• dc inc (double crochet increase: 2 dc in one st)
• sl st (slip stitch)
• MR (Magic Ring/Magic Circle)
• BLO (back loop only)
• FLO (front loop only)
• A sequence like (sc, inc) x 8 means you repeat the instruction eight times.
Part 3: The Detailed Crochet Pattern Tutorial
We will construct your creation piece by piece. Work in continuous rounds and use your stitch marker diligently.
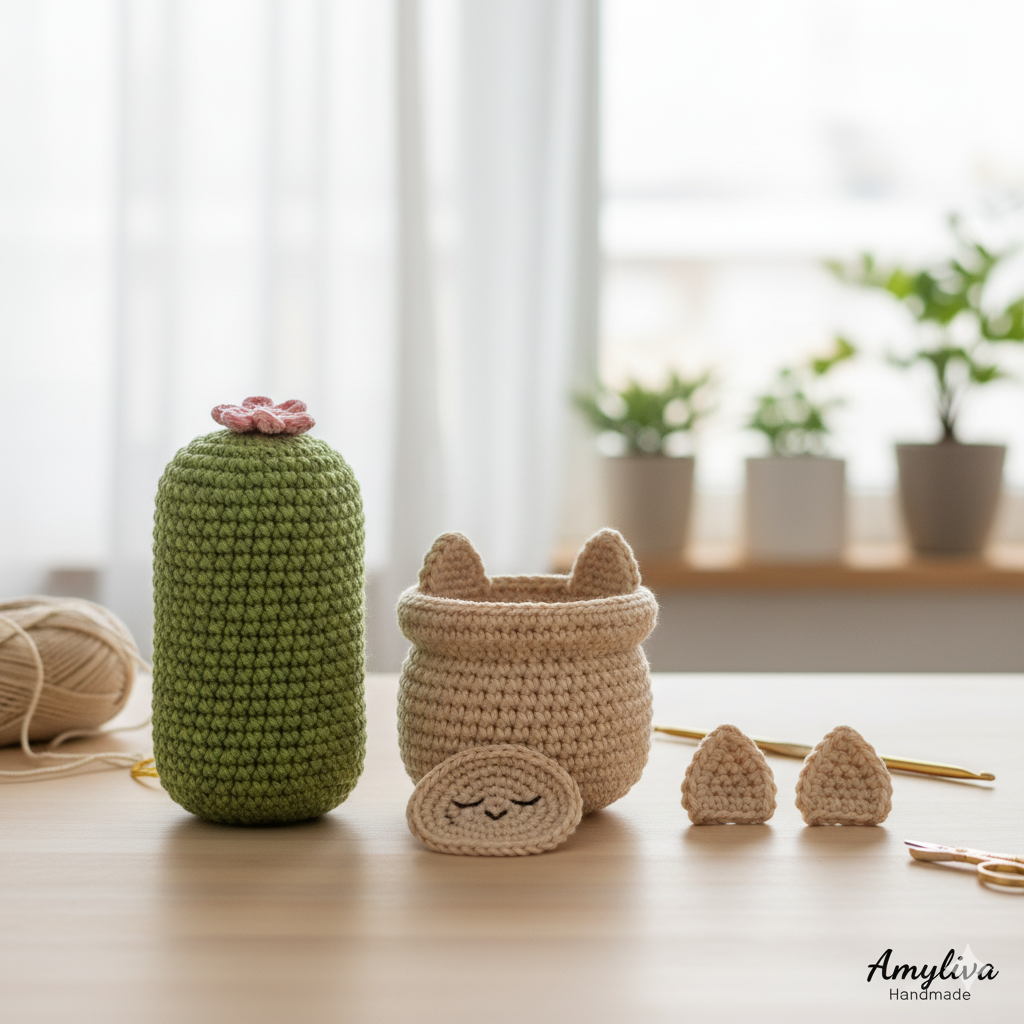
A. The Cactus Body (Makes 1)
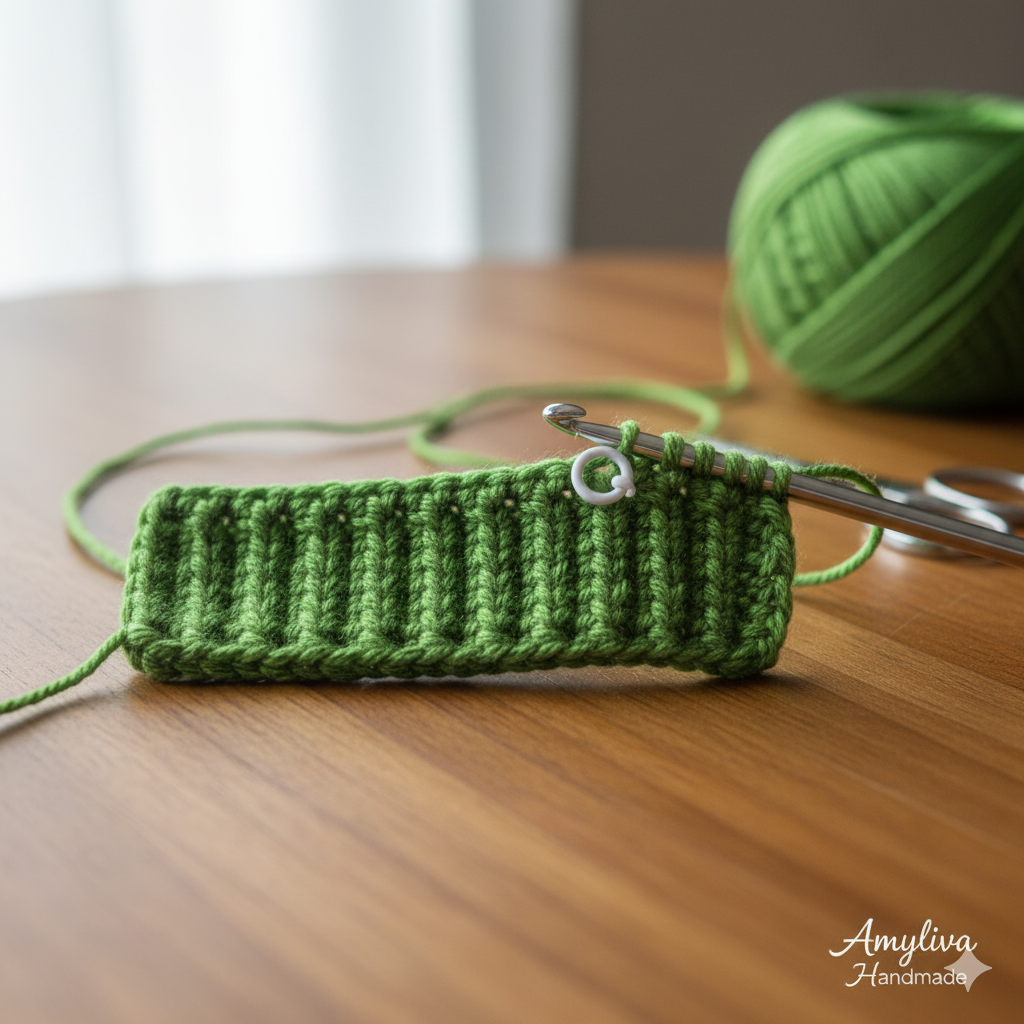
The cactus is crocheted in rows to form a flat, ribbed strip, which is later sewn into a cylinder. The use of a mix of stitches creates a slight taper, and the BLO work creates the signature texture.
Start with your Green Yarn (Yarn B) and chain 19.
• Row 1: Starting in the 2nd chain from the hook, work 2 sl st (in the first two chains), 1 sc, 1 hdc, then 12 hdc, 1 sc, and finish with 2 sl st (in the last two chains). (Total 18 sts).
• Row 2: ch 1 and turn. Work the entire row in the Back Loop Only (BLO): 2 sl st, 1 sc, 1 hdc, 12 hdc, 1 sc, and 2 sl st (18 sts total).
• Pro Tip: Working in BLO on this piece ensures the front loop remains visible, creating the realistic vertical ribbed texture.
• Rows 3-22: Repeat Row 2 for a total of 22 textured rows.
• Finishing: Cut the yarn, leaving a long tail (about 12 inches) for sewing.
Assembly Prep: Fold the strip lengthwise so the short edges meet. Use the long tail and your yarn needle to sew these edges together. Stuff the tube firmly with Fiberfill to create a dense, straight cylinder. Set aside.
B. The Cat Pot (Makes 1)
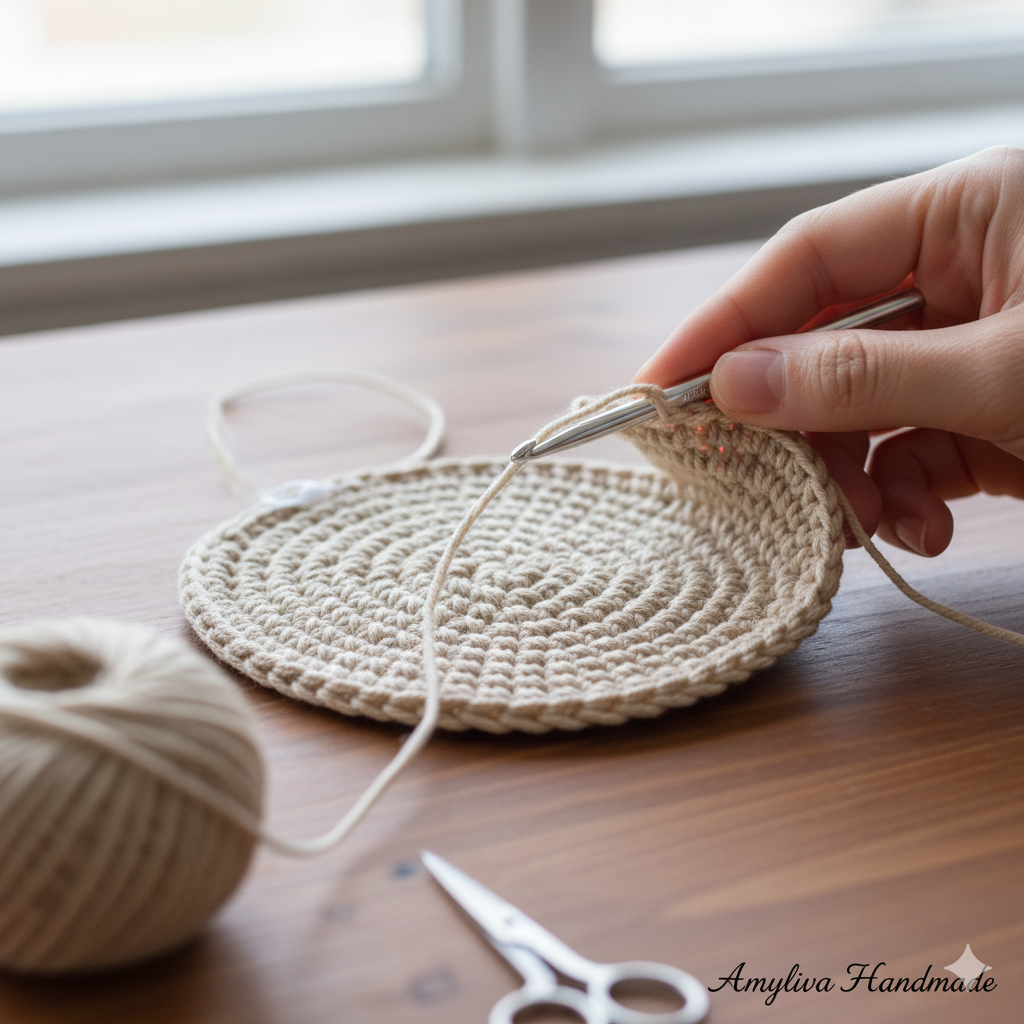
The pot is crocheted in continuous rounds (a spiral). Pay close attention to the FLO and BLO instructions for shaping the base and rim.
Use your Beige Yarn (Yarn A).
• R1 (Base): Work 8 sc into a Magic Ring (MR) (8 sts).
• R2: 8 inc (increase in every stitch) (16 sts).
• R3: (sc, inc) x 8 (24 sts).
• R4: (sc, inc, sc) x 8 (32 sts).
• R5 (Final Base Size): (3 sc, inc) x 8 (40 sts).
• R6 (Side Wall Start): Work 40 sc in the Front Loop Only (FLO).
• Detail: This FLO round forces the work to turn upward, cleanly defining the transition from the flat base to the pot’s side.
• R7-12 (Height): Work 40 sc straight (6 rounds) (40 sts).
• R13 (Rim Detail): Work 40 sc in the Back Loop Only (BLO).
• Detail: This BLO round creates a small ridge on the exterior of the pot, adding texture before the fold.
• R14 (Rim Fold): Work 40 sc in the Front Loop Only (FLO).
• Detail: This FLO round creates the final line where the pot’s rim will naturally fold. Fasten off and weave in the end securely.
C. The Flower (Makes 1 )
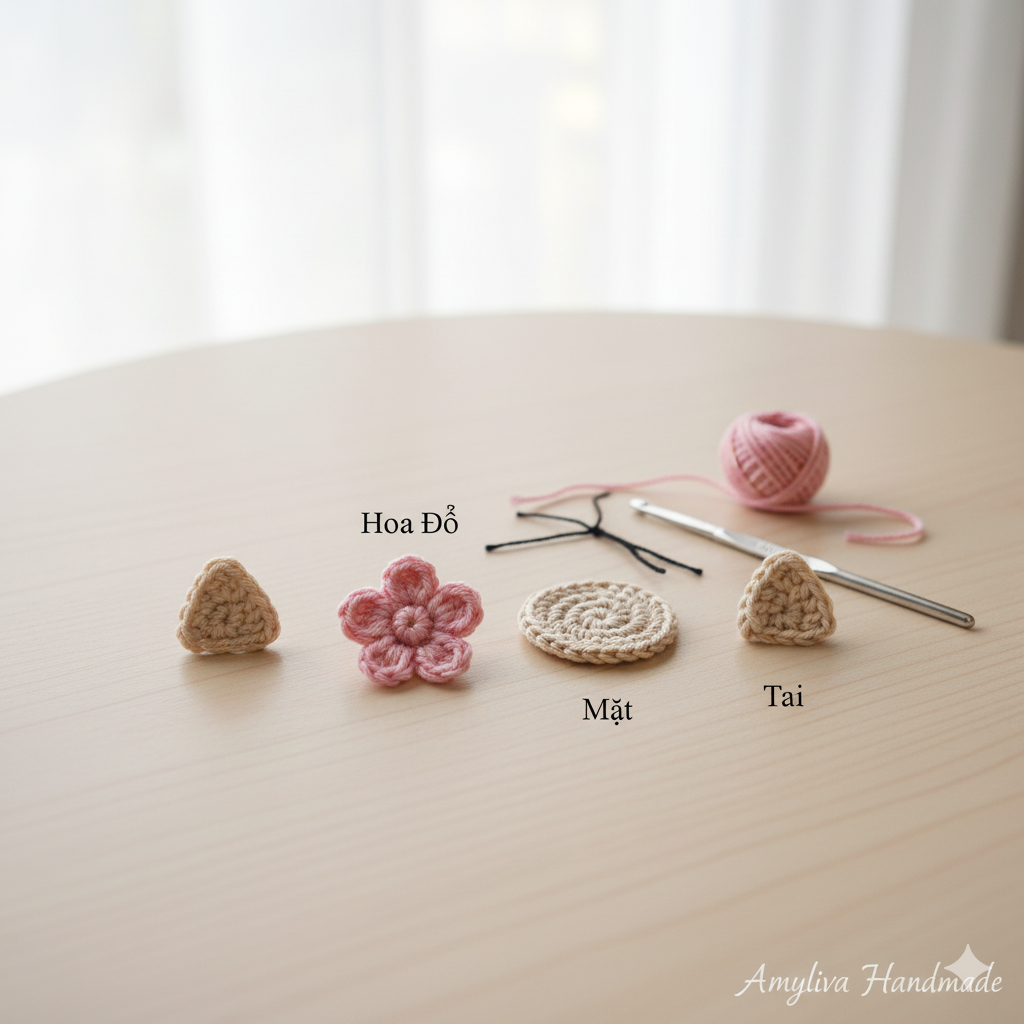
This piece creates the flower detail for the cactus top.
Use your Pink Yarn (Yarn C).
• R1 (Center): Work 6 sc into a Magic Ring (MR). Join with a sl st (6 sts).
• R2 (Petals): Work the following sequence into each of the 6 stitches: (ch 2, dc inc, ch 2, sl st in the same stitch). Repeat this sequence 5 times to create 5 full petals. (Note: The original pattern implies 5 repetitions, leaving the 6th stitch for joining or finishing).
• Detail: The double crochet increase (dc inc) makes the petal pop and adds volume.
• Fasten off and leave a long tail for sewing.
D. The Face Base (Makes 1)
This small circle provides a neat base for embroidering the facial features.
Use your Beige Yarn (Yarn A).
• R1 (MR): 6 sc inside (6 sts).
• R2: 6 inc (increase in every stitch) (12 sts).
• Fasten off, leave a tail for sewing.
E. The Ear (Makes 2)
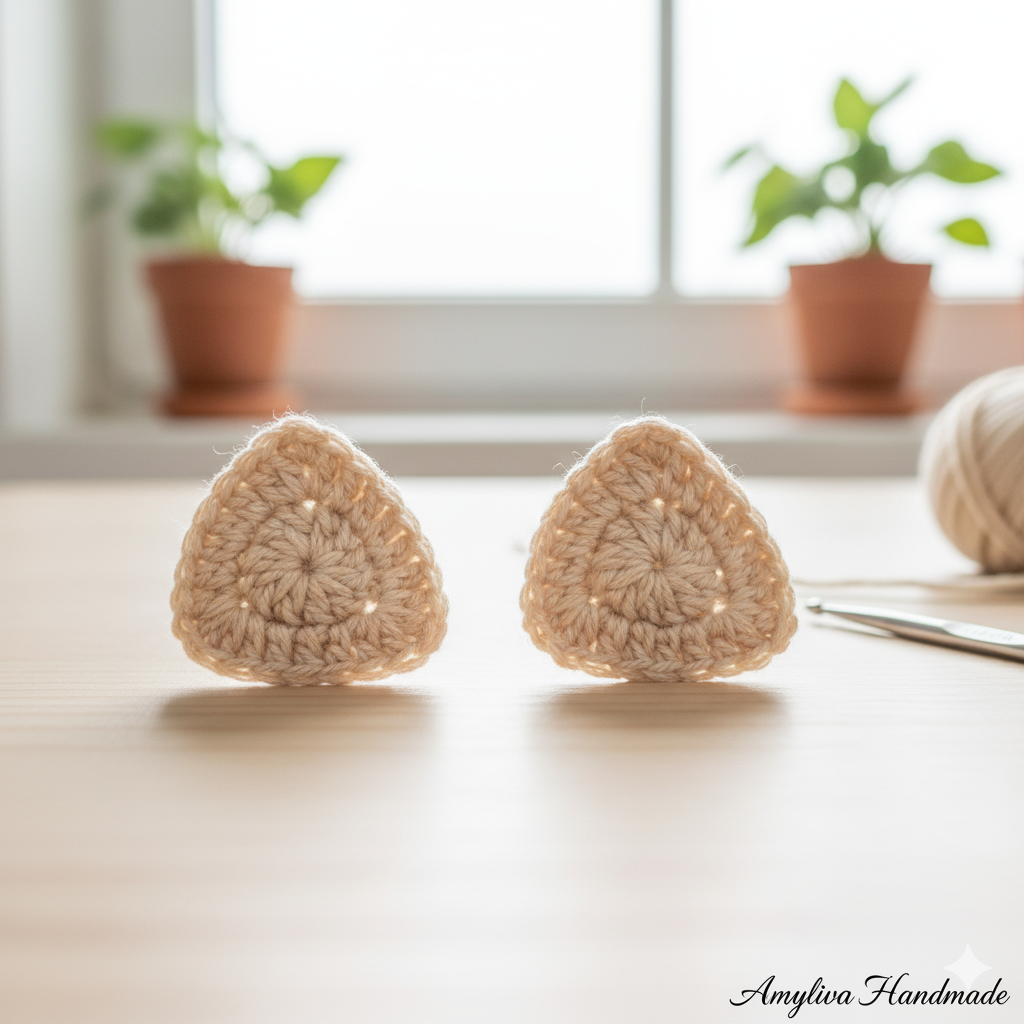
These triangular pieces form the cat ears.
Use your Beige Yarn (Yarn A).
• Chain 3. Starting in the 2nd chain from the hook, work 1 sc, then 1 dc.
• Fasten off, leaving a long tail for sewing.
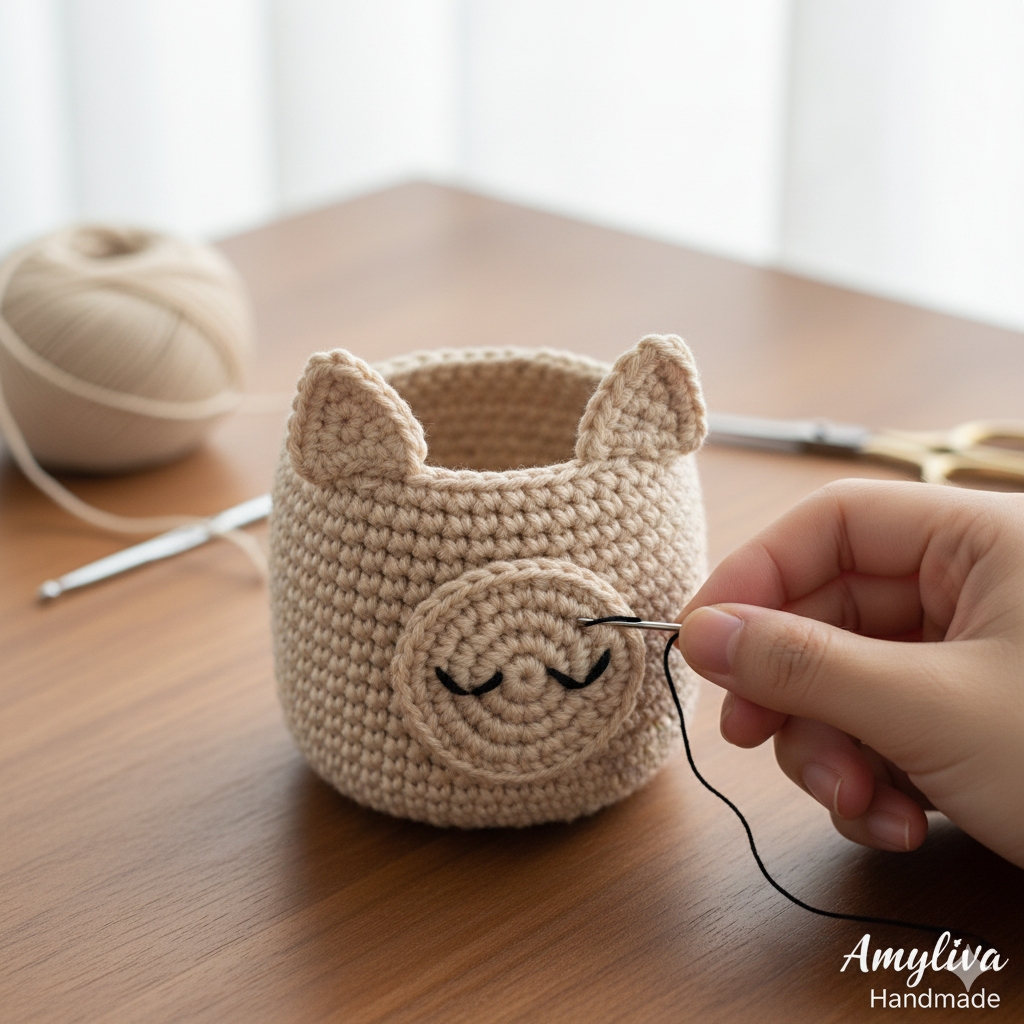
Part 4: Final Assembly & Finishing Touches
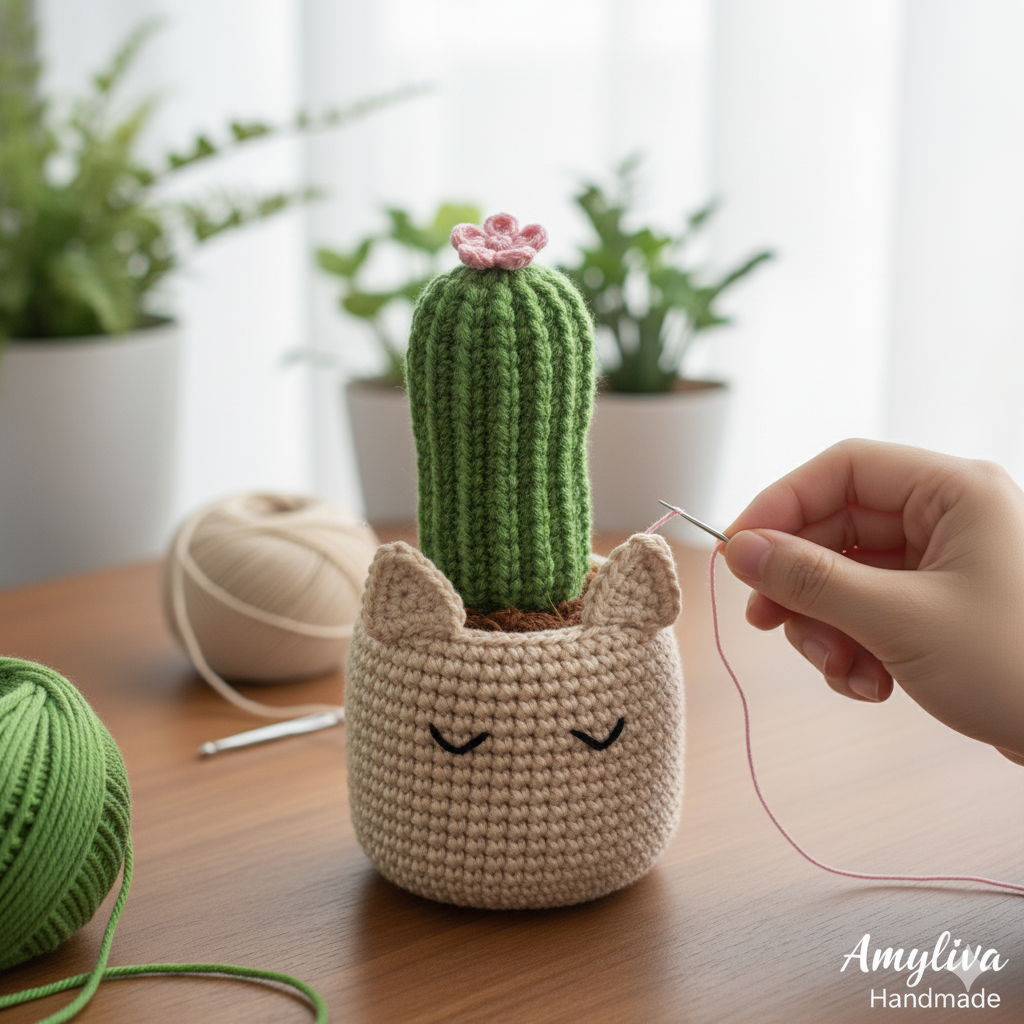
The assembly process brings your pieces together into the final adorable Cat Cactus Amigurumi.
Step-by-Step Assembly:
1. Prepare the Pot: Lightly stuff the area between the base and the rim of the Cat Pot.
2. Attach the Face and Ears: Sew the Face Base centrally onto the front of the pot (between R8 and R11). Use black embroidery floss to embroider two small, closed eyes and a tiny nose/mouth. Next, sew the two Ears firmly to the top rim of the pot, spaced evenly above the face.
3. Insert the Cactus: Place your stuffed Cactus Body into the pot. Use the long tail and yarn needle to sew the base of the cactus securely to the pot’s opening. This step is vital for stability.
4. Attach the Flower: Sew the small Flower onto the top center of the Cactus Body.
Amigurumi Pro Tips & Best Practices
• Stuffing Uniformity: Stuff your pieces firmly and evenly using small handfuls of fiberfill. The cactus needs to be very dense to stand straight and maintain its shape.
• Invisible Finishing: When closing the cactus tube, use an invisible seam technique (like the whipstitch through the back loops) to keep the vertical texture consistent.
• Yarn Recommendation: Using cotton or acrylic yarn is recommended for amigurumi as they hold stitch definition well and provide structure.
• Design Customization: Feel free to change the face! You can use safety eyes instead of embroidery, or stitch a little ‘V’ mouth for a happy cat look. [Internal Link: “10 Ways to Personalize Amigurumi Faces”].
• Finding Supplies: For all your materials, check out major craft stores or online yarn suppliers. [External Link: “The Best Yarns for Crochet Toys”].
Frequently Asked Questions (FAQ)
Q1: What stitch creates the ribbed texture on the cactus?
The distinct ribbed look is created by working every row of the cactus body in the Back Loop Only (BLO). This pushes the unworked front loop forward, creating a raised ridge for a realistic cactus texture.
Q2: Why are there two different rows using FLO and BLO on the Cat Pot?
The use of FLO on Round 6 creates the sharp horizontal fold where the base transitions into the side walls. The combination of BLO on Round 13 and FLO on Round 14 creates a subtle, layered rim effect that makes the top of the pot look clean.
Q3: I’m a total beginner. Is this pattern too hard?
This pattern is a perfect challenge for an advanced beginner. It requires mastery of the Magic Ring and single crochet but introduces new, easy techniques like BLO/FLO and hdc. If you can handle an increase (inc), you can definitely handle this project!
Q4: How should I care for my finished Cat Cactus?
Care Warning: Do not machine wash! Amigurumi pieces can lose their shape and firmness. Spot clean with a damp cloth and mild soap.
👉 Full guide here: How to Wash Crochet Toys Safely.
Conclusion
This Cat Cactus Amigurumi is more than just a decoration; it’s a testament to your growing crochet skills and a charming piece of handmade joy. Whether you keep it for yourself or give it as a cute crochet gift, it’s a project you’ll be proud of.
This Cat Cactus Amigurumi is more than just décor—it’s a fun project to show off your crochet skills.
👉 Looking for your next project? Try our:
- Mini Amigurumi Bunny Pattern 🐰
- Mini Amigurumi Strawberry Keychain 🍓
- Amigurumi Mushroom Keychain Pattern 🍄
- Cozy Crochet Cat Bag 🐱
Happy hooking! If you enjoyed this, be sure to check out our other beginner crochet projects!

Yorum gönder