TUTORIALS AND TIPS
#AmigurumiForBeginners, #CrochetCarPattern, #CrochetGiftIdeas, #CuteKeychainDIY, #FreeAmigurumiPattern, #HandmadeKeychain, #KawaiiCrochet, #KeychainPatternFree, #MiniCarAmigurumi, #MiniCarCrochet, #RedCarAmigurumi, #SmallAmigurumiProjects, #ToyCarAmigurumi, AmigurumiKeychain, AmyLivaHandmade
admin
1 Yorumlar
How to Crochet a Mini Car Keychain – Free Amigurumi Pattern & Tutorial
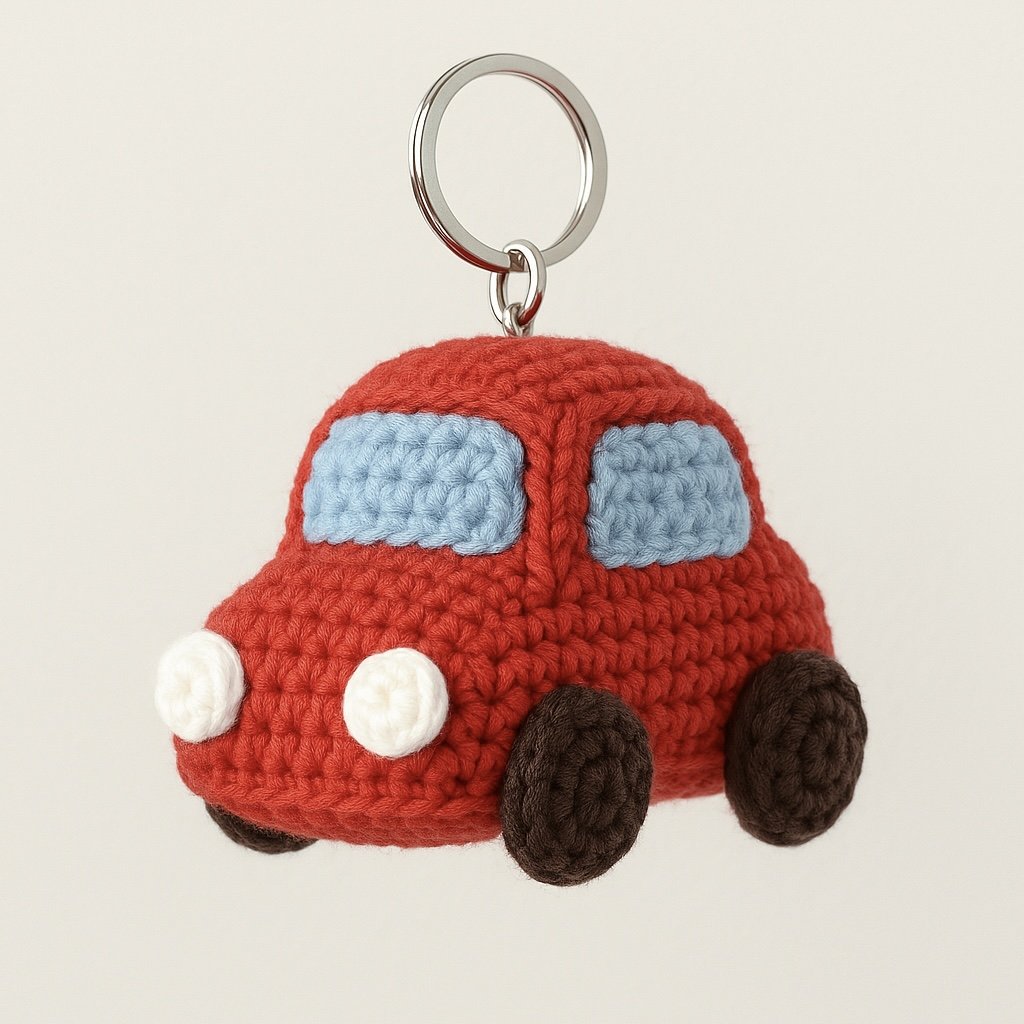
This free mini car amigurumi keychain pattern is perfect for crochet beginners.

Looking for a cute and quick amigurumi project? This mini crochet car keychain is an easy, beginner-friendly design that’s perfect for gifts, handmade markets, or just for fun. In this free tutorial, you’ll find all the steps, materials, and tips you need to make your own adorable mini car keychain. Let’s dive in!
Materials You’ll Need:
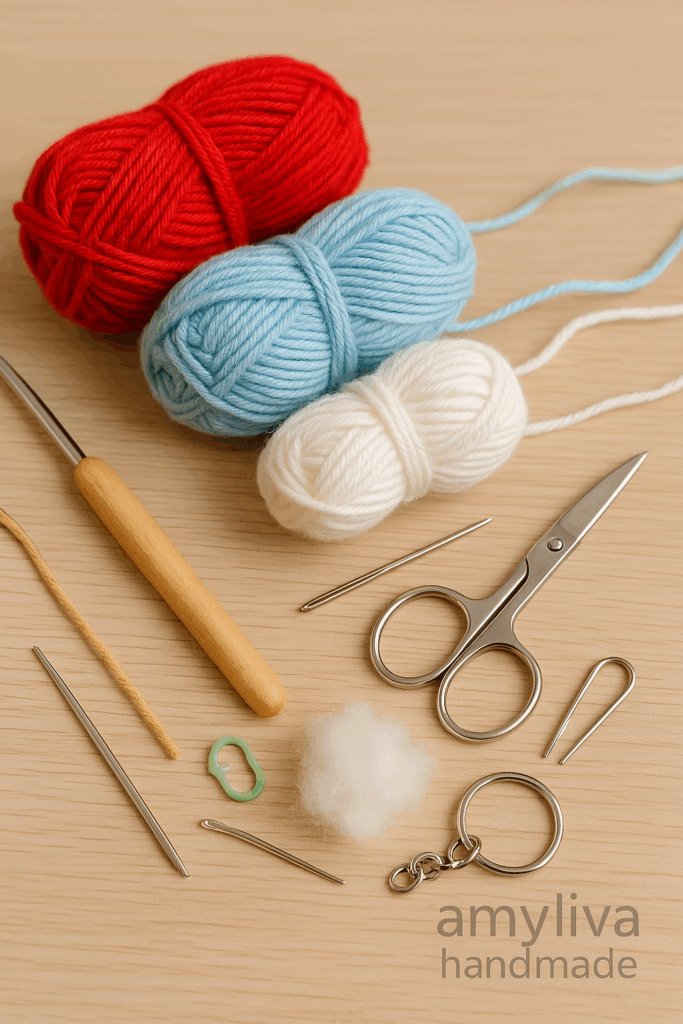
“Materials needed for crocheting a mini car keychain – high-quality cotton yarn, 2.5mm crochet hook, stuffing fiber, scissors, and a sewing needle. Perfect for beginners and handmade gift lovers!” 🚗
Yarn:
Red (Body – cotton, DK weight)
Sky Blue (Windows)
White (Headlights)
Dark Brown or Black (Wheels)
Hook: 2.0 mm or 2.5 mm crochet hook
Stuffing: Polyester fiberfill
Yarn needle & scissors
Stitch marker (optional)
Keychain ring & jump ring
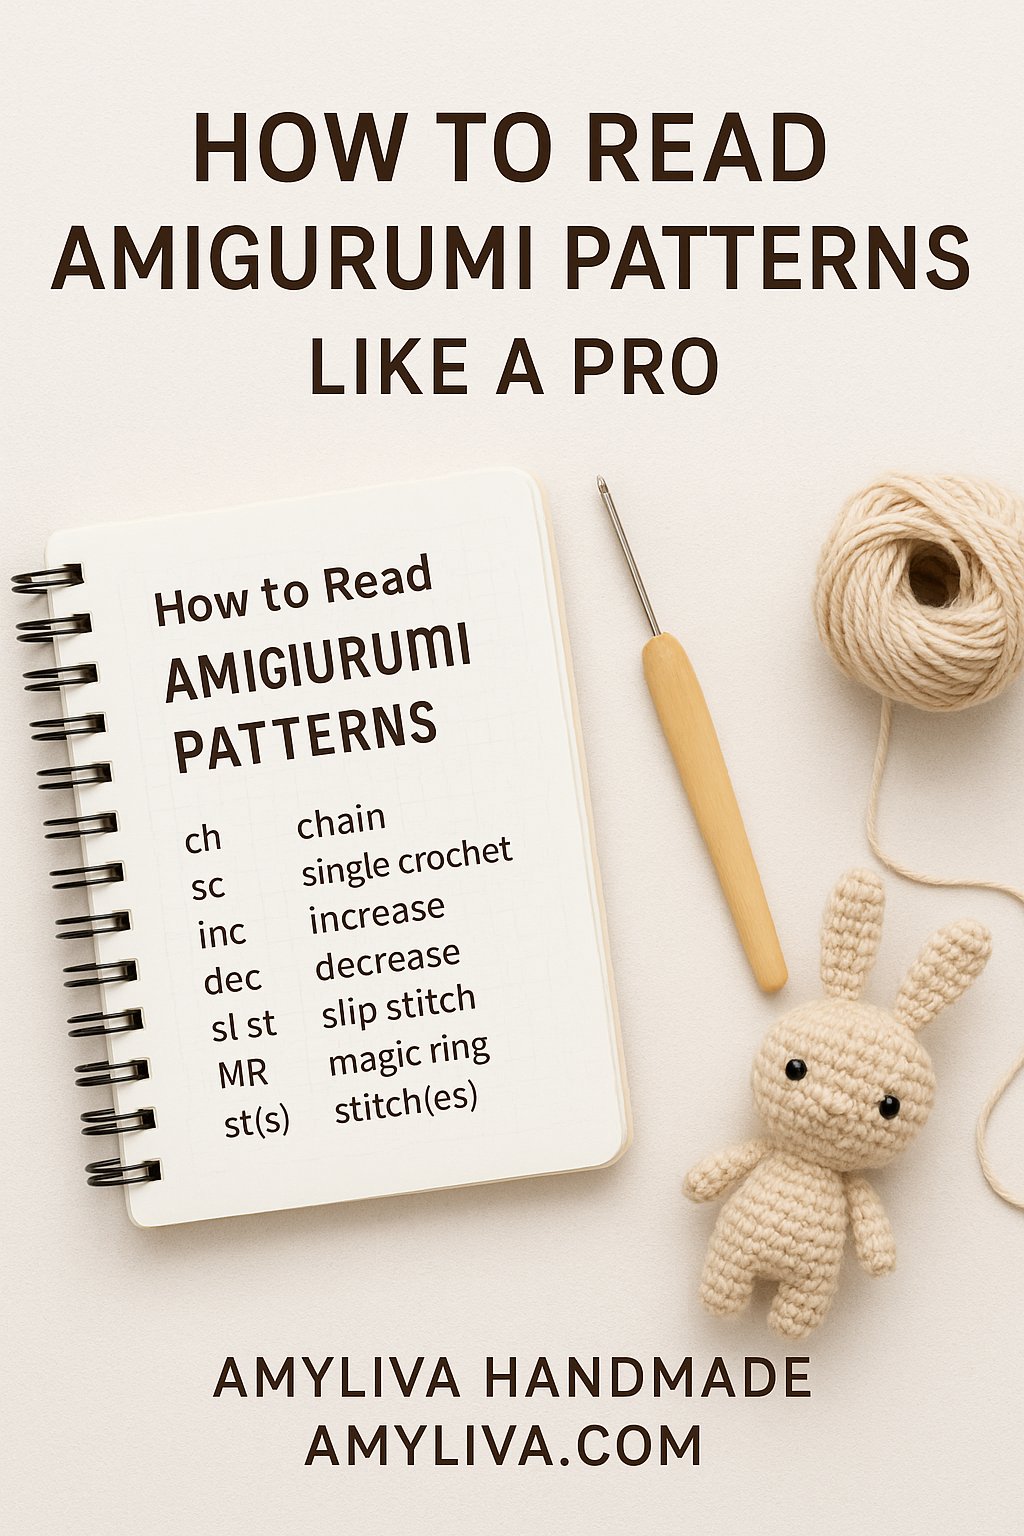
Abbreviations (US Terms):
MR: Magic Ring
sc: single crochet
inc: increase (2 sc in same st)
dec: decrease (sc 2 together)
ch: chain
sl st: slip stitch
st(s): stitch(es)
Pattern Instructions:
Car Body (Red):

“Crochet a mini car keychain – handcrafted with premium cotton yarn for durability and style. Perfect for car enthusiasts, handmade gift lovers, and DIY crafters!” 🚗
- Round 1: 6 sc in MR (6)
- Round 2: inc around (12)
- Round 3: (1 sc, inc) x 6 (18)
- Round 4: (2 sc, inc) x 6 (24)
5–10: sc around (24) - (2 sc, dec) x 6 (18)
- (1 sc, dec) x 6 (12)
- dec around (6), fasten off.
Stuff lightly before closing.
Windows (Sky Blue, Make 2):
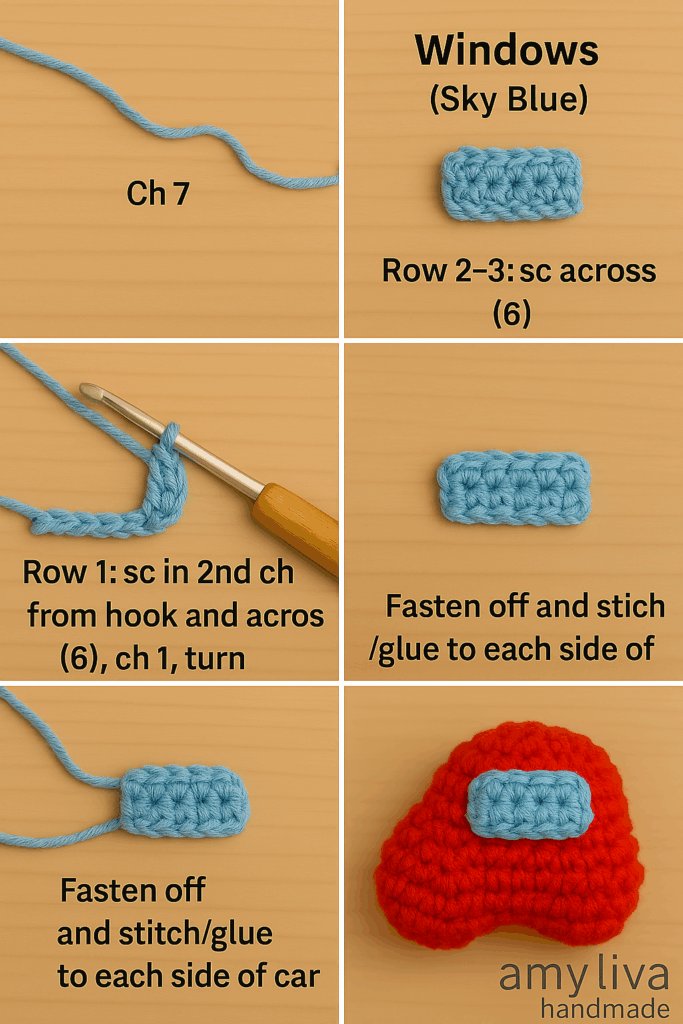
Step-by-step crochet window tutorial – Handmade with fine cotton yarn, perfect for DIY crafters and home decor lovers. Create your own miniature crochet window with detailed guidance!
Ch 7
Row 1: sc in 2nd ch from hook and across (6), ch 1, turn
Rows 2–3: sc across (6)
Fasten off and stitch/glue to each side of the car.
Headlights (White, Make 2):
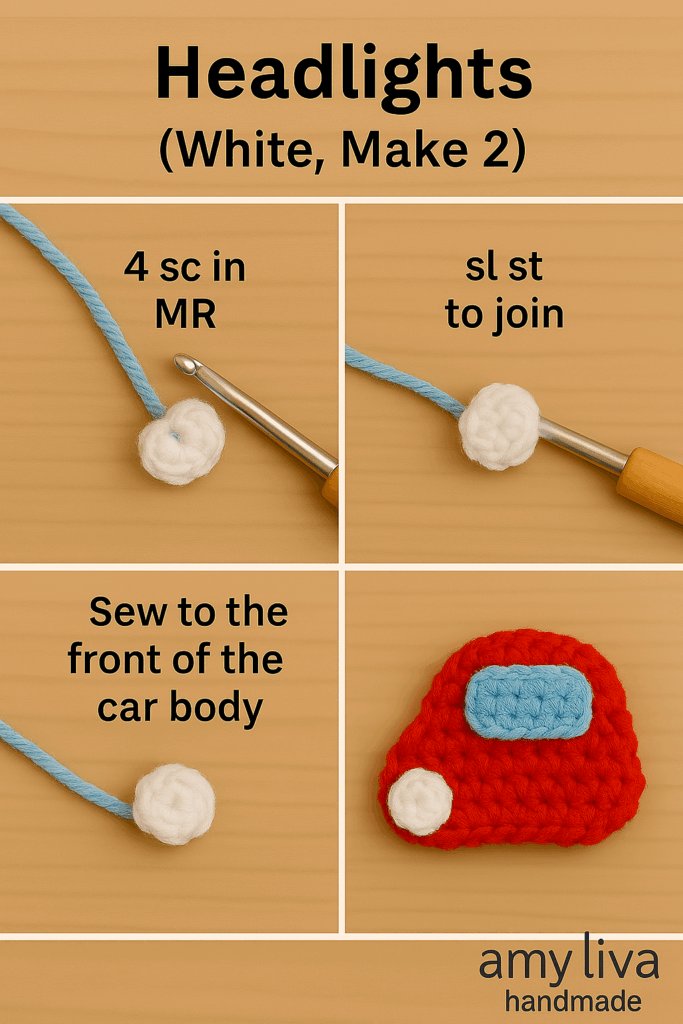
Crochet headlights – handcrafted with fine cotton yarn for realistic detail. A perfect addition to mini crochet car designs, DIY amigurumi projects, and handmade keychains!
4 sc in MR, sl st to join.
Sew to the front of the car body.
Wheels (Dark Brown/Black, Make 4):
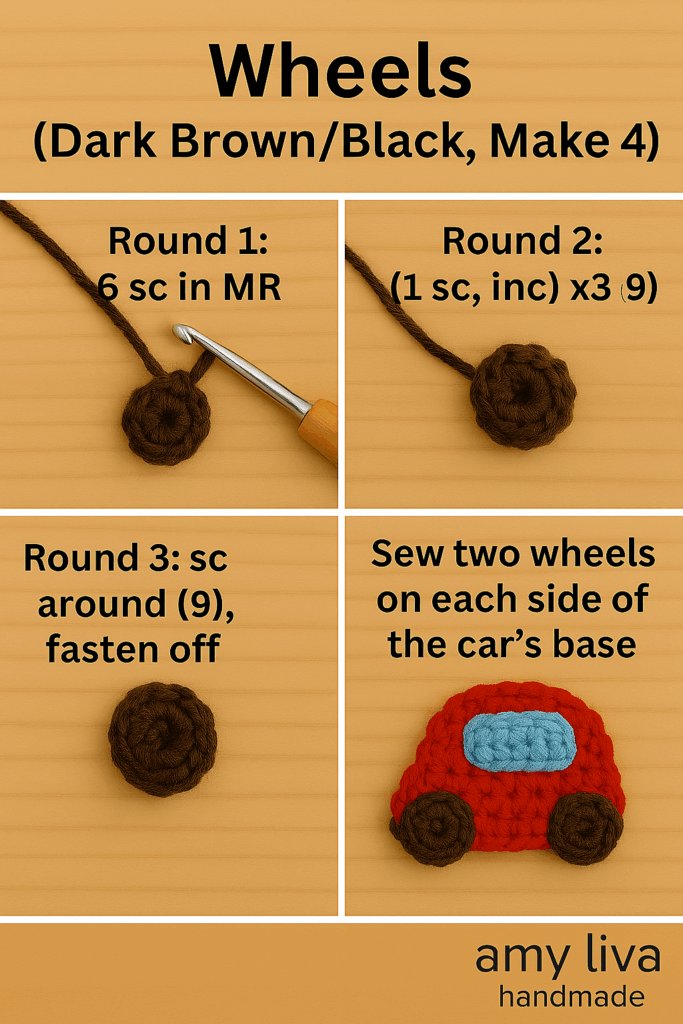
Crochet car wheels – expertly handmade using premium cotton yarn for a realistic and sturdy finish. A great addition to mini amigurumi cars, crochet vehicle projects, and creative DIY accessories!
- Round 1: 6 sc in MR
- Round 2: (1 sc, inc) x 3 (9)
- Round 3: sc around (9), fasten off
- Sew two wheels on each side of the car’s base.
Assembly:
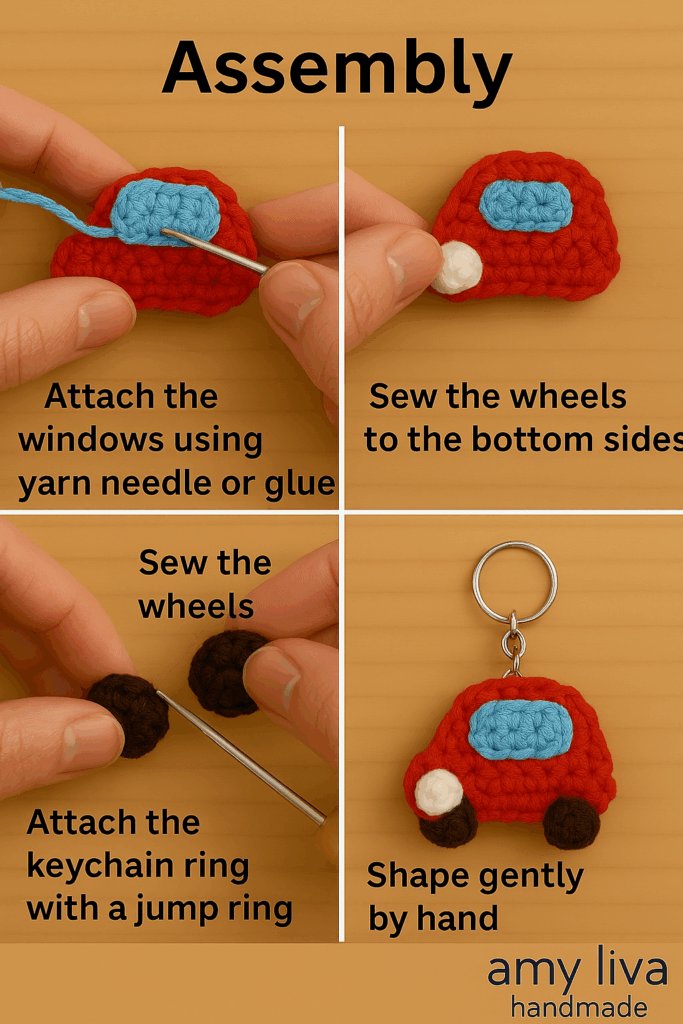
Attach the windows to each side of the car using a yarn needle or fabric glue.
Sew the headlights to the front area of the body.
Sew the wheels to the bottom sides, aligned evenly.
Use a jump ring to attach the keychain ring securely to the car.
Shape the finished piece gently by hand.
Tips for a Professional Finish:
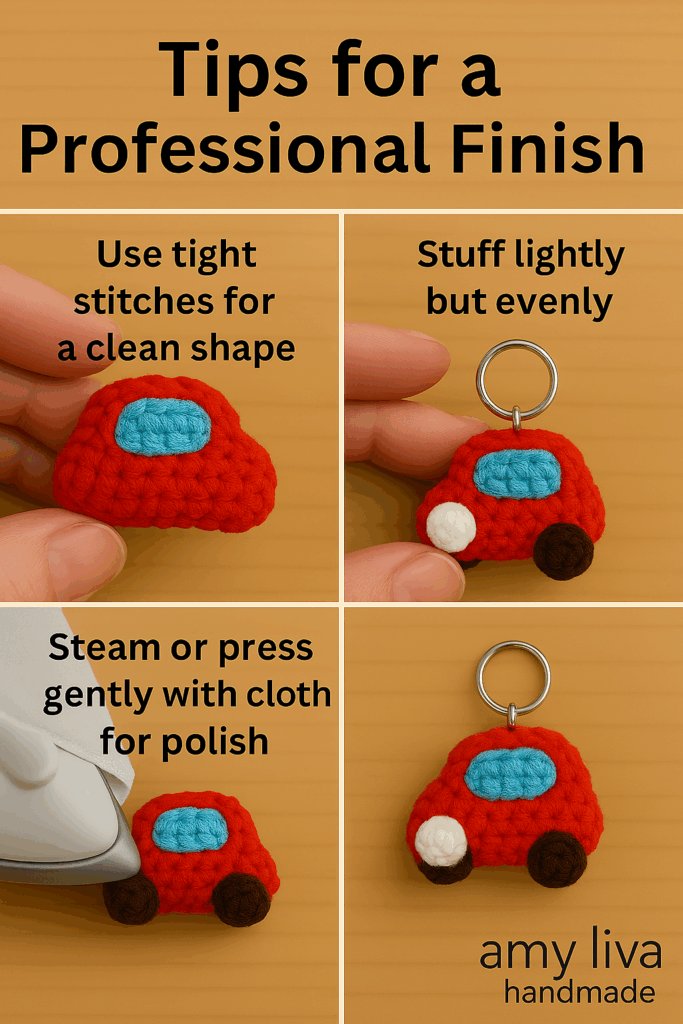
Use tight stitches for a clean shape.
Stuff lightly but evenly to avoid bumps.
Steam or lightly press with a cloth to soften yarn fuzz for a polished look.
Who Is Amigurumi Perfect For?
✅ Craft lovers seeking a creative and enjoyable activity
✅ Those looking for unique, handmade gifts for loved ones
✅ Small business owners and handmade product sellers
How Can Amigurumi Creations Be Used?
✅ Selling on online marketplaces like Etsy, Instagram, and Pinterest
✅ Offering custom orders for personalized crochet designs
✅ Using as educational materials in craft workshops
✅ Creating safe and soft toys for children
Usage Instructions:
This pattern is for personal use only. You may:
Gift or sell the finished items in small quantities, but credit Amyliva Handmade as the designer.
🔗 Stay connected & find more patterns here
📌 Pinterest: Amyliva Handmade
📸 Instagram: @amylivahandmade
▶ YouTube: https://www.youtube.com/@Amyliva
📄 You can download the full crochet pattern as a printable PDF here:
👉 Download the Free PDF Pattern
1. What type of yarn should I use?
Cotton yarn is the best choice because it’s strong, soft, and easy to shape.
2. What size crochet hook do I need?
A 2.5mm – 3.5mm hook works well for small crochet projects like a mini car.
3. How do I make the car hold its shape?
Fill it with fiber stuffing to keep it firm and well-structured.
4. What can I use for wheels?
Buttons or small crocheted circles make great wheels for a realistic look.
5. Is this project good for beginners?
Yes! If you know how to do single crochet stitches, you can follow the steps easily.
6. Can I add custom details?
Of course! You can use contrast yarn for windows, beads for headlights, or embroidery for doors to make it unique.
Disclaimer:
This crochet pattern is for personal use only. Please do not copy, distribute, or sell the pattern as your own. You are welcome to sell finished items made from this pattern, but please give credit to Amyliva Handmade as the designer. Thank you for respecting handmade creators!
💛 Thank you for supporting handmade! Happy crocheting! 🧶
AmyLiva Handmade
1 yorum