Mini Alien Amigurumi Keychain – Free Crochet Pattern
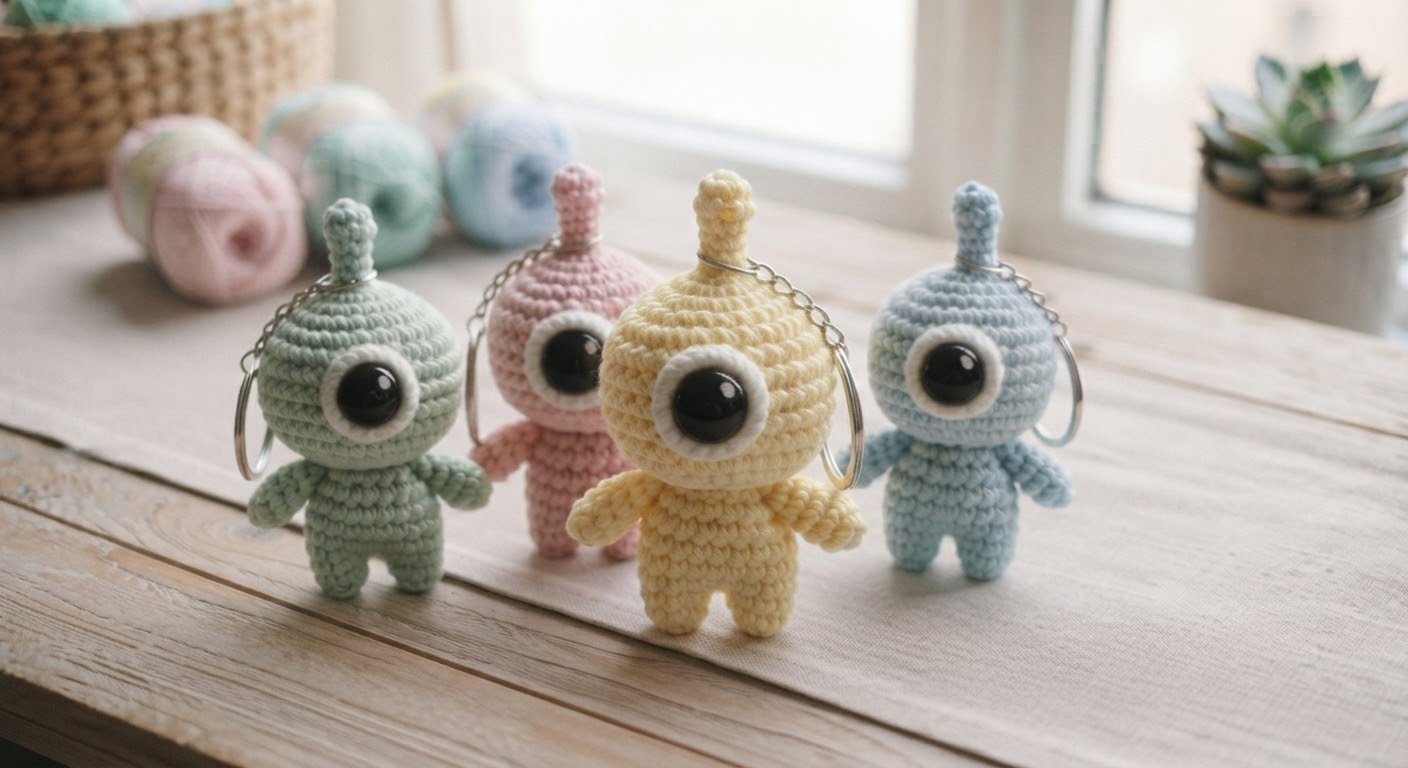
I designed this little alien while looking for a simple crochet project that would be small enough to turn into a colorful keychain.
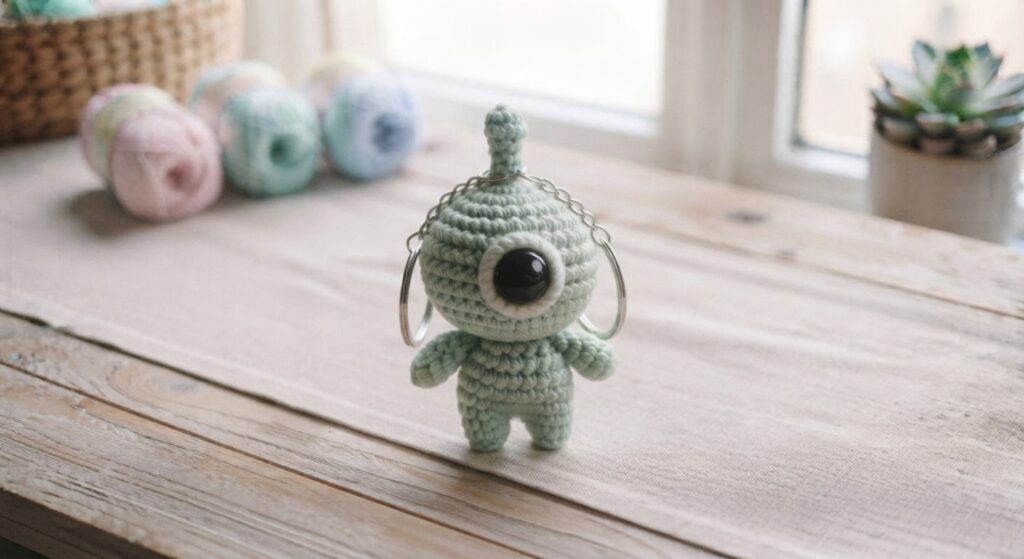
These mini alien keychains are a fun little crochet project made with simple amigurumi stitches. The finished alien is small and lightweight, making it a cute accessory for a backpack, bag, or set of keys.
I designed this project with a simple one-piece body, small arms and legs, and an optional antenna. You can make the aliens in different pastel colors and use either a safety eye or embroidered eye for the face.
In this free crochet pattern, I’ll show you how to crochet the alien step by step, add the small details, and attach a keyring to turn it into a finished keychain.
Whether you are looking for a fun accessory for your keys or a charming handmade gift for someone who loves quirky space themes, this mini alien amigurumi keychain is a delightful and quick project to make.
Project Details
- Skill level: Easy
- Crochet terms: US terms
- Project type: Amigurumi keychain / bag charm
- Crochet time: About 1–2 hours
- Main techniques: Magic ring, single crochet, increases, decreases, continuous rounds, stuffing, and sewing
- Pieces: 1 head and body, 2 arms, 2 legs, and 1 optional antenna
Materials
- Cotton yarn in pastel colors such as pink, blue, green, yellow, or purple
- 2.5 mm crochet hook
- 5–6 mm safety eye or black embroidery yarn
- Polyester fiberfill
- Keyring
- Yarn needle
- Scissors
- Stitch marker (optional)
Using a smooth cotton yarn helps keep the stitches neat and makes it much easier to shape the small alien body and details.
How Long Does It Take to Crochet This Alien Keychain?
This mini alien keychain is a quick and beginner-friendly project that can usually be completed in 1 to 2 hours. The exact time will depend on your crochet speed, experience level, and the amount of time spent attaching the arms, legs, antenna, and keyring.
Because the alien is made from only a few small pieces, most of the project time is spent on assembly rather than crocheting. Taking a little extra time to position the pieces evenly can help create a cleaner finished result.
Best Yarn for a Mini Alien Amigurumi
Cotton yarn is a great choice for this project because it provides clear stitch definition and helps the alien keep its shape after stuffing. Smooth cotton yarn also makes the small details easier to see and work with.
Acrylic yarn can also be used if you prefer a softer texture. Whichever yarn you choose, use a hook size that creates firm stitches so the stuffing does not show through the fabric. Using the same yarn weight for all pieces will help keep the alien proportional.
Abbreviations
The pattern uses US crochet terms.
- MR = magic ring
- sc = single crochet
- inc = increase
- dec = decrease
- sl st = slip stitch
- ch = chain
Pattern Notes
- The head and body are crocheted as one piece in continuous rounds.
- The arms and legs are made separately and sewn to the body.
- Work in continuous rounds unless otherwise stated, and use a stitch marker to identify the beginning of each round.
- The stitch count at the end of each round is shown in parentheses.
- Add fiberfill gradually as the head and body are worked. Avoid overstuffing, as this can stretch the stitches and change the shape.
- If using a safety eye, check its position before continuing and make sure it is securely fastened.
- The finished size may vary depending on the yarn, hook size, and crochet tension.
Head and Body
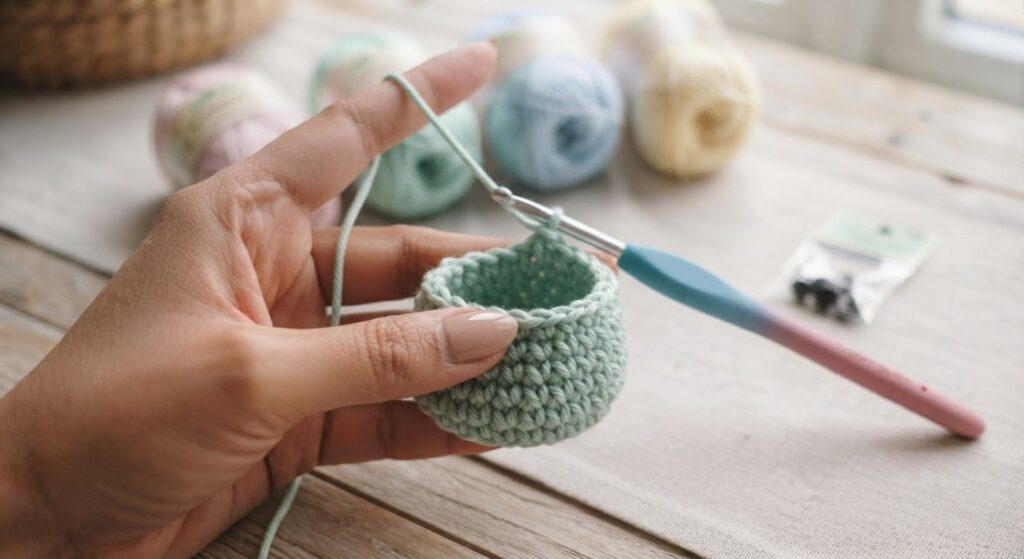
The head and body are worked as one piece using the main yarn color.
Round 1: 6 sc in a magic ring. (6)
Round 2: Inc in each stitch around. (12)
Round 3: (1 sc, inc) around. (18)
Rounds 4–6: Sc around. (18)
If using a safety eye, insert it between Rounds 3 and 4. Position it on the front of the head and check that it is centered before securing the back.
Round 7: (1 sc, dec) around. (12)
Add fiberfill gradually and shape the piece with your fingers. Use small amounts of stuffing at a time so the head stays rounded without becoming too firm.
Round 8: Dec around. (6)
Fasten off, leaving a long yarn tail. Using a yarn needle, weave the tail through the front loops of the remaining 6 stitches and pull gently to close the opening. Secure the yarn and weave in the end.
The finished piece should have a small rounded shape. Avoid overstuffing, as the stitches may stretch and the shape can become uneven.
Eyes
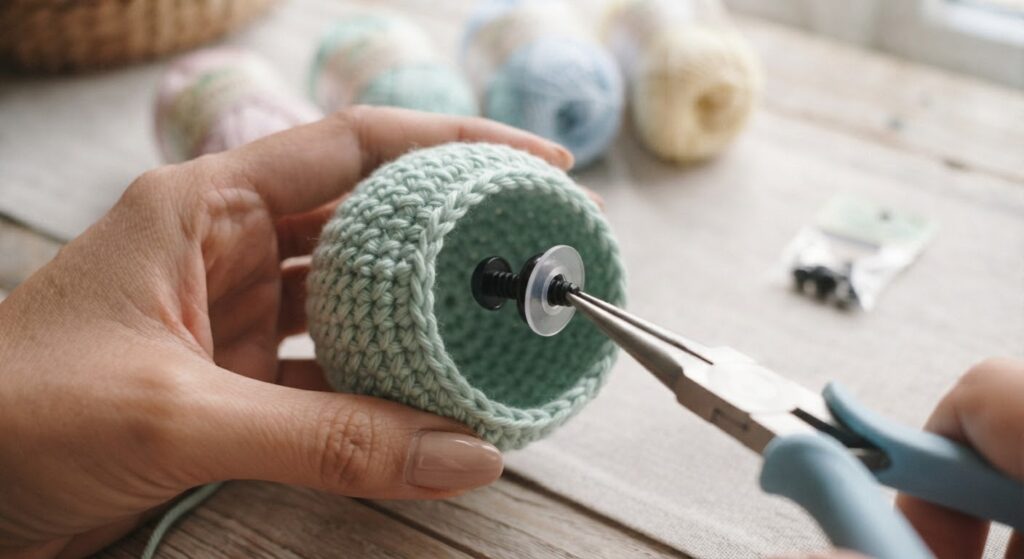
If using a 5–6 mm safety eye, place it between Rounds 3 and 4 on the front of the head.
Before securing the back of the safety eye, check the position from the front and make sure it is centered and straight.
If you prefer an embroidered eye, use black embroidery yarn and stitch a small eye in the same area. Secure the embroidery firmly and weave in the yarn end.
If making the alien for a young child, use embroidered facial features instead of safety eyes because safety eyes are small parts and may present a choking hazard.
Arms
Make 2 arms using the main yarn color.
Round 1: 6 sc in a magic ring. (6)
Rounds 2–3: Sc around. (6)
Fasten off, leaving a long yarn tail for sewing. Do not add fiberfill; the arms are small and should remain flat and flexible.
Sew the arms to the sides of the body at the same height. Pin both arms in place first and check that they are even before sewing them securely.
Weave in the yarn ends after attaching the arms.
Legs
Make 2 legs using the main yarn color.
Round 1: 6 sc in a magic ring. (6)
Rounds 2–3: Sc around. (6)
Fasten off, leaving a long yarn tail for sewing. Do not add fiberfill; keeping the legs unstuffed makes them easier to attach to the small body.
Sew the legs to the bottom of the body, keeping them evenly spaced. Pin both legs first and check that the alien sits evenly before sewing them securely.
Weave in the yarn ends after attaching the legs.
Antenna
The antenna is optional and can be made using the same yarn color as the body.
Chain 4. Starting in the second chain from the hook, slip stitch back along the chain.
Fasten off, leaving a long yarn tail for sewing.
Sew the antenna securely to the top of the alien. Check that it is centered before making the final stitches.
If you prefer a simpler look, you can leave the antenna off.
Assembly
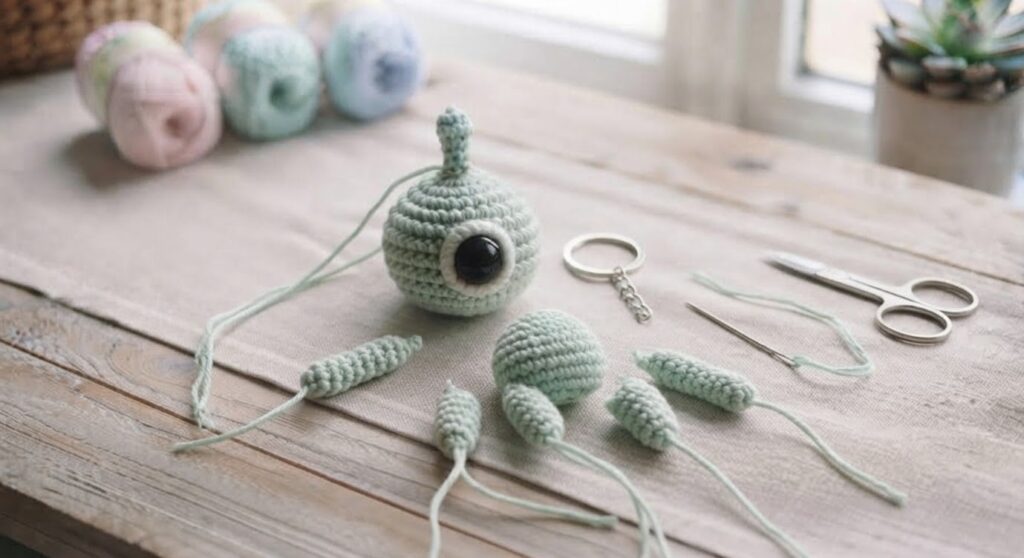
- Pin the arms to the sides of the body and check that they are at the same height. Sew them securely in place.
- Pin the legs to the bottom of the body, keeping the spacing even. Sew around the attachment points several times so they are firmly secured.
- If you made the optional antenna, center it on the top of the alien and sew it securely.
- Attach the keyring to the top of the alien. Pass a strong piece of yarn through several stitches at the top of the body and through the keyring loop several times. Tie the yarn securely and weave in the ends.
- Check all sewn parts and gently pull the keyring to make sure it is firmly attached before using the alien as a keychain.
- Trim and weave in any remaining yarn ends, then gently shape the finished alien with your fingers.
Safety Note
This crochet alien keychain contains small parts, including a safety eye and keyring, that may present a choking hazard.
It is intended as a decorative accessory rather than a toy. Keep it away from babies, young children, and pets.
If making the alien for a young child, use embroidered eyes instead of safety eyes and make sure all crocheted parts are securely sewn in place.
Check the keyring and sewn attachments regularly, especially if the keychain is used frequently.
Beginner Tips
- Use a stitch marker to keep track of the beginning of each continuous round.
- Count your stitches at the end of each round. A missed increase or decrease can change the shape of the alien.
- Keep your tension consistent, especially when working the small arms and legs.
- Add fiberfill gradually and avoid overstuffing the body.
- Pin the arms and legs in place before sewing so you can adjust their position if needed.
- When attaching the keyring, sew through several stitches and reinforce the connection so it does not pull away during use.
- If safety eyes are difficult to position, embroidered eyes are a simple alternative.
- Try different yarn colors to create a set of aliens with different looks.
Common Mistakes to Avoid
One common mistake is overstuffing the body. Too much fiberfill can stretch the stitches and make the stuffing visible between them.
Another common issue is attaching the arms and legs unevenly. Before sewing permanently, pin the pieces in place and check their positions from different angles.
If you are adding a keyring, reinforce the attachment through several stitches at the top of the alien. A strong attachment will help the finished keychain withstand regular use.
Frequently Asked Questions
Can I use a different yarn color?
Yes. You can use any cotton yarn color you like. Pastel shades give the alien a soft look, but brighter colors work well too.
Can I make the alien without the antenna?
Yes. The antenna is optional, so you can leave it off for a simpler design.
Can I use embroidered eyes instead of safety eyes?
Yes. Embroidered eyes are a good alternative, especially if the finished keychain will be used around young children.
Can I use a different hook size?
Yes, but changing the hook and yarn size will affect the finished shape and size. Use a hook that works well with your chosen yarn and keep your tension consistent.
Can I make this as a regular amigurumi instead of a keychain?
Yes. Simply leave out the keyring attachment and use the finished alien as a small decorative amigurumi.
Can I wash the finished crochet alien keychain?
Spot cleaning is recommended. Avoid soaking the alien keychain in water because the combination of yarn, fiberfill stuffing, and metal hardware may not respond well to prolonged moisture. Allow it to dry completely before using it again.
Final Thoughts
This mini alien amigurumi keychain is a fun and beginner-friendly crochet project that uses only a small amount of yarn and basic crochet techniques. Its compact size makes it perfect for keychains, bag charms, gifts, and small crochet collections.
By changing the colours, embroidered details, or adding different accessories, you can easily create unique aliens while using the same basic pattern. Whether you make one or a whole collection, this cheerful little alien is a quick and enjoyable project to crochet.
Using and Caring
This mini alien can be used as a keychain or bag charm. Attach it to a backpack, handbag, purse, or set of keys.
Avoid pulling or stretching the crocheted parts. Keep the keychain away from excessive moisture and allow it to dry completely if it becomes damp.
Check the keyring and sewn parts regularly. If any attachment becomes loose, repair it before using the keychain again.
Copyright
This crochet pattern and the photographs on this page are the original work of Amyliva Handmade.
You may make finished aliens for personal use, as gifts, or in small quantities for sale. If you share or sell a finished alien, please credit Amyliva Handmade as the designer.
Please do not copy, repost, translate, redistribute, or publish this pattern or the photographs as your own. Do not reproduce the written instructions on another website, social media page, or in a video.
If you would like to share this pattern with others, please share the original Amyliva Handmade link instead of copying the instructions or photographs.

Yorum gönder