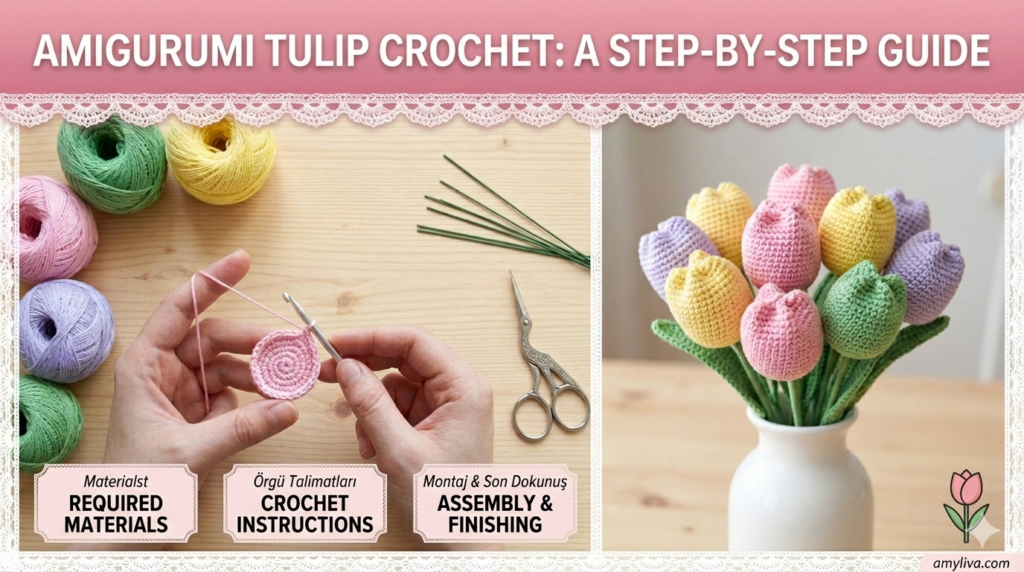
How to Crochet Amigurumi Tulips – A Complete Step-by-Step Crochet Flower Guide

Spring is the season of renewal, color, and creativity. One of the most beautiful ways to celebrate spring through crochet is by making amigurumi tulips. These charming handmade flowers capture the elegance of real tulips while offering the durability and warmth of yarn.
Unlike fresh flowers that wilt within days, crochet tulips stay vibrant forever. They are perfect for decorating your home, creating handmade bouquets, gifting to loved ones, or even selling in your crochet shop.
In this detailed tutorial, you will learn how to crochet amigurumi tulips step by step, including the materials needed, essential crochet techniques, shaping tips, and creative variations. Whether you are a beginner or an experienced crocheter, this guide will help you create stunning tulip flowers with confidence.
Why Crochet Tulips?
Tulips are among the most recognizable flowers in the world. They symbolize love, happiness, renewal, and the arrival of spring. Because of their simple yet elegant shape, tulips translate beautifully into crochet form.
Creating crochet tulips offers several benefits:
• They never fade or lose their color
• Perfect for home decoration
• Great handmade gifts for friends and family
• Ideal products for craft markets or online shops
• Beginner-friendly crochet project
• Relaxing and mindful crafting activity
Amigurumi tulips are also a fantastic way to practice basic crochet techniques like working in the round, shaping with increases and decreases, and assembling small pieces.
Materials Needed for Crochet Tulips
Before starting your project, gather the following materials. Using quality tools will make the process easier and improve the final result.
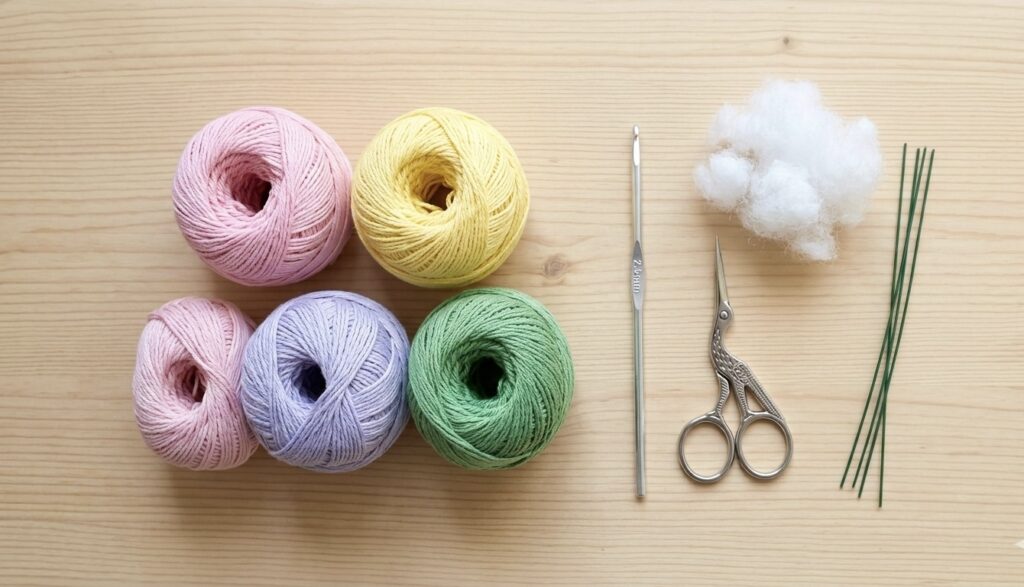
Yarn
Medium-weight yarn works best for tulip flowers. Cotton yarn is highly recommended because it holds its shape well.
Suggested colors:
• Pink
• Red
• Yellow
• White
• Lavender
• Green for stems and leaves
Using pastel colors can create a soft spring bouquet aesthetic.
Crochet Hook
A 2.5 mm or 3.0 mm crochet hook works well for most yarn types used in amigurumi.
Smaller hooks help create tighter stitches, which prevent gaps in the finished flower.
Tapestry Needle
Used for sewing parts together and weaving in yarn ends.
Scissors
Sharp scissors allow precise cutting when finishing pieces.
Floral Wire (Optional)
Floral wire helps stems stay upright and allows gentle shaping.
Stuffing (Optional)
Polyester fiberfill can be used to slightly stuff the tulip bud for a fuller look.
Basic Crochet Techniques Used in This Tutorial
This project uses several common amigurumi techniques. If you are new to crochet, practicing these stitches beforehand will help.
Magic Ring (Magic Circle)
A technique used to start projects worked in the round without leaving a hole in the center.
Single Crochet (sc)
The most common stitch in amigurumi. It creates tight, dense fabric.
Increase (inc)
Two single crochets worked in the same stitch to expand the round.
Decrease (dec)
Combining two stitches together to narrow the shape.
Invisible Decrease
A cleaner version of decrease used in amigurumi for smoother shaping.
Slip Stitch (sl st)
Used to join stitches or move yarn without adding height.
Working in Continuous Rounds
Most amigurumi projects are worked in a spiral rather than joining rounds.
Using a stitch marker is highly recommended to keep track of rounds.
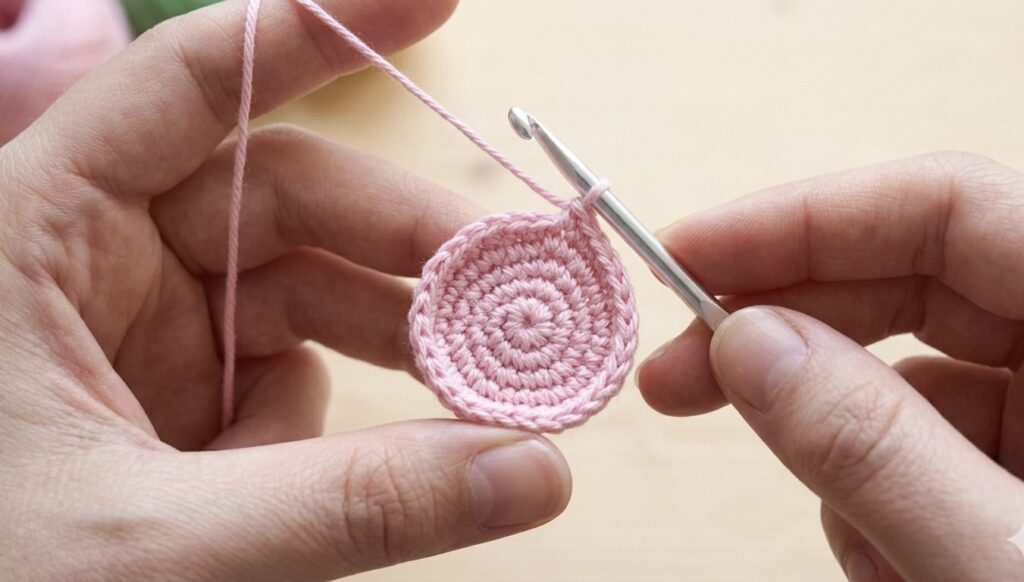
Step 1 – Crochet the Tulip Bud
The tulip bud forms the flower part of the project. This piece is worked in the round.
Instructions
- Start with a magic ring.
- Crochet 6 single crochets into the ring.
Round 2:
Increase in every stitch (12 stitches).
Round 3:
(sc, inc) repeat around (18 stitches).
Round 4:
(2 sc, inc) repeat around (24 stitches).
Rounds 5–10:
Single crochet in each stitch (24 stitches).
This section creates the tall shape of the tulip bud.
Round 11:
(2 sc, dec) repeat around (18 stitches).
Round 12:
(sc, dec) repeat around (12 stitches).
Round 13:
Decrease around (6 stitches).
Fasten off and leave a long yarn tail for sewing.
Lightly stuff the bud if you prefer a fuller appearance.
Step 2 – Crochet the Tulip Stem
The stem connects the flower to the base and helps the tulip stand upright.
Instructions
- Chain 6 stitches.
- Join with a slip stitch to form a ring.
Now begin working in rounds.
Round 1–20:
Single crochet in each stitch (6 stitches per round).
This will create a long, narrow tube.
If you want the stem to be flexible yet sturdy:
• Insert floral wire
• Or use a pipe cleaner
This allows the tulip to be gently bent or arranged in bouquets.
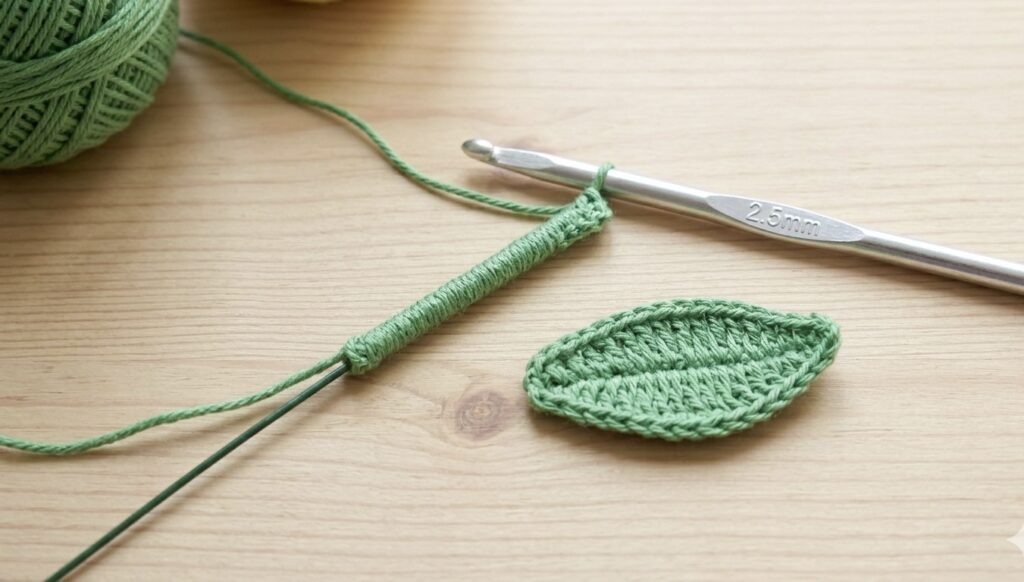
Step 3 – Crochet the Tulip Leaf
Leaves add realism and elegance to the finished tulip.
Instructions
Chain 10.
Row 1
Single crochet across (9 stitches).
Row 2
Increase at the beginning and end, sc across (11 stitches).
Row 3
Single crochet across (11 stitches).
Row 4
Decrease at both ends, sc across (9 stitches).
Row 5
Single crochet across (9 stitches).
Fasten off and leave a small tail.
You can gently shape the leaf by:
• Steam blocking
• Adding thin floral wire inside
• Folding slightly along the center line
Step 4 – Assemble the Crochet Tulip
Once all pieces are complete, it’s time to assemble the flower.
Assembly Steps
- Sew the tulip bud securely to the top of the stem.
- Attach the leaf to one side of the stem.
- Use a tapestry needle to weave in loose ends.
- Trim excess yarn carefully.
- Shape the flower gently with your fingers.
Optional: A small amount of hot glue can provide extra stability.
Your amigurumi tulip is now complete.
Styling Your Crochet Tulips
One of the best parts of crocheting tulips is arranging them creatively.
Bouquet Ideas
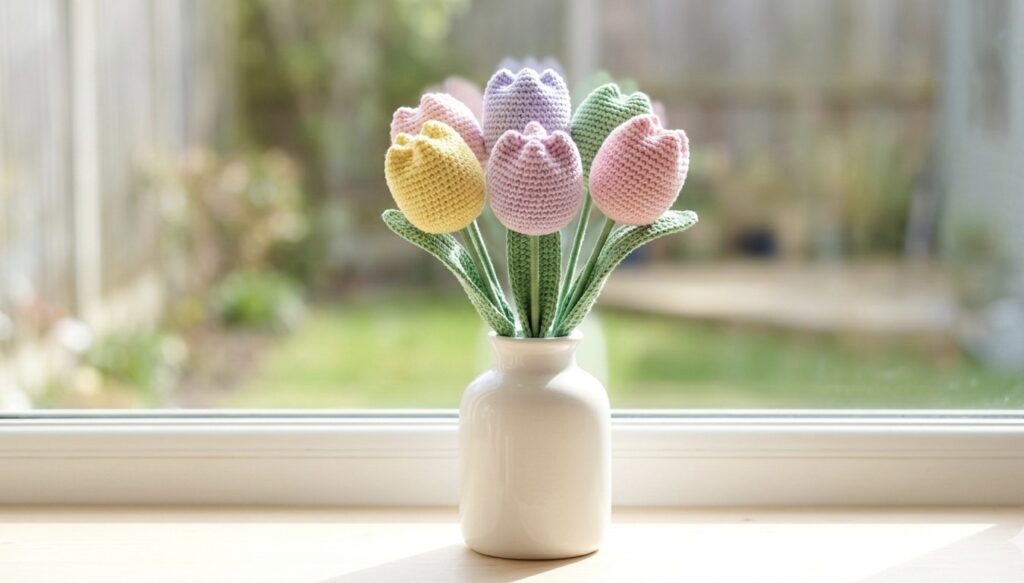
• Combine 5–7 tulips in different colors
• Wrap stems with ribbon or lace
• Place them inside a glass jar or ceramic vase
• Add crocheted leaves for fullness
These arrangements make beautiful decorations for:
• Living rooms
• Craft rooms
• Wedding tables
• Spring photo shoots
Crochet tulips also photograph beautifully for Pinterest and Instagram content.
Troubleshooting Tips for Perfect Tulips
Even experienced crocheters sometimes encounter small issues. Here are helpful solutions.
Tight Stitches
If the fabric feels stiff or difficult to work into:
• Switch to a slightly larger crochet hook.
Loose Stitches
If gaps appear between stitches:
• Use a smaller hook
• Maintain tighter tension.
Uneven Bud Shape
This usually happens when stitches are miscounted.
Always:
• Count stitches at the end of each round
• Use a stitch marker.
Curling Leaves
Leaves may curl naturally.
To fix this:
• Lightly steam block them
• Add thin floral wire inside.
Advanced Crochet Tulip Variations
Once you master the basic tulip pattern, you can explore creative variations.
Double Layer Tulips
Crochet two buds and attach them together to create fuller petals.
Gradient Tulips
Change yarn colors halfway through the bud to create ombre petals.
Mini Tulips
Use thinner yarn and a 1.5 mm hook to create miniature flowers.
Long Stem Tulips
Extend the stem rounds to create taller bouquet flowers.
These variations make your crochet tulips look more unique and professional.
Frequently Asked Questions About Crochet Tulips
How long does it take to crochet a tulip?
For beginners, one tulip usually takes 1–2 hours. Experienced crocheters can finish in under an hour.
A bouquet of 5–7 tulips makes a perfect weekend crochet project.
What yarn works best for crochet flowers?
Cotton yarn is ideal because it:
• Holds shape well
• Creates clean stitches
• Gives a professional finish.
However, acrylic yarn can also work if you prefer softer petals.
Can I make tulips without floral wire?
Yes. The stem will simply be softer.
If you want the tulips to stand upright in a vase, wire or pipe cleaners are recommended.
How do I make tulips look more realistic?
You can enhance realism by:
• Using gradient yarn
• Adding multiple leaves
• Creating layered petals
• Arranging flowers in mixed colors.
Natural lighting also helps when photographing crochet flowers.
Can I sell tulips made from this pattern?
Yes. Handmade crochet flowers are very popular at:
• Craft fairs
• Online handmade shops
• Gift markets.
You can also create bouquets or seasonal decorations for extra value.
SEO Tips for Sharing Crochet Tulips Online
If you want your tulip tutorial to reach more people online, follow these tips.
Use vertical images (9:16 ratio) with titles like:
“Step-by-Step Crochet Tulip Tutorial”.
Pinterest loves bright, clean photos with clear text overlays.
Create short Reels showing the transformation from yarn to flower.
Ask followers questions like:
“Which tulip color is your favorite?”
YouTube
A strong title could be:
How to Crochet Amigurumi Tulips | Easy Spring Crochet Tutorial
TikTok
Use quick editing showing the flower blooming.
Popular hashtags include:
#crochettok
#amigurumi
#crochetflowers
#springcrafts
Final Thoughts
Crocheting amigurumi tulips is a beautiful way to combine creativity with relaxation. These delicate flowers capture the charm of spring while allowing crocheters to practice essential techniques like shaping, working in the round, and assembling small pieces.
Whether you make a single tulip or a colorful bouquet, this project is perfect for beginners and experienced makers alike.
Handmade crochet flowers also carry emotional value — they can be gifted to loved ones, used in home décor, or even sold as unique handcrafted items.
Take your time, enjoy the process, and let your creativity bloom just like a field of tulips.
Discover More Crochet Patterns
If you enjoyed this tutorial and want more beginner-friendly crochet ideas, visit:
Amyliva.com
There you’ll find:
• Free amigurumi patterns
• Crochet flower tutorials
• Step-by-step guides
• Creative handmade inspiration
Happy crocheting! 🌷
Yorum gönder