Free Crochet Frog Keychain Pattern with Big Funny Lips

Amigurumi keychain projects are among the most fun and rewarding accessories to crochet. With their quick completion time and charming details, they make wonderful handmade gifts, bag charms, or personalized backpack decorations.
This free crochet frog keychain pattern combines a simple rounded body with oversized, funny pink lips, giving it a playful and distinctive personality. Whether you are using up scrap yarn or creating a matching set of handmade accessories for friends and family, this project works up quickly and requires only a small amount of yarn.
This small crochet frog keychain is a great beginner-friendly project that helps practice essential amigurumi techniques such as working in continuous rounds, increasing, decreasing, stuffing, and assembling separate pieces. The rounded green body, oversized pink lips, and cheerful expression make it a fun accessory for keys, backpacks, handbags, zipper pulls, and gift packaging.
With clear step-by-step instructions and plenty of opportunities for customization, this funny frog keychain can easily become one of your favorite quick crochet projects.
Why Make a Crochet Frog Keychain?
Crochet keychains are enjoyable projects because they are quick to complete and require only small amounts of yarn. This frog keychain combines a simple amigurumi shape with playful oversized lips, creating a fun accessory that stands out from traditional crochet keychains.
Small projects like this are also great for practicing essential amigurumi techniques, including shaping, stuffing, sewing, and assembling multiple pieces. The finished frog can be attached to keys, backpacks, handbags, or gift packages as a unique handmade decoration.
Finished Size
The finished frog is approximately 4–5 cm (1.5–2 inches) tall.
The final size can vary depending on your yarn, hook size, and crochet tension.
🧶 Materials & Yarn Choices
Tension Tip: For amigurumi, your stitches should be tight enough that the stuffing does not show through. If your stitches are loose, try going down by 0.5 mm on your hook size.
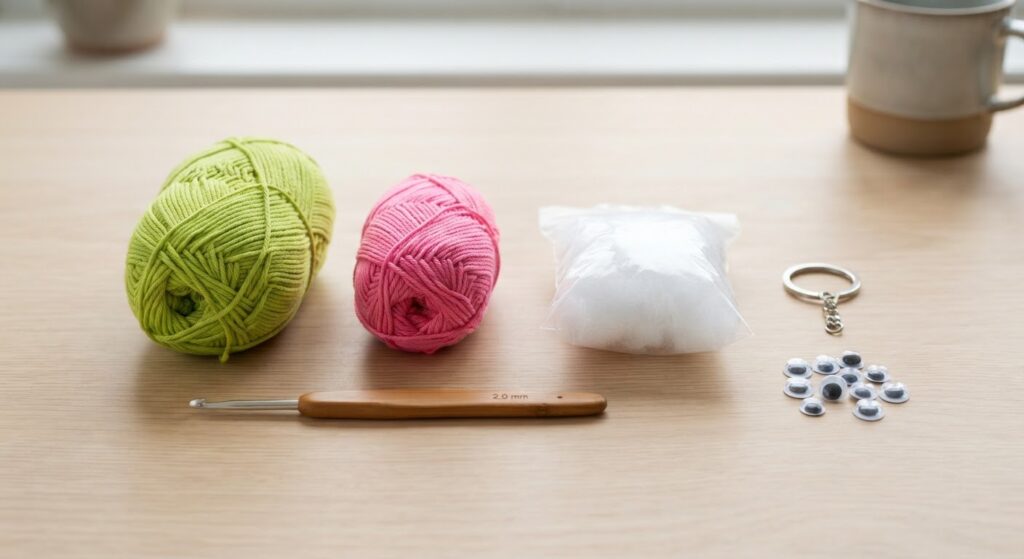
Keychain Ring & Embroidery Floss: For attaching the frog securely to a keychain, bag, or backpack.
Yarn Needle and Scissors
Pink DK or Sport-Weight Cotton Yarn: Just a small scrap for the signature big lips.
2.0 mm Crochet Hook: Using a slightly smaller hook with cotton yarn creates a tight, firm fabric so your polyfill stays securely inside.
Fiberfill Stuffing: For shaping the body. Tip: Stuff it little by little to keep it nicely rounded without over-stretching the stitches.
Small Googly Eyes or Safety Eyes: You can use either option. For a young child, embroidered eyes are a safer alternative because they do not create a detachable small part.
Keychain Ring & Embroidery Floss: To turn your cute frog into a durable bag charm.
Abbreviations
US crochet terms are used throughout the pattern.
MR – Magic Ring
ch – Chain
SC – Single Crochet
INC – Increase
DEC – Decrease
st / sts – Stitch / stitches
FO – Fasten Off
Note: The frog body and lips are worked in continuous rounds. The arms are worked separately as a short chain and single crochet strip.
Before You Begin
The frog body is worked in continuous rounds, so there is no need to join each round with a slip stitch. A stitch marker can help you keep track of the first stitch of each round, especially because the body is small and the rounds are worked continuously.
For this project, try to keep your stitches firm and even. Small amigurumi pieces can show the fiberfill if the stitches are too loose. If you can see large gaps between the stitches while crocheting, try using a smaller hook or adjusting your tension.
When stuffing the frog, add the fiberfill in small amounts rather than filling the whole body at once. Use the end of your crochet hook, a stuffing tool, or a blunt pencil to gently push the fiberfill into the smaller areas. Turn the piece as you work so the stuffing is spread evenly.
Do not overfill the body. The frog should feel firm enough to hold its shape, but the stuffing should not stretch the crochet stitches or make the body look uneven.
Before sewing on the lips, eyes, and arms, place each piece on the body without attaching it first. This makes it easier to adjust the position of each piece and check the frog’s overall expression and shape.
The finished size can vary depending on your yarn, hook size, and crochet tension. Small differences in tension are completely normal, so focus on keeping the shape even rather than trying to match an exact measurement.
Common Mistakes When Making Small Amigurumi Keychains
One of the most common mistakes when making keychain-sized amigurumi is overstuffing the body. Too much fiberfill can stretch the stitches and make the shape uneven.
Another common issue is attaching decorative pieces before checking their position. Placing the eyes, lips, and arms temporarily before sewing can help create a more balanced expression.
Because keychains experience more handling than decorative amigurumi, it is also important to reinforce all sewn pieces and attachments securely.
Crochet Frog Body
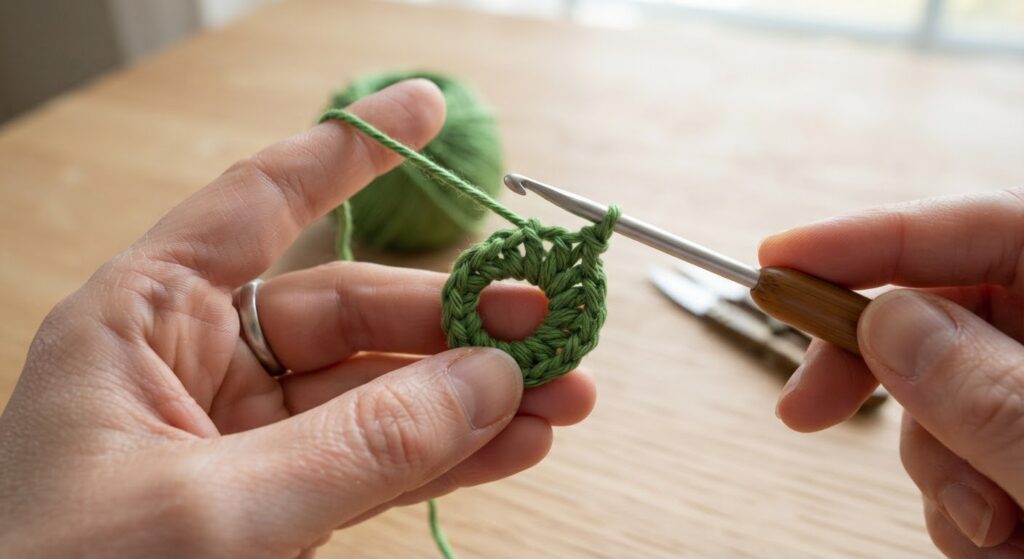
The frog body is worked in continuous rounds from the bottom upward. The body is kept slightly taller than a simple ball so there is enough space for the eyes, lips, and arms.
Using green yarn:
Round 1: Make 6 SC into a magic ring. (6 sts)
Round 2: INC in each stitch around. (12 sts)
Round 3: Repeat (1 SC, 1 INC) around. (18 sts)
Round 4: Repeat (2 SC, 1 INC) around. (24 sts)
Round 5: Repeat (3 SC, 1 INC) around. (30 sts)
Rounds 6–10: SC in each stitch around. (30 sts each round)
Round 11: Repeat (3 SC, 1 DEC) around. (24 sts)
Round 12: Repeat (2 SC, 1 DEC) around. (18 sts)
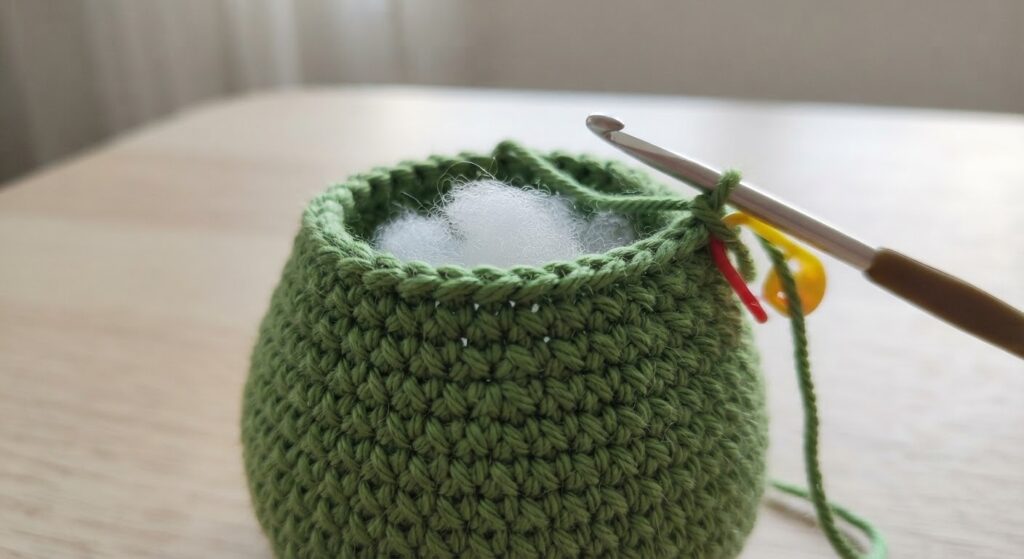
Begin adding fiberfill gradually. Do not overstuff the body.
Round 13: Repeat (1 SC, 1 DEC) around. (12 sts)
Add a little more stuffing if needed and check that the body keeps its rounded shape.
Round 14: DEC around. (6 sts)
Fasten off, leaving a long yarn tail. Using a yarn needle, weave the tail through the remaining front loops and pull gently to close the opening. Secure the yarn and weave in the end.
Oversized Pink Lips
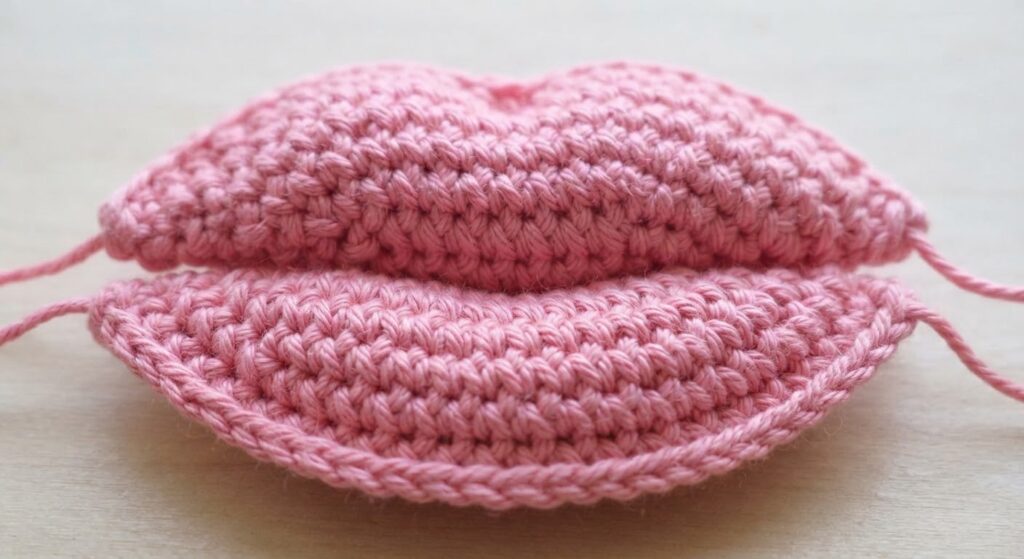
Using pink yarn, make the lips in two separate rounded pieces. The larger upper lip sits above the smaller lower lip to create the frog’s oversized mouth.
Upper Lip
Round 1: Make 6 SC into a magic ring. (6 sts)
Round 2: INC in each stitch around. (12 sts)
Round 3: Repeat (1 SC, 1 INC) around. (18 sts)
Fasten off, leaving a long yarn tail for sewing.
Lower Lip
Using pink yarn, make 6 SC into a magic ring. (6 sts)
Round 2: INC in each stitch around. (12 sts)
Fasten off, leaving a long yarn tail for sewing.
Shaping and Attaching the Lips
Place the larger upper lip in the center of the frog’s face, below the eyes. Place the smaller lower lip directly underneath it, with the two pieces touching slightly in the center.
Do not stuff the lip pieces. Flatten each piece gently with your fingers before sewing.
Before sewing, hold both pieces against the body and check their position from the front. Adjust them if needed so the lips are centered and the expression looks balanced.
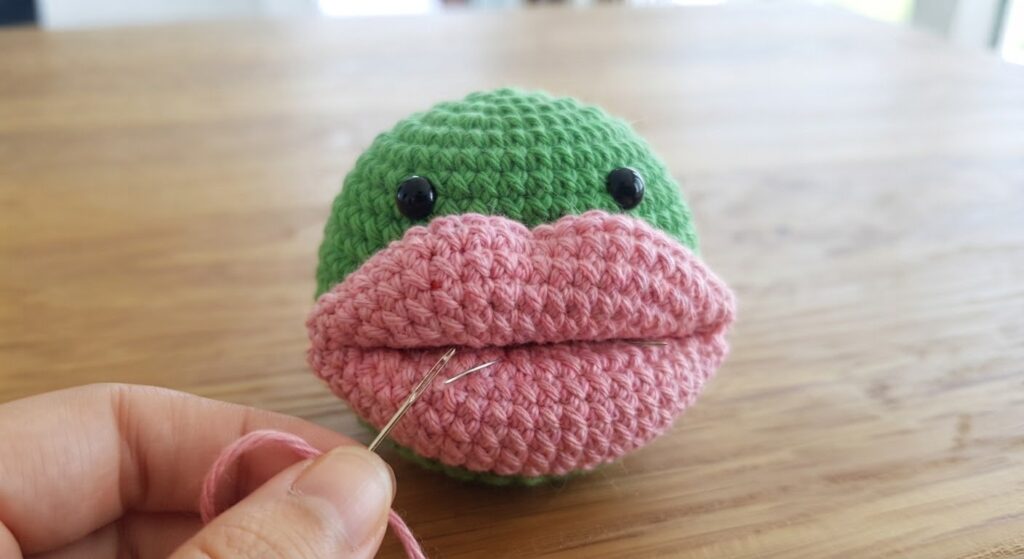
Sew the upper lip securely around its edge. Then sew the lower lip underneath it. Add a few stitches where the two lips meet to keep the pieces together and give the mouth a slightly raised, fuller appearance.
Make sure the yarn ends are securely woven into the body after sewing.
Adding the Eyes
The eyes are placed on the upper front of the frog’s body, above the lips.
For this keychain, you can use two small safety eyes or two small googly eyes. Place one eye on each side of the upper face, leaving enough space between them for the oversized lips.
Before attaching the eyes permanently, place them on the body first and check the frog from the front. Move them slightly if needed until the expression looks balanced.
If you prefer to avoid plastic parts, the eyes can also be embroidered with black yarn or embroidery floss.
If using safety eyes, make sure they are firmly secured. For young children, embroidered eyes are a safer alternative because they do not create a detachable small part.
Arms
Make 2.
Using green yarn:
Chain 5.
Starting in the second chain from the hook, SC in each of the next 4 chains. (4 sts)
Fasten off, leaving a long yarn tail for sewing.
Fold each arm slightly and sew one arm to each side of the frog’s body. Place them below the eyes and slightly above the middle of the body.
The arms do not need to be stuffed.
Attaching the Keychain Ring
Choose a point at the top center of the frog’s body for the keychain ring, opposite the lips.
Using a strong piece of green yarn or embroidery floss, pass the yarn through several stitches at the top center of the body.
Sew through the same stitches several times to reinforce the attachment. Pull gently to make sure the ring is secure and does not move easily.
Once the ring feels firmly attached, knot the yarn and weave the remaining ends into the body.
Before using the frog as a keychain, bag charm, backpack accessory, or zipper pull, check the attachment and reinforce it if necessary.
Helpful Tips
- Keep your stitches firm and even so the fiberfill does not show through the body.
- Use a stitch marker to avoid losing track of the first stitch in each round.
- Add stuffing gradually as you work instead of filling the body all at once.
- Do not overstuff the frog. Too much fiberfill can stretch the stitches and change the shape.
- Place the eyes and lips before sewing them on permanently. Small changes in their position can give the frog a completely different expression.
- Leave long yarn tails when finishing the crocheted pieces so you have enough yarn for sewing and securing them.
- Check the keychain ring carefully after attaching it and reinforce the stitches if the ring feels loose.
- If your finished frog is larger or smaller than the example, this is normal. Yarn weight, hook size, and crochet tension all affect the final size.
Safety Notes
This crochet frog keychain is designed as a decorative accessory rather than a toy for babies or toddlers.
Plastic safety eyes, googly eyes, and metal keychain rings are small parts that may present a choking hazard if they become detached. Make sure all parts are attached securely and check them regularly during use.
For young children, embroidered eyes are a safer alternative to plastic eyes. Always supervise children around small handmade accessories.
Creative Ways to Customize Your Frog
This frog pattern can easily be customized with different colors, facial expressions, and accessories. While the original design uses a green body and pink lips, you can experiment with bright, pastel, or even multicolored combinations.
Different eye sizes and placements can completely change the frog’s personality. You can also add tiny bows, miniature hats, scarves, or embroidered details to create a unique handmade character.
Frequently Asked Questions
What yarn can I use?
DK or sport-weight cotton yarn works well for this project. Cotton gives the frog a firm shape and makes the small stitches easy to see.
You can use another yarn weight, but the finished size will be different.
What hook size is used?
The pattern uses a 2.0 mm crochet hook with DK or sport-weight yarn.
If your stitches are too loose, try a smaller hook to create a firmer fabric.
Why is my frog a different size?
The finished size depends on your yarn, hook, and crochet tension. Even when following the same pattern, two crocheters can end up with slightly different sizes.
Can I use a different color for the lips?
Yes. Pink is used for this version, but red, purple, white, or any color you like can work.
Can I change the eye size?
Yes. Different eye sizes will give the frog a different expression. Try placing the eyes in a few different positions before attaching them.
Can I embroider the eyes?
Yes. Embroidered eyes are a good alternative to plastic eyes, especially if you want to make the frog without detachable parts.
How do I make the lips look fuller?
Place the upper and lower lips close together, with the edges touching slightly in the center. Adding a few stitches where the two pieces meet will help keep them together and give the mouth a slightly raised, fuller appearance.
Can I use the frog as a bag charm?
Yes. The finished piece can be used as a keychain, bag charm, backpack accessory, or zipper pull. Make sure the ring is securely attached before using it.
Can I sell finished frogs made from this pattern?
Yes. You may sell finished handmade frogs made from this pattern.
The written pattern, photographs, and original content should not be copied, reposted, or sold as your own.
If you share the project online, please direct people to the original pattern rather than reposting the complete instructions.
Best Uses for a Crochet Frog Keychain
This small crochet frog is perfect for use as a keychain, backpack charm, handbag accessory, zipper pull, or decorative gift topper. Its compact size makes it easy to carry while adding a fun handmade touch to everyday items.
Because it works up quickly and requires only a small amount of yarn, it is also a great project for craft fairs, handmade gift sets, and scrap-yarn projects.
Final Thoughts
This crochet frog keychain is a fun and beginner-friendly amigurumi project that combines simple construction with a playful design. The oversized lips give the frog its unique personality, while the compact size makes it practical as a daily accessory.
Whether you are creating it for yourself, making gifts for friends, or using leftover yarn from larger projects, this cheerful frog is a quick and rewarding crochet pattern to add to your collection.


Yorum gönder