A Complete Guide to Crocheting the Cutest Cube Cat: The Ultimate Amigurumi Pattern
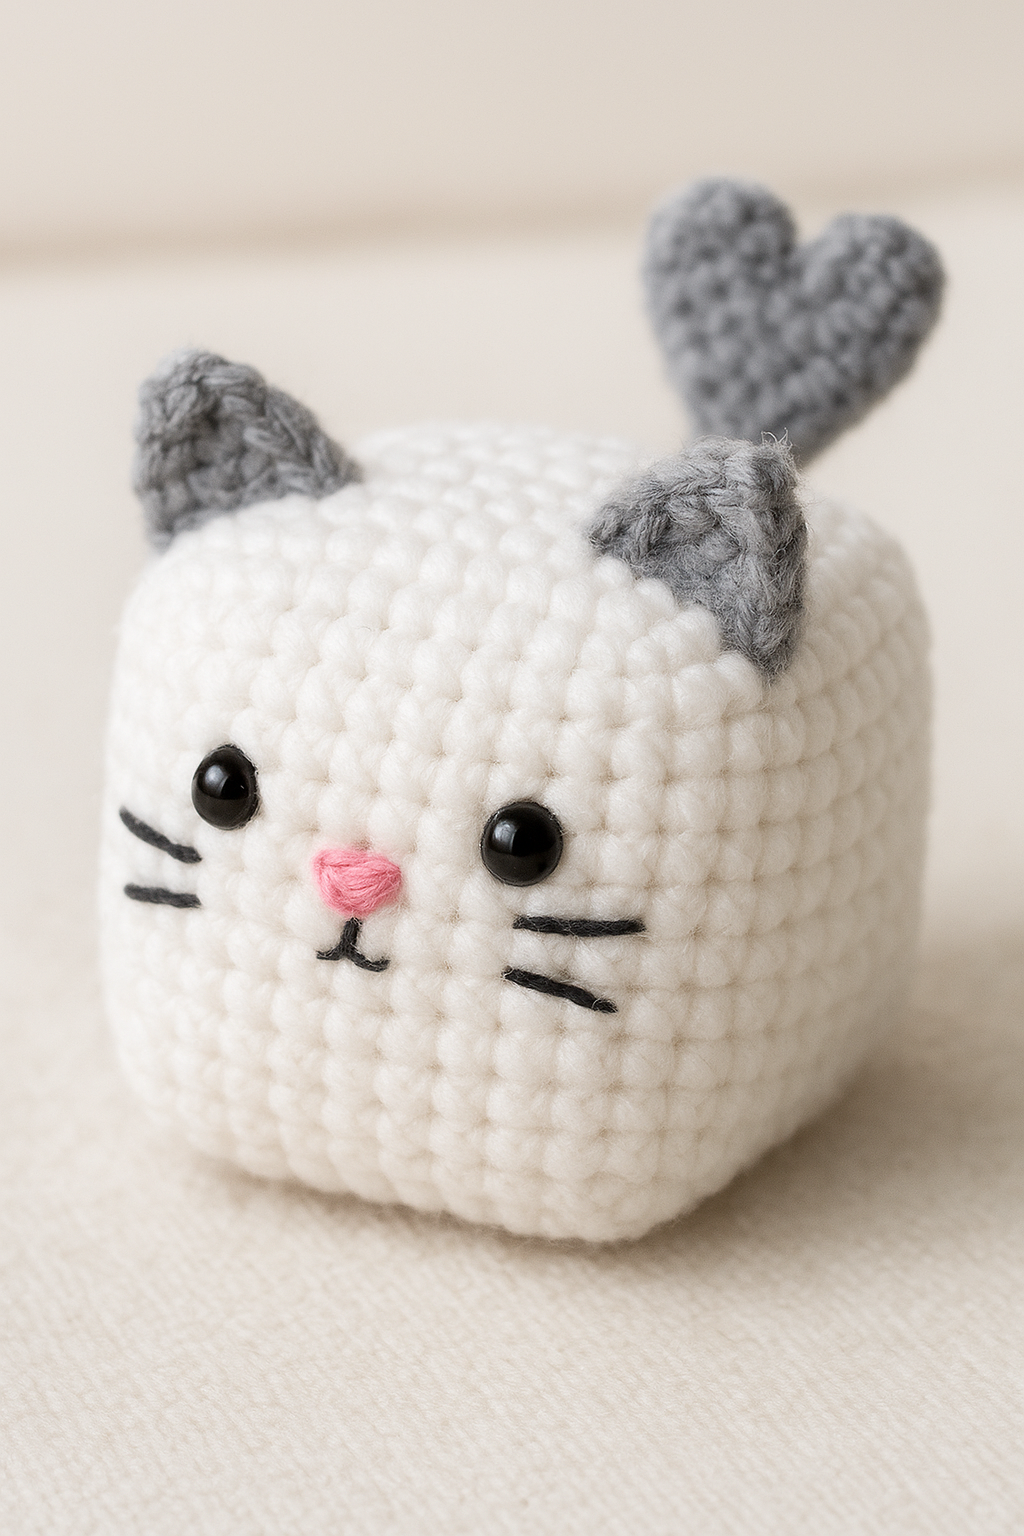
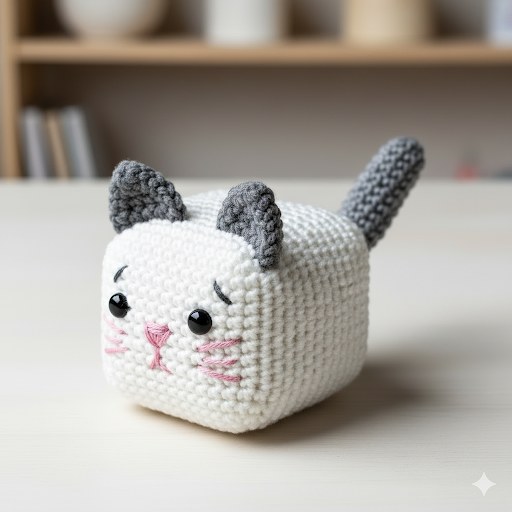
Welcome, fellow crafters, to a delightful amigurumi adventure! If you’ve ever wanted to create a plush, charming, and utterly unique stuffed toy, this is the perfect project for you. We’re going to dive into the world of amigurumi with a pattern for a super cute, cube-shaped crochet cat.
This isn’t just a pattern; it’s a comprehensive guide designed to help you every step of the way. Whether you’re a beginner taking on your first amigurumi project or an experienced crocheter looking for a fun and quirky design, this post has everything you need to succeed. We’ll cover the essential supplies, break down the stitches, walk through the pattern round by round, and even provide expert tips for assembly and troubleshooting.
By the time you’re done, you’ll have an adorable handmade cat that’s perfect for gifting, decorating your space, or simply snuggling. So, grab your hook and your favorite yarn—let’s get started on your next favorite project!
Table of Contents
1. Essential Supplies: What You’ll Need
2. Decoding the Pattern: A Crochet Terminology Guide
3. The Complete Pattern Walkthrough: Step-by-Step Instructions
• The Body
• The Tail
• The Ears
4. Assembly and Finishing Touches: Bringing Your Cat to Life
• Stuffing Your Cat
• Sewing the Pieces Together
• Embroidering the Facial Features
• Hiding Your Yarn Ends
5. Frequently Asked Questions (FAQs)
6. Usage and Care Instructions
7. Sharing Your Creation & Final Thoughts
1. Essential Supplies: What You’ll Need
Before we start crocheting, let’s make sure you have all the necessary tools and materials. Choosing the right supplies is the first step to a successful project.
• Yarn: The type of yarn you choose will greatly impact the final look and feel of your cat. The original design uses a soft, plush chenille yarn which gives the cat its fluffy, cuddly texture. A chunky weight yarn would be a good substitute. For a more classic, defined look, you can use worsted weight acrylic or cotton yarn.
• You will need two colors: a white or light-colored yarn for the main body and a gray or dark-colored yarn for the accent parts (ears and tail).
• Crochet Hook: The size of your hook should correspond to your yarn’s weight. For plush chenille yarn, a larger hook (like a 4.0mm to 5.0mm) is a good choice. For worsted weight yarn, a smaller hook (around 3.0mm to 3.5mm) will work well. The goal is to use a hook that creates tight stitches with no gaps, preventing the stuffing from showing through.
• Stuffing: High-quality polyester fiberfill is the standard for amigurumi. It’s light, soft, and maintains its shape well. Avoid using cotton batting or other lumpy materials.
• Safety Eyes or Embroidery Floss: The original design uses small black plastic safety eyes for a classic, cute look. If you are making this for a very young child (under 3 years old), it’s safer to use black embroidery floss to embroider the eyes instead.
• Yarn Needle: This is a large, blunt needle with a big eye, essential for sewing all the parts of your cat together and weaving in the ends.
• Stitch Markers: A stitch marker is a must-have tool for keeping track of your rounds. It’s a small piece of plastic or metal that you place in the last stitch of each round to mark the beginning of the next.
• Scissors: A small pair of sharp scissors for cutting your yarn.
2. Decoding the Pattern: A Crochet Terminology Guide
If you’re new to crochet patterns, the abbreviations can look like a foreign language. Don’t worry! This simple guide will help you understand every instruction in the pattern.
• R: Stands for Round. This is a single, complete circle of stitches. Most amigurumi patterns are worked in the round.
• x: Stands for a single crochet (sc) stitch. This is the most basic stitch used in amigurumi.
• v: Stands for an increase (inc). This means you will work two single crochet stitches into a single stitch from the previous round. This is how you add stitches to make your work grow.
• a: Stands for a decrease (dec). This means you will work two stitches together to form one stitch. This is how you reduce stitches to make your work smaller.
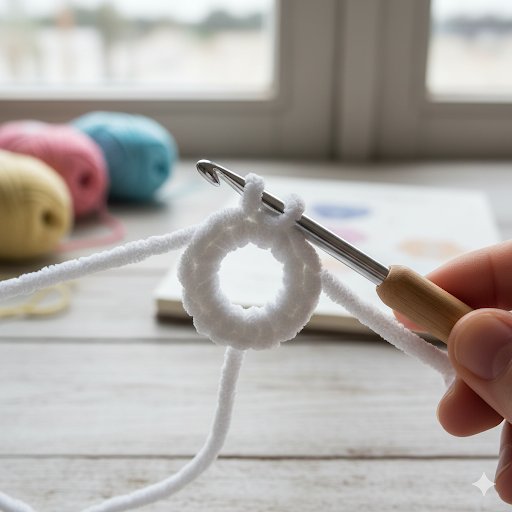
• MR: Stands for Magic Ring (also known as a Magic Loop or Adjustable Ring). This is the foundation of most amigurumi projects. It allows you to create a tight, closed center without a hole.
• BO: Stands for Bind Off, also known as a Slip Stitch (sl st) or finishing off. It’s a method to secure your stitches and finish a piece.
• ch: Stands for chain (ch) stitch. It’s the starting point for many projects and is a series of loops.
• T: Stands for half double crochet (hdc). This stitch is slightly taller than a single crochet.
When you see something like 8(x, v), it means you will repeat the sequence of “one single crochet followed by one increase” a total of 8 times. The number in front of the parenthesis is the number of repeats.
3. The Complete Pattern Walkthrough: Step-by-Step Instructions
Now for the fun part! We’ll go through each section of the pattern in detail. Work in a continuous spiral unless the pattern says otherwise. Use a stitch marker to mark the beginning of each round.
The Body (Using White and Gray Yarn)
Start with your white yarn.
• R1: MR8x (8)
• Pro Tip: To start your Magic Ring, make a loop and hold it with your thumb and middle finger. Yarn over and pull the loop through the ring. Make a chain to secure it, then work 8 single crochets inside the ring. Pull the tail end of the yarn to close the ring tightly.
• R2: 8v (16)
• Pro Tip: For a clean increase, make sure you are working both single crochets into the same stitch.
• R3: 8(x, v) (24)
• R4: 4(v, 2x), v, 2x, 3(2x, v) (32)
• Pro Tip: This is a slightly more complex round to shape the cat’s face. Take your time and count your stitches carefully.
• R5: 3(3x, v), 3x, v, 3x, v, 3(3x, v) (40)
• R6: 17x, 8x, 15x (40)
• Pro Tip: Pay close attention to the stitch count here. The bolded section indicates where the gray yarn will be used. You will work 17 single crochets in white, then switch to gray yarn for the next 8 stitches, and finish with 15 stitches in white. To switch colors, start the last stitch of your white section but don’t complete it. With the two loops still on your hook, yarn over with the new gray color and pull through both loops. This makes for a seamless color change.
• R7: 9x, v, 6x, 3x, v, 6x, 3x, v, 9x, v (44)
• Pro Tip: Continue to alternate between white and gray yarn as instructed. This round is where the gray patches on the head start to take shape.
• R8: 15x, 15x, 14x (44)
• Pro Tip: This is a full round of single crochets. The instructions indicate you will work 15 stitches in white, 15 in gray, and 14 in white. This is a crucial step for eye placement. After this round, you will insert the safety eyes, 6 stitches apart, on the seam between R8 and R9.
• R9: 5x, v, 3(10x, v), 5x (48)
• R10: 48x (48)
• Pro Tip: This is another solid round of single crochets. The entire round is worked in gray yarn.
• R11: 2x (add tail), 5x, BO, 3(11x, BO), 4x (40)
• Pro Tip: This round is complex. You’ll be working decreases and a special step to add the tail. When the pattern says “BO,” it means to bind off or use a slip stitch to finish the section. We’ll detail how to attach the tail in the assembly section.
• R12: 5x, 2a, 3(8x, 2a), 3x (32)
• Pro Tip: This is the start of the decreases to close the body. Make sure your decreases are tight and consistent to maintain a good shape.
• R13: 4x, 2a, 3(6x, 2a), 2x (24)
• R14: 3x, 2a, 3(4x, 2a), x (16)
• R15: 2x, 2a, 3(2x, 2a) (8)
• R16: 8a (8)
• Pro Tip: This final round is all decreases. After this round, your opening will be very small. Cut your yarn, leaving a long tail for sewing. Using your yarn needle, weave the tail through the front loop of each of the final 8 stitches. Pull the tail tightly to close the hole completely.
The Tail (Using Gray Yarn)
Work in a continuous spiral.
• R1: MR6x (6)
• R2-19: 6x (6)
• Pro Tip: These 18 rounds are all single crochets. Don’t stuff the tail as it’s so thin. Simply work the stitches and keep a consistent tension.
• R20: 2(x, a) (4)
• Pro Tip: This final round tapers the tail to a point. Cut your yarn, leaving a long tail for sewing. Use this tail to sew the tail onto the body.
The Ears (Make 2, Using Gray Yarn)
Work in rows.
• 4ch, chain 2, 2T, x
• Pro Tip: Start with 4 chain stitches. Now, turn your work. Skip the first two chains from your hook. In the next chain, work a half double crochet (T). Repeat with another half double crochet (T) in the following chain. Finally, work one single crochet (x) in the last chain. This will create a small, triangular ear shape. Leave a long tail for sewing.
4. Assembly and Finishing Touches: Bringing Your Cat to Life
This is where your cat truly comes to life. Don’t rush this part—it’s what will give your finished piece a professional, polished look.
Stuffing Your Cat
Before you begin sewing, you need to firmly stuff the body. Use small pieces of fiberfill to fill all the corners and curves of the cat’s body. Use the back of your hook or a small dowel to push the stuffing into the far reaches of the piece. Make sure it is stuffed evenly—avoiding lumps and gaps—but don’t overstuff it, as this can cause the stitches to stretch and reveal the stuffing.
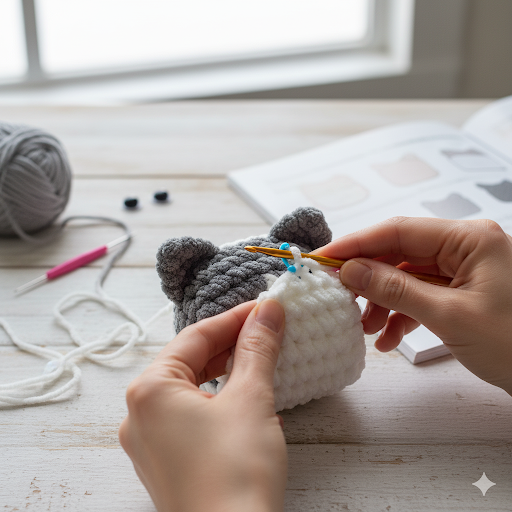
Sewing the Pieces Together
Use your yarn needle and the long tails you left on each piece.
• Ears: Position the ears on top of the cat’s head. Use the yarn needle to sew them securely into place. You can use a backstitch or a whip stitch to get a clean finish.
• Tail: Sew the tail onto the body, using a tight, secure stitch. You can place the tail wherever you like, but the original pattern suggests adding it in R11.
Embroidering the Facial Features
This is the most fun part! Use embroidery floss or a thin yarn for a neat look.
• Nose: Use a small amount of pink or red floss to create a triangle shape for the nose. You can use a satin stitch to fill in the triangle for a smooth, colored look.
• Whiskers: Use a few strands of embroidery floss to create short, straight lines for the whiskers on either side of the nose. A simple backstitch works perfectly for this.
Hiding Your Yarn Ends
After all the pieces are attached, use your yarn needle to weave the remaining yarn tails back into the body of the amigurumi. Weave them through the stuffing and out a few stitches away, then trim the excess yarn flush with the body. This hides the ends and prevents your work from unraveling.
5. Frequently Asked Questions (FAQs)
Here are answers to some of the most common questions crafters have when making this adorable amigurumi cat.
• My stitches are too loose, and the stuffing is showing!
• This is a very common problem. Your hook might be too large for your yarn. Try going down a hook size to create tighter stitches. The key is to use a hook that creates a dense fabric with no visible holes.
• My amigurumi piece is lumpy.
• This is usually due to uneven stuffing. To fix this, pull apart your fiberfill into small, cloud-like pieces before stuffing. This ensures a smooth, even texture.
• How can I make my cat bigger or smaller?
• The easiest way to change the size of your final piece is to change the weight of your yarn and your hook size. Using a thicker yarn (like a jumbo or super bulky yarn) and a larger hook will result in a much larger cat, while using a thinner yarn (like a fingering weight) will make it smaller. The number of stitches will remain the same.
• What if I don’t know how to do a Magic Ring?
• The Magic Ring is essential for amigurumi. If you’re a beginner, there are many excellent video tutorials online that can walk you through the process step-by-step. It’s a skill worth learning!
• Can I use a different color for my cat?
• Absolutely! This pattern is a great canvas for creativity. Feel free to experiment with different color combinations to create your own unique cat. You can even use stripes or different colored patches!
6. Usage and Care Instructions
To ensure your amigurumi cat stays in great condition for years to come, follow these simple care instructions.
• Gentle Handling: This plush toy is a handmade item, so it’s best to handle it with care to maintain its shape and stitching.
• Washing: If your cat gets dirty, it’s best to hand wash it gently in cold water with a mild detergent. Avoid using a washing machine, which can damage the stitches and stuffing.
• Drying: After washing, gently squeeze out the excess water and let your amigurumi cat air dry completely. Do not use a dryer, as the heat can shrink or melt the yarn and stuffing.
• Storage: Store your cat in a dry, clean place away from direct sunlight to prevent fading.
7. Sharing Your Creation & Final Thoughts
Congratulations, you’ve just created a charming handmade plush! Your new cube-shaped cat is a testament to your hard work and creativity.
We’d love to see your finished creation! Share a photo on social media and tag it with #CuteCubeCat to connect with other crafters who have made this project. Pin this pattern to your Pinterest board so you can easily find it for your next project, or share it with a friend who loves to crochet.
If you have any other questions, feel free to leave a comment below! Happy crafting!
⚠️ Usage Disclaimer
• All images in this post are the property of Amyliva Handmade. Please do not use, copy, or share them without permission.
• If you would like to feature this design on your website, kindly link back to the original post on
By following this tutorial, you agree to use the pattern and related images responsibly.
Yorum gönder