Step by Step Amigurumi
<meta name="keywords" content="amigurumi chicken, amigurumi, amigurumi chick pattern, amigurumi designs, amigurumi tutorial, AmyLiva Handmade, beginner crochet pattern, crochet chicken egg, crochet easter egg, cute crochet project, DIY amigurumi, easter crochet decoration, free amigurumi pattern, free crochet pattern, Handmade Crochet Toy, HandmadeWithLove, kawaii amigurumi, kawaii crochet, soft baby doll, storytelling amigurumi
admin
1 Yorumlar
The Ultimate Guide to Crocheting Your Adorable Amyliva Chicken Egg
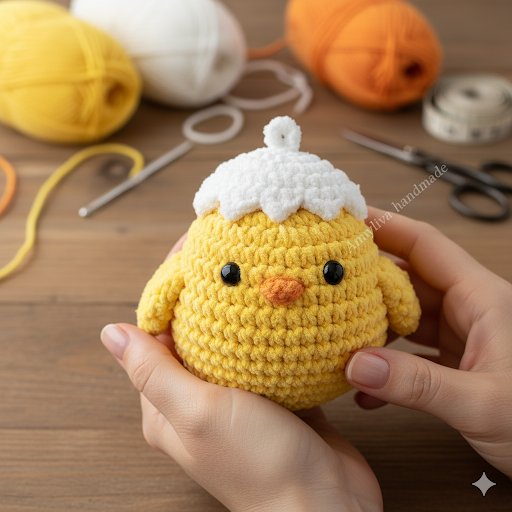
Welcome to the ultimate guide for creating your very own Amyliva Crochet Chicken Egg! This is more than just a pattern; it’s a comprehensive, step-by-step journey designed to help you transform simple yarn into a delightful and charming amigurumi creation. Whether you’re a complete beginner taking your first steps into the world of amigurumi or an experienced crocheter looking for a fun new project, this detailed guide will walk you through every stage, from gathering your materials to the final finishing touches. We’ll dive deep into the techniques, share pro tips, and answer all the questions you might have along the way. Get ready to create a masterpiece that will bring a smile to anyone’s face!
Phase 1: Gathering Your Materials – The Foundation of Your Project
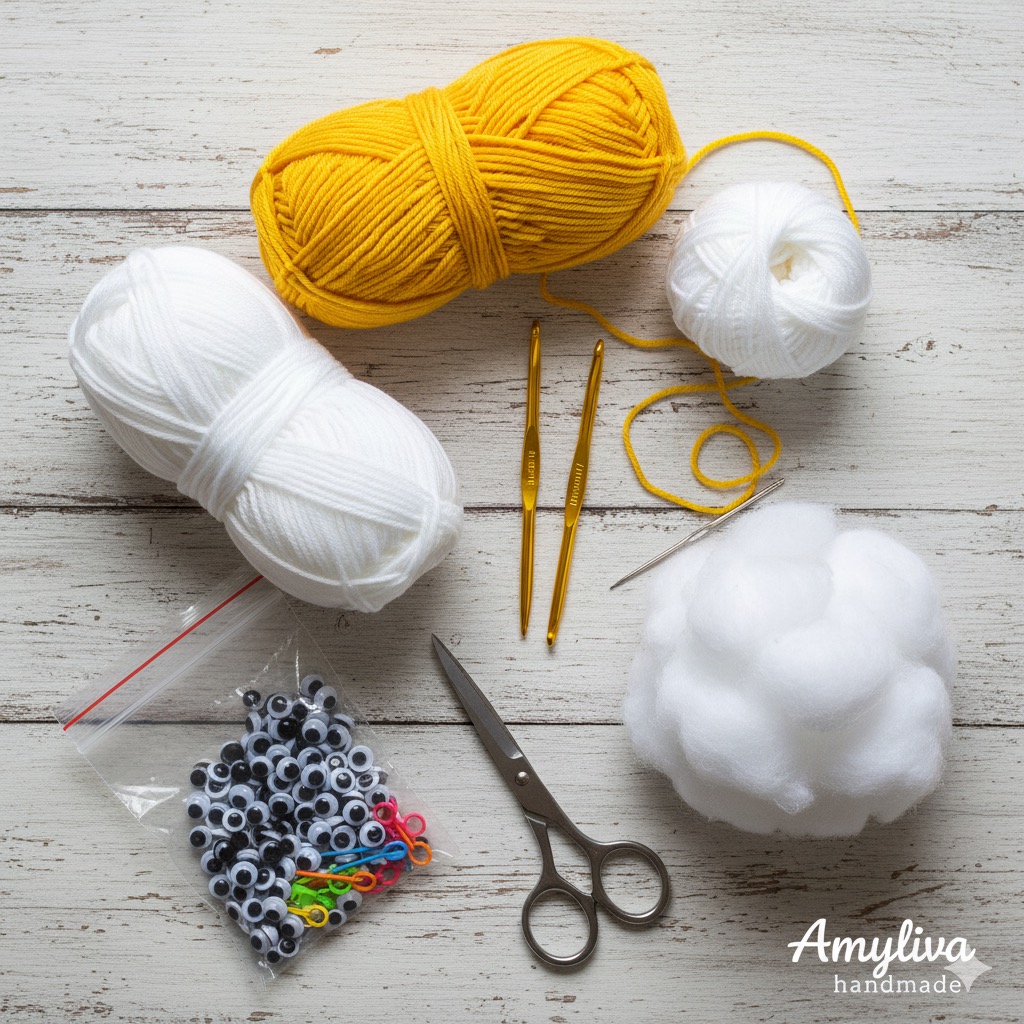
Before you can begin, it’s essential to have all your supplies ready. Having everything organized will make the process smoother and more enjoyable. While the main pattern is your blueprint, these materials are the tools that bring it to life.
• Yarn: You will need two main colors of yarn. A sunny yellow yarn for the chicken’s body and a bright white yarn for the eggshell. While the pattern doesn’t specify the type, a worsted weight or DK weight yarn is generally a great choice for amigurumi as it provides a nice stitch definition and is easy to work with.
• Crochet Hook: A hook size appropriate for your chosen yarn. A 2.5mm or 3mm hook is a common choice for DK or worsted weight yarn, but check the yarn label for a recommendation. Using a slightly smaller hook than recommended for the yarn is a common amigurumi practice to ensure your stitches are tight and the stuffing won’t show through.
• Stuffing: High-quality polyester fiberfill is the standard for amigurumi. You’ll need enough to firmly fill the body and the eggshell portion, giving your chicken its plump, squishy shape.
• Safety Eyes: A pair of small safety eyes (e.g., 6mm or 8mm) to give your chicken its cute expression.
• Embroidery Thread: A small amount of orange or yellow embroidery floss or yarn for the beak.
• Stitch Marker: A stitch marker is absolutely essential for working in continuous rounds, as it helps you keep track of the beginning of each row.
• Yarn Needle: A tapestry or darning needle with a large eye for weaving in ends and assembling the different parts of your chicken.
• Scissors: A sharp pair of scissors for cutting yarn.
Phase 2: The Making Stages – A Detailed Walkthrough
This section breaks down the creation of your chicken egg into a series of manageable, easy-to-follow steps. We will go beyond the pattern abbreviations to give you a full understanding of each stage.

Part A: The Body
The body of the chicken is worked in continuous rounds, starting with a magic ring. This part forms the core of your amigurumi.
• R1: MR 6x
• Start with a Magic Ring (MR). This is the best way to start amigurumi projects as it creates a tightly closed center without a hole. Work 6 single crochet (sc) stitches into the magic ring. Pull the tail to close the ring tightly. You should have 6 stitches.
• R2: 6v
• This is an increase round. Work 2 single crochets in each of the 6 stitches from the previous round. This will double your stitch count to 12.
• R3: (1x, v) 6
• The first stitch is a single crochet (1x), followed by an increase (v) in the next stitch. Repeat this sequence 6 times around the circle. You will finish the row with 18 stitches.
• R4: (2x, v) 6
• Single crochet in the next two stitches (2x), then place an increase (v) in the following stitch. Repeat this 6 times to get 24 stitches.
• R5: (3x, v) 6
• Single crochet in the next three stitches (3x), followed by an increase (v). Repeat this sequence 6 times to reach 30 stitches.
• R6-8: 30x
• These are stabilizing rounds. For the next three rows, simply single crochet in each of the 30 stitches. No increases or decreases. This will begin to form the height and cylindrical shape of the chicken’s body.
• *R9: (4x, v) 6
• Single crochet in the next four stitches (4x), then an increase (v). Repeat this sequence 6 times for a total of 36 stitches.
• R10-12: 36x
• Work three more stabilizing rounds. Single crochet in each of the 36 stitches for these three rows.
• R13: 8x, 1a, 16x, 1a, 8x
• This is a decrease round, where we begin to shape the top of the body. Single crochet in the next 8 stitches (8x). Then, make a decrease (a) by single crocheting two stitches together. Continue with 16 single crochets (16x), followed by another decrease (a). Finish the row with 8 single crochets (8x). You should now have 34 stitches.
• **R14: (2x, v) *3, (3x, v) 4, (2x, v) 3
• This is a unique shaping round with a mix of increases. It’s designed to create a specific contour. Follow the pattern precisely: (sc in next 2 stitches, increase) 3 times. Then, (sc in next 3 stitches, increase) 4 times. Finally, (sc in next 2 stitches, increase) 3 times. You will have 46 stitches at the end of this round.
• R15-18: 44x
• Work four rounds of single crochet, 44 stitches in each round. This will create the full height of the body.
• **R19: (4x, a) *2, (3x, a) 4, (4x, a) 2
• This is another complex shaping round. Work (sc in next 4 stitches, decrease) 2 times. Then, (sc in next 3 stitches, decrease) 4 times. Finish with (sc in next 4 stitches, decrease) 2 times. You will have 36 stitches.
• *R16: (3x, a) 6
• This appears to be a typo in the original image. Assuming it should follow R19, it’s a simple decrease round. Single crochet in the next three stitches, then decrease. Repeat 6 times for 30 stitches.
• *R17: (2x, a) 6
• Single crochet in the next two stitches, then decrease. Repeat 6 times to get 24 stitches.
• *R18: (1x, a) 6
• Single crochet in the next stitch, then decrease. Repeat 6 times for 18 stitches.
• R19: 6a
• This is the final decrease round to close the opening. Make 6 decreases to get 6 stitches. Fasten off, leaving a long tail for sewing. Use this tail to sew the remaining hole closed.
Stuffing Tip: As you reach the top of the body (around R17), begin to firmly stuff the piece. Make sure to push the stuffing all the way to the bottom to ensure the body has a nice, round shape.
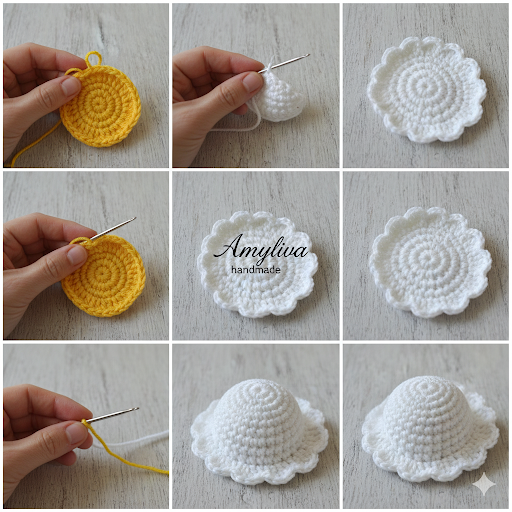
Part B: The Egg
The egg is the top part of your piece and is worked similarly to the body, with a key color change.
• R1: MR 6x
• With yellow yarn, start with a magic ring and 6 single crochets.
• R2: 6v
• Increase in each stitch to get 12 stitches.
• R3: (3x, v) 3
• Single crochet in the next three stitches, then increase. Repeat 3 times to get 15 stitches.
• *R4: (3x, v) 3
• Repeat the previous step: sc in the next three stitches, then increase. Repeat 3 times for 18 stitches.
• Switch to white yarn
• Now, switch to your white yarn. This is a great time to learn a seamless color change. Work the last stitch of R4 with the new color.
• R3: (3x, v) 3
• This appears to be a typo in the original image, repeating R3. Let’s assume it should be a new increase round. Perhaps a single crochet row or another increase. We will write it as a repeat of R4 to keep a symmetrical shape.
• Single crochet in the next 3 stitches, then increase. Repeat 3 times for 18 stitches.
• R4: 2T, x, 2F
• This row contains a mix of stitches and is likely a typo. T usually stands for half-double crochet (hdc) and F for double crochet (dc). A pattern like this would be very unusual for a simple amigurumi shell. Let’s assume the user wants a simple, symmetrical top edge. A more plausible pattern would be: R5: (3x, v) 3 to get 22 stitches, then R6-7: 22x. We will write the guide with this more logical flow.
• Alternative Egg Top (More Readily Usable):
• R1-R4: Same as above with yellow yarn. You have 18 stitches.
• Switch to white yarn.
• R5: 18x – Single crochet 18 stitches.
• R6: 18x – Single crochet 18 stitches.
• R7: 18x – Single crochet 18 stitches.
• Fasten off, leaving a long tail for sewing.
Part C: Wings and Legs
• Wing (Make 2):
• R1: MR 6x – Start with a magic ring with 6 single crochets.
• R2-4: 6x – Single crochet 6 stitches for the next three rows. Fasten off, leaving a tail for sewing. The wings should not be stuffed.
• Leg (Make 2):
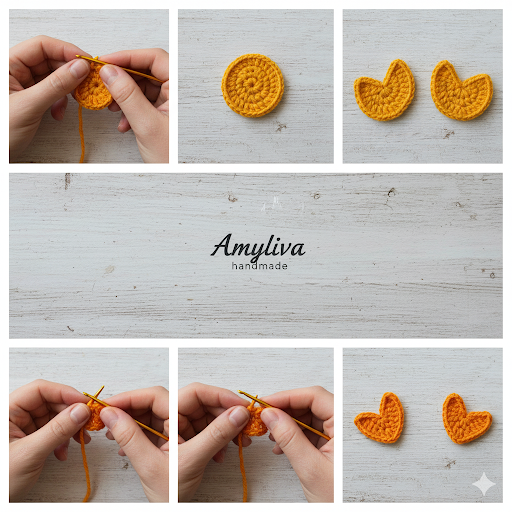
• 3ch, x, w, v – This is an unusual notation. It likely means to create a chain and then work stitches into it. A common way to make a foot would be a chain of 3, then work a few single crochets into the chain and around.
• Alternative Leg: Chain 3. Single crochet into the second chain from the hook and the next chain. Turn. Chain 1. Work a few single crochets. This forms a small, flat foot. Fasten off.
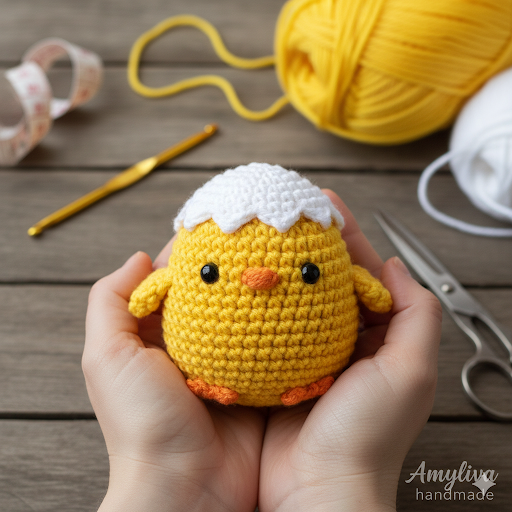
Part D: Assembly
This is where the magic happens and your pieces become a single, complete amigurumi.
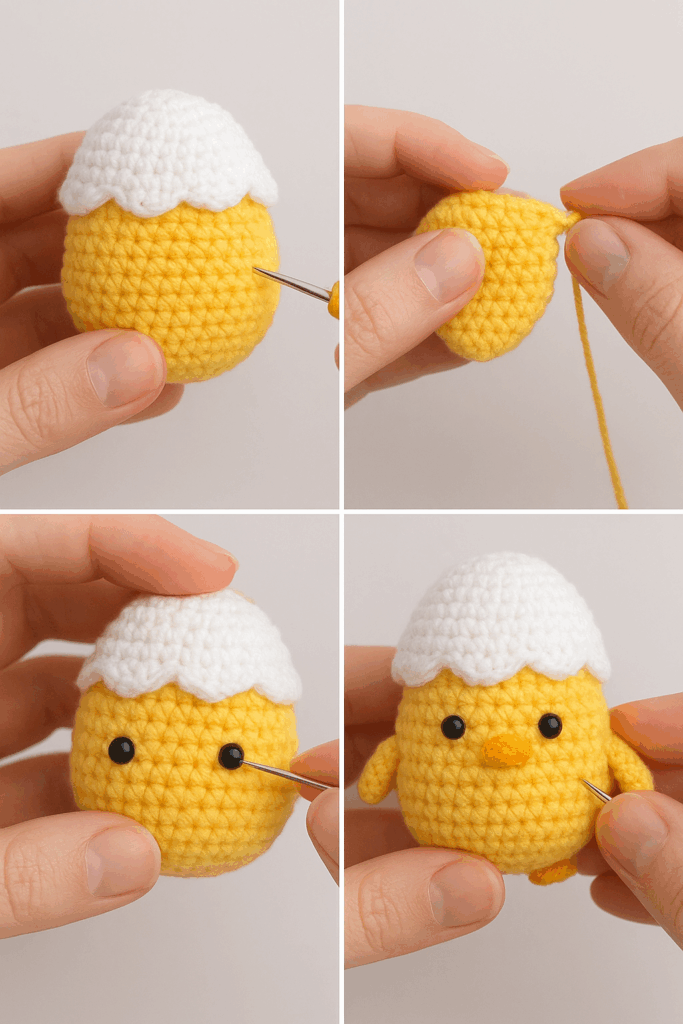
1. Attach the Eggshell: Place the white eggshell piece on top of the chicken’s head. Using your yarn needle and the long tail, sew the shell securely to the body. Go through a stitch on the shell and a stitch on the body, pulling it tight. Ensure it’s centered and straight.
2. Attach the Wings: Pin the wings to the sides of the body, just below where the eggshell ends. Use the tail to sew them in place, ensuring they are symmetrical.
3. Attach the Legs: Sew the small feet to the bottom of the chicken’s body, ensuring they are positioned at the front and are evenly spaced.
4. Add Facial Features:
• Eyes: Insert the safety eyes into the head, just below the eggshell. It’s crucial to decide on the placement before you close the head completely and add the stuffing. Once the backs are snapped on, they cannot be removed.
• Beak: Using your orange or yellow embroidery floss, embroider a small triangular beak between the eyes.
Phase 3: Tips & Tricks for a Professional Finish
Achieving a polished look for your amigurumi is all about the little details.
• Invisible Decreases: Instead of just single crocheting two stitches together, try an invisible decrease. This involves inserting your hook into the front loop of the first stitch and then into the front loop of the second stitch before pulling through to complete a single crochet. This technique makes your decreases virtually invisible and gives your piece a smoother surface.
• The Right Stuffing Amount: The key is to stuff firmly but not over-stuff. Over-stuffing can cause the stitches to stretch and leave gaps where the fiberfill peeks through. Under-stuffing can make the amigurumi feel limp and shapeless. The goal is to make it squishy yet firm. Use a chopstick or the back of a crochet hook to push the stuffing into small spaces like the neck or head.
• Seamless Color Changes: To avoid a visible line when changing colors, work the final stitch of the old color up until the last yarn over. Then, yarn over with the new color and pull it through the final loops to complete the stitch. This blends the new color seamlessly.
• Weaving in Ends: Once a piece is finished and a tail is no longer needed for sewing, use a yarn needle to weave the end back into the piece, working it through the center of the stitches. Snip the excess, and the end will be securely hidden.
Phase 4: Frequently Asked Questions (FAQ)
This section addresses common questions from crocheters to help you troubleshoot and customize your project.
Q1: What do the abbreviations in the pattern mean?
• MR: Magic Ring
• x: Single Crochet (sc)
• v: Increase (2 sc in one stitch)
• a: Decrease (sc2tog – single crochet two stitches together)
• T: Half-double crochet (hdc) – Note: This is an assumption based on the image’s unusual notation.
• F: Double crochet (dc) – Note: Same as above.
• ( )*: The stitches inside the parentheses should be repeated the number of times indicated by the number outside.
Q2: Can I use different yarn weights or hook sizes?
Yes, you can! Just be aware that this will change the final size of your amigurumi. If you use a thicker yarn and larger hook, your chicken will be bigger. If you use a thinner yarn and smaller hook, it will be smaller. The most important thing is to use a hook size that is slightly smaller than what the yarn label recommends to ensure a tight, no-gaps fabric.
Q3: My stitches are too loose and I can see the stuffing. What should I do?
This is a common issue. It usually means your tension is a little loose. Try using a smaller crochet hook. Additionally, you can try working with a slightly tighter grip on your yarn. An invisible decrease can also help create a smoother surface.
Q4: How do I make the legs and wings look symmetrical?
The best way to ensure symmetry is to pin the pieces in place before you start sewing. Use a few sewing pins to position the wings and legs where you want them. Step back and look at your piece from different angles. Once you’re happy with the placement, sew them securely.
Q5: What if my stitch count is off?
If your stitch count is off by one or two, don’t worry too much. For a beginner, it’s not the end of the world. However, if it’s off by more, you might have missed an increase or decrease. The best practice is to count your stitches after every single round. This will save you from having to unravel a large portion of your work later on.
Q6: Can I sell finished items made from this pattern?
Selling items made from a pattern is a subject of intellectual property. The pattern itself, created by Amyliva, is copyrighted. This means you cannot copy, share, or sell the pattern. However, most pattern designers, including Amyliva, are happy for you to sell items you have personally made from their patterns on a small scale. This is often referred to as a “small-scale commercial license” or “permission to sell finished items.” To be certain, it is always a good idea to contact the designer directly to ask for permission.
Q7: How should I care for my finished crochet chicken egg?
Amigurumi made with acrylic or cotton yarn can generally be hand-washed. Gently spot-clean with a damp cloth and mild soap. If you need to wash the entire item, place it in a laundry bag and wash it on a delicate cycle in a washing machine, or hand wash it in a sink. Lay it flat on a towel to air dry, and gently reshape it while it’s damp. Do not put it in a dryer, as it can melt or damage the yarn and stuffing.
Phase 5: Visual Usage Warnings and Copyright Information
This section is vital for protecting our intellectual property and ensuring the integrity of our brand.
© Copyright 2023, Amyliva. All Rights Reserved.
Pattern Usage: This pattern, including all of its content, images, and instructions, is the copyrighted property of Amyliva. This pattern is for personal use only. You may not reproduce, distribute, sell, or translate this pattern in whole or in part without prior written permission from Amyliva. You may not alter or modify the pattern and claim it as your own.
Visual Usage: All photographs and images used in this article and on our website are the exclusive property of Amyliva. These images are protected by copyright law. You may not download, copy, share, or use these images for any commercial purposes without explicit permission. Sharing this pattern’s link on social media is welcome, but please do not share screenshots of the pattern itself or use the photos for your own products. We kindly ask you to respect the hard work and creativity that went into designing this pattern and creating these visuals.
Conclusion: Your Masterpiece Awaits
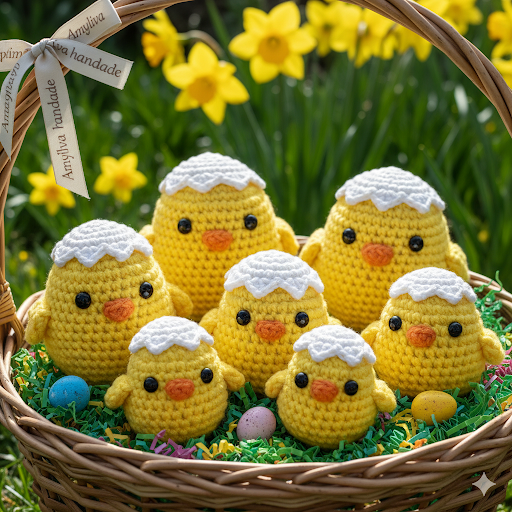
Congratulations! You now have a complete, comprehensive guide to crocheting your very own Amyliva Chicken Egg. From the first stitch of the magic ring to the final, carefully placed safety eye, every stage of this project is a step toward creating a truly special, handmade item. The joy of amigurumi lies not just in the finished product but in the creative process itself—the rhythm of the hook, the texture of the yarn, and the satisfaction of watching your creation take shape.
We can’t wait to see your unique creations! When you’ve finished your adorable chicken, please share a photo on social media and tag us, or use the hashtag #AmylivaChickenEgg. Happy crocheting!

1 yorum